When I first acquired my BK PRECISION 8500 (used on eBay), I was a little disappointed with the screw knobs that secured the leads to the device being loaded. I had hoped that the screws were cross drilled so that I could easily connect stripped wire through the threaded lugs (sure, I could just wrap the wire around the lugs and tighten the screw knobs). I ended up using some U-type crimp lugs which were suitable for my uses. Recently while purchasing some Banana-to-Banana leads I started thinking about how I might be able to mount some banana jacks to the front of the Programmable DC Load. My first ideal was a U-type crimp attached to a solid copper wire (10 gauge) with a banana jack attached to the other end. While this might have been a fairly simple hack, I was not completely sold on this as a solution.
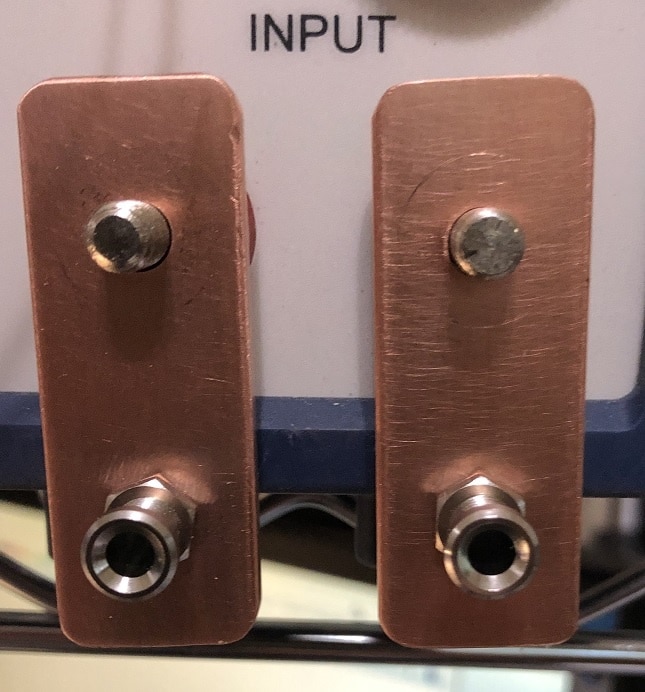
This brings me to my Maximum Overkill solution which I sharing with you today. I found some copper bar (0.1875" x 0.75" x 12") in my scrap material collection and cut off a couple of 2" sections. I then drilled to 15/64" (0.234375" or slightly under 6mm) holes, 1/2" front each end and centered in bar. I then filed/sanded the bar smooth and rounded the corners.


The Banana Jacks in the image are CT2224 from CAL TEST ELECTRONICS. I had these parts left over from some work that I did on custom building some Synthesizer modules for a client (passed the jacks through an insulated sleeve through an aluminum panel and fitted to the PCB with a 6mm through hole). Here are some shots of the adapters installed to the from the Programmable DC Load.


As I started test fitting the adapters, I became a little concerned about the copper bars shorting out, so I went to work on an insulator/spacer that I could 3D print. After a bit of work, this is what I came up, a two part cover that could be secured with a 2/56 screw between the two copper bars.

The upper piece goes on first (rectangular through hole for the copper bars), then the banana jacks are installed and then the lower piece slips over the bottom stubs of the copper bars. A 1 1/4" 2/56 screw is used to secure the top and bottom halves of the cover together with the two semi-circles surrounding the hex nuts of the banana jacks, keeping the cover in place.
After a couple hours of printing, here are the final results:


Overall, I am very happy with the results. I might reprint the upper half of the cover, lowering the overall height of that piece. The screw knobs rubbing/interfering with the top of the cover. Dropping the height of this piece by 1/4" would be a big improvement (I might also want to make the back of the upper cover a bit thinner as it is tight up against the rubber bezel bumper).
For now I'll call it a day.

-

shabaz
-
Cancel
-
Vote Up
0
Vote Down
-
-
Sign in to reply
-
More
-
Cancel
Comment-

shabaz
-
Cancel
-
Vote Up
0
Vote Down
-
-
Sign in to reply
-
More
-
Cancel
Children