


In this chapter, I will cover various aspects related to the user experience of the DAS240-BAT, including build quality, ergonomics, user interface, capabilities and documentation. Testing was performed with the shipped Firmware V2.0 and the downloadable Firmware V2.2 dated October 2019 from the Sefram Software Update page.
Build Quality
My initial impression of the DAS240-BAT is that it is a solid, chunky-feeling unit that looks set for field usage with a few potential weak points. Holding it in the hand, it feels sturdy with no flex whatsoever, which is not unexpected as the unit is made of an aluminium frame, slightly roughly finished on the rear edges. Large rubber bumpers at the ends protect the unit from handling damage, although the screen is still precariously exposed without any cover-glass or protector over the LCD panel that I could see. B&K Precision offer a rugged carrying case (902408000, US$125), which might well be a sound investment. The LCD panel is surrounded by a black self-adhesive plastic frame including the branding, although there seems to be a slight gap between the display and the frame which might allow dirt to enter the unit. The side and front edge panels of the unit also contain ventilation holes, which may also result in dirt or water ingress in case of an accident in the field.
The unit is provided with a shoulder strap and a warning that warranty will be void if it is not used. The shoulder strap itself feels rather basic but sufficient, but the anchor points on the DAS240-BAT are made of plastic and flex slightly. In fact, the whole outer casing is assembled purely using plastic rivets (i.e. no metallic screws) which seems slightly odd for such a device. The only visible screws are those that hold the kickstand to the rear panel.
Of the ports and button along the top, the power button appears to be a high-quality vandal-resistant fixture which looks a little out-of-place on such a device. The other ports are sturdily anchored to the unit, with the chosen DC barrel jack for power feeling a little “loose” in terms of how much it “grips” the plug. This did not affect functionality, however. The supplied power supply from Cincon also feels solid and remains cool in operation with no audible noise.
Ergonomics
The design of the unit is quite user friendly, with all the necessary connections and power button placed at the top of the unit, making it easier to manage.

The 10” colour LCD with capacitive touch is large compared to its competitors and bright, although its glossy nature tends to show up fingerprints and glare more readily. The design of the user interface has paid attention to the potential difficulties in operating a touch-screen instrument, opting for large touch targets throughout to make it easier to use. A capacitive-compatible stylus is also included. Users are also provided with a “click” from the onboard beeper as user feedback of a registered touch event.
The main downside to the screen is the limited viewing angle due to the TN technology in use, which results in contrast reduction and colour shifts when viewed at an angle. This occurs especially when the one position kickstand on the rear is used.
The included kickstand has just one position, allowing for the unit to be propped at an angle for more comfortable use when placed on a desk. The lack of adjustability does make it difficult to find the optimal angle for all situations and it does have a habit of “flipping down” if one applies too much pressure to the front of the unit (e.g. when furiously tapping on the screen).

My experience with the detachable channel interface module has been mixed. The design of the module is sensible, with 20-channels per module and up to 10 modules per unit assembled together on a frame for a total of up to 200 channels. This module connects up to the unit with a custom cable of 1m length with captive connections, not intended for hot-swapping. Each of the input channels resides in its own 3-terminal detachable angled rising-clamp style terminal block, reducing the chances for wire conflicts and making wiring easier.
I quite like the use of terminal blocks, as they can be pre-wired and labelled as required and plugged into the channel module in any order. It makes swapping channels quite easy as well. While an advertised advantage is to have channel modules pre-wired on site and the recorder moving from location to location, the cost of the channel module itself is US$850 (or about a quarter of the cost of the unit), making this prospect perhaps slightly uneconomical.
The main downside in my experience is that the cabled connection to the channel module makes one-handed relocation of the recorder a tricky prospect, as while the recorder can be easily lifted by the strap, the 1m cable is not long enough to lift the recorder without tugging on the channel module, so additional care is needed to pick up the channel module first and support it while moving. Then, one of my concerns is the proximity of the channel module connector to the strap and edge of the unit, where inadvertent application of force may be more likely. The terminal blocks themselves are also not ideal for thermocouple connections, seemingly not wide enough to accommodate the common bladed connection.
The digital (logical) input channels reside on their own DB-25 connector with included mating connector and back-shell cover. While this is definitely a good thing to have, it is unfortunate that it is not pre-terminated into something a little more useful (e.g. wires, terminal connectors, break-out) which would make for more rapid connections on site. Instead, that appears to be available as a relatively expensive (902407000, US$310) option.
User Interface & Capabilities


When the unit is first powered up, it shows a splash screen including the number of detected channels. In case that the channel interface module is not detected, a cryptic “Error: Ti” is shown.
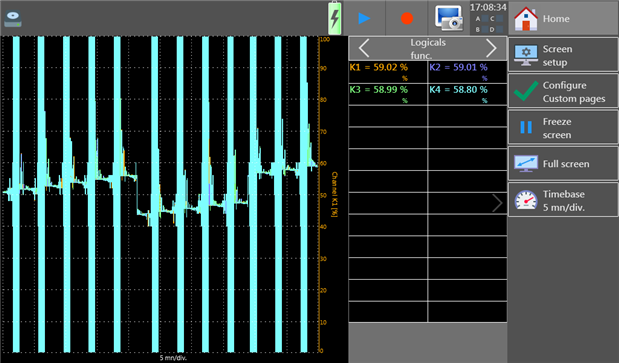
Ordinarily the unit will boot into the F(t) graphing mode, which emulates the display of a chart recorder scrolling new readings on the graph from right to left. The interface features a toolbar at the top with recording indicator, power, playback, record, screenshot, time and alarm channel indicators. Towards the right side of the screen are buttons including home and configuration for the display including screen setup, configure custom pages, freeze screen, full screen and timebase.
In this example, this screen actually shows a glitch where the values should be increasing step-wise but instead seems to arbitrarily “drop”. This seems to occur when changing screens and returning to F(t) mode and has been reported to B&K Precision.


Screen configuration includes the ability to change modes of display, hide numerical display and borders, put digital channels on a separate axis, use a custom grid and change colours. Configuring custom pages allows viewing only a subset of enabled channels where there are two custom pages. There is also the possibility of having multiple screens, but there does not seem to be a way to directly allocate certain channels to a given screen. Limitations in X-Y mode were also noted where dissimilar channel types could not be plotted X-Y (e.g. A channel versus K channel).
Full screen, as expected, moves the plotting area to the whole screen to maximise viewing area. In this mode, however, there is no ability to interact with any other functions. The timebase feature allows selecting the horizontal timebase of the chart from fixed selections of 100, 200, 500ms/div, 1, 2, 5, 10, 20, 30s/div, 1, 2, 5, 10, 20min/div.

The home screen where all the functionality and configurability of the device can be accessed. This includes a summary of channel status on the left, with buttons for setup, trigger, logic channels, channels, channels and functions on/off, XY, F(t), numeric, record and view records. The labelling, especially surrounding channels, is already somewhat confusing as I find myself frequently pushing the wrong button for configuration tasks (i.e. channels instead of channels and functions on/off).

The settings menu is perhaps the most important for ensuring the recorder’s language, time (or NTP), date, alarms and network remote access features are correctly configured. As this unit is made by a French company, by default the unit is in French and has to be changed to English. The channel names remain French (i.e. Voie A1) unless you also then commit to loading the default setup which results in English names being applied (i.e. Channel A1). The software carries over a few strange terms due to poor English localisation which can be seen especially in other menus.

On requesting default settings, a warning dialogue is presented. This is very similar to many of the dialogues used by this unit, which use pictorial icons and seem to have the reverse convention – I’m used to “OK” being on the left, but instead, it is on the right.
The screen shut off feature is particularly important as it dims the screen after a set amount of time to preserve battery and backlight lifetime. This is not a “shut off” as such. VNC allows for configuration of the VNC password which was initially a corrupted jumble on my unit. Additional option brings up another menu with more options. The software update feature allows for loading of new firmware from an attached storage device.


There is also the network configuration options which allows for setting a static IP address (for Ethernet) and for connecting to wireless networks, assuming you have a compatible USB adapter attached.

Saving and loading settings data (and data files in general) is done using this rudimentary file browser interface. Owing to the lack of labelling of the icons, it is not intuitive to use. During the course of the review, I even managed to destroy some collected review data by inadvertently deleting the root directory and all files underneath when I had intended to delete a subdirectory instead. The icons, in order, represent switching to USB drive, copying to USB drive, saving (i.e. enter a filename), create a new folder, delete file/folder, multi-select and close. I think this is an area for improvement.


It also seems slightly unintuitive that alarm configuration is put into the bottom portion of the settings menu when it probably deserves a separate screen of its own. Each alarm output can be configured to be triggered from an analog or digital source, individually or in combination.
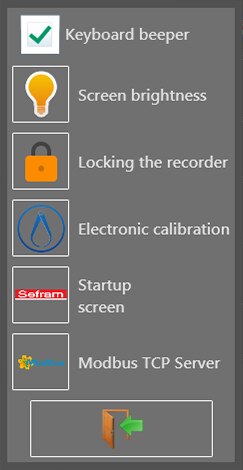
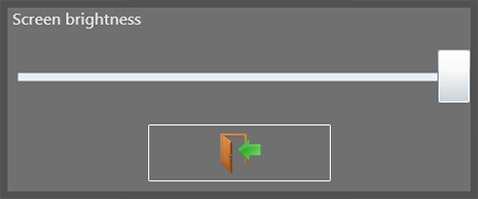
Nested in the additional settings are some arguably very useful features. One is to disable the “keyboard beeper”, which is in essence, a little speaker which provides touch feedback clicks and melodic tones on starting/stopping recording. Unfortunately, while this option does silence the beeper, it is automatically re-enabled if you run the electronic calibration or reboot the unit. Screen brightness can be adjusted using a slider. The slider is, however, very non-linear with the first half being very dark and ramping up rapidly to full brightness on the last few notches of the sider. Recorder locking allows for the touch-screen to be disabled and is locked several seconds after selecting the feature. It seems an unusual place to bury a useful feature – I would have preferred it to be on the toolbar. It was discovered that even if the recorder is locked, it is possible to do a shutdown, which seems unexpected.


Electronic calibration (or self-calibration) is used to tune out any offsets automatically and needs to be run prior to use after the unit has fully warmed up to ensure the unit meets datasheet accuracy. This menu allows initiating a new calibration or recovering the original factory calibration. This process takes many minutes, with the progress bar not indicative of actual calibration progress. Once completed, a message states “Adjustement completed”, noting the typo. The startup screen option just displays the splash screen.

The Modbus TCP Server options allows enabling or disabling Modbus TCP and configuring the port number. Modbus operation seemed to result in an occasional mouse pointer appearing and staying on the screen randomly, but otherwise worked as expected and is fully detailed in the next chapter.
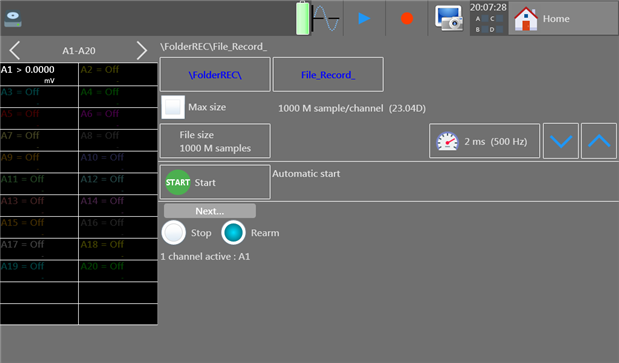


The trigger option from the home screen allows for the configuration of recording settings and recording triggers. Within the configuration settings include the ability to set a folder in which recordings are made and the file-name prefix for each file. Each file can be limited to a certain number of samples, with numerical input being made using an on-screen keyboard. Note that the number 2 on the keyboard is slightly out of alignment, which irks me slightly. The recording sample rate can be selected from a menu of options, with inappropriate values greyed out. The trigger options allow for setting of conditions on when to start a capture (e.g. on a date/time, on certain conditions of input) and what to do after the recording finishes.
Testing of the recording features and trigger options seems to suggest there is some rounding of recording file lengths, resulting in lengths such as 86400s (1 day) instead recording just 86000s. There is also no interval trigger, thus making regular length recordings starting at a particular time is not easily possible – date and time trigger fires just once at a set date and time and can’t be set to time-only. This issue has been reported to B&K Precision.
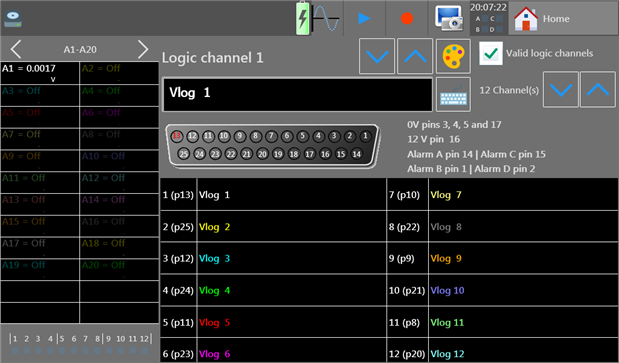
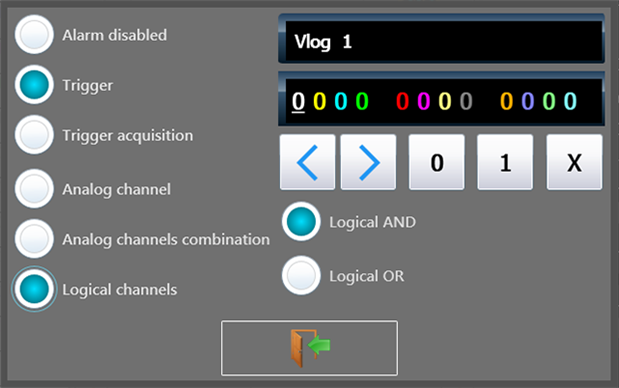
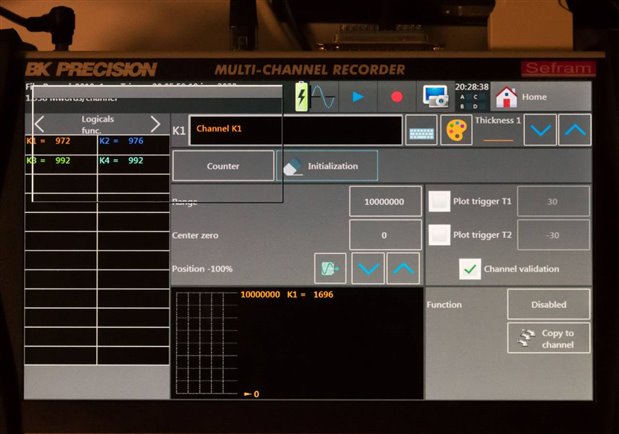
Selecting logic channels from the home screen shows a graphical representation of the DB-25 connector on the recorder and allows for the configuration of the name and colour of each channel. Of note is that the word “Valid” is used instead of “Enabled”, likely a carry-over from French which makes the interface slightly confusing in later sections. Note that this only covers the digital logic channels and not the timing channels (i.e. K-channels, confusingly termed logical function channels).

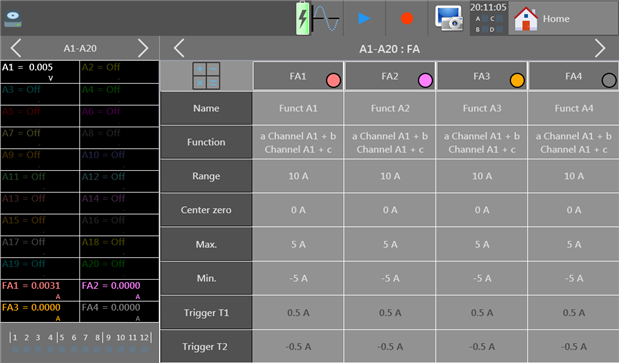
Selecting the channels button from the home screen brings up the channel table, where individual channels can be quickly configured for most parameters. The table displays ten channels at a time, with arrows to toggle between the various channels. Interestingly, certain combinations of features were found to cause corruption in channel configuration which led to unexpected results and recorder instability. Unfortunately, there does not seem to be an easy way to perform batch set-up of a number of channels with the same parameters, instead one has to configure a channel and use the detailed channel screen to copy to every other channel individually. Also, the free-selection of range, minimum and maximum values which determine the vertical plotting axis do not clearly correspond to the hardware ranges on offer, making it difficult to understand the expected accuracy levels.


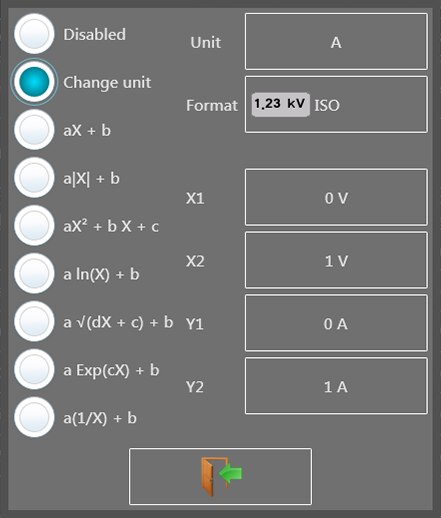
For convenience, channel names can be changed using the on-screen keyboard which approximates a QWERTY layout. Channel functions are quite extensive, with Voltage, Current, Thermocouple, RTD and Resistance features. Current measurement relies on an external shunt resistor, with a configurable value. Thermocouple support is available for J, K, T, S, B, E, N, C and L type with switchable units and compensation. Channel math can also be applied to perform various functions to scale inputs from transducers into more human-friendly units.
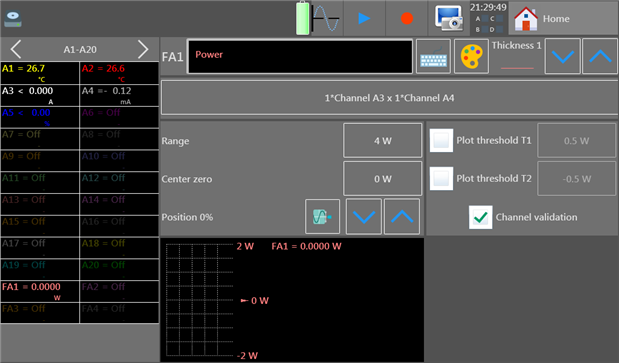
Tapping on a channel identifier itself allows for accessing a more comprehensive configuration menu which allows for setting plotting line thicknesses as well. This type of configuration menu can also be accessed by tapping on the channel name in the value table on the left of the home screen.

For certain features like mathematical function channels, the configuration table can only be accessed once the channels are first enabled via an extra button in the home screen. This allows for basic mathematical functions to be computed between channels. Combining these features with per-channel mathematical functions led to problems in testing, however.
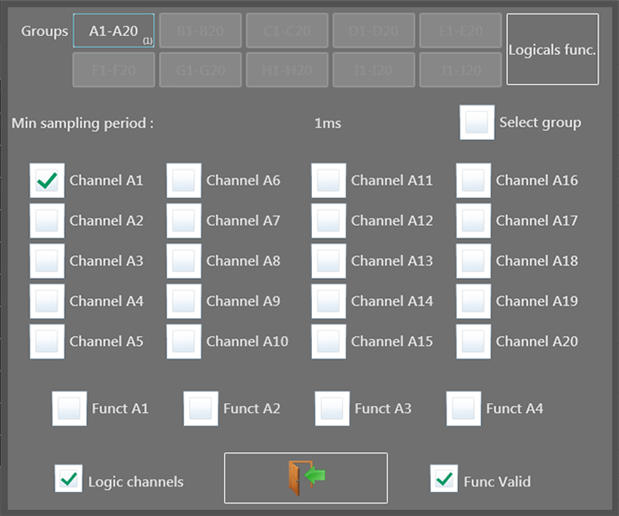
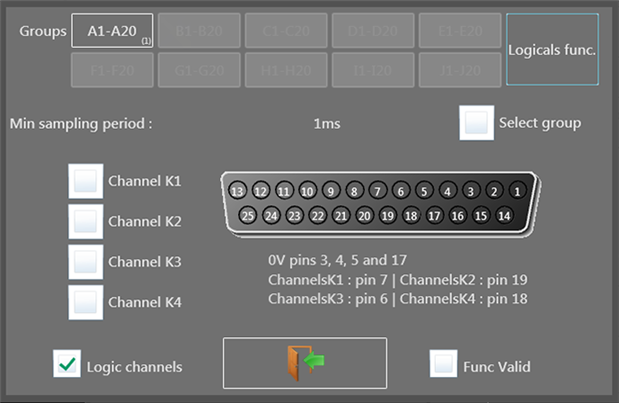
A separate set of menus is used to toggle channels on and off, with some options only appearing once the channels are enabled. Analog channels are grouped by the module, with the possibility to enable or disable a whole group. Logicals func. Button changes over to the second menu allowing for timing channels (K) to be enabled or disabled. The Logic channels tick-box at the bottom enables or disables digital input channels, while the Func valid checkbox actually enables or disables the mathematical function channels (which performs basic math between functions). Because of poor localisation, this was more confusing than expected.
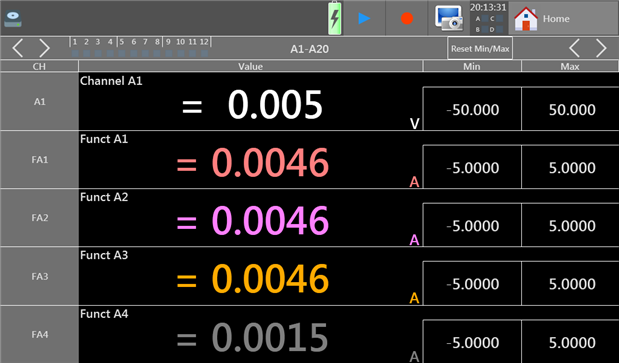
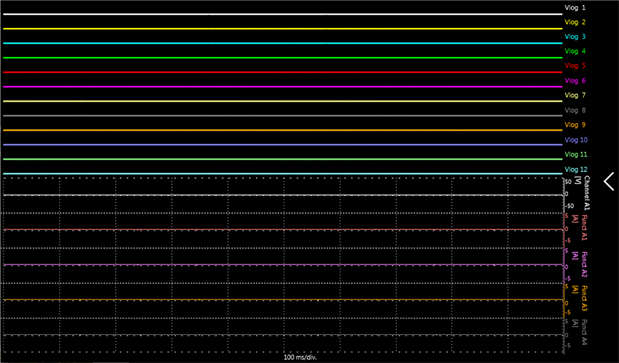
Aside from the F(t) and X-Y modes mentioned earlier, the unit also supports numeric display which turns the screen into a large multimeter-like display. All 20-channels of a single group can be displayed simultaneously on a single screen if desired.
In order to start a recording, either Record can be pushed from the home screen, or the record button in the toolbar when in any display mode (e.g. F(t), X-Y, Numeric). Recording start/stop is confirmed with a musical jingle. During recording, the display appears similar to the regular F(t) display, with the top bar indicating the filename, number of samples recorded and time remaining. Occasionally, the display flickers “Calculation in Progress …” at the bottom, but data recording continues uninterrupted. By default, the full record is scaled to fit into the display, but can be changed to zoom in using cursors which seemed a little unintuitive as no multi-touch gesture capability is available. No vertical zoom appears to be available.

The View records option allows for a .rec recording file to be loaded and viewed on-recorder. This particular feature is quite basic. One limiting factor of the replay seems to be a lack of search feature. Sometimes it is especially useful for digital signals, for example, in order to find a violation or error status. Reviewing recordings ultimately is a manual process of zooming and scrolling, which is nice to see on the recorder itself rather than relying on a computer. More detailed analysis can be undertaken in other software through exporting the data out of SeframViewer (as noted in the next chapter).
A defect was noticed with cursor operation, where a given measurement was reported incorrectly if the cursors were set, a zoom in operation is performed followed by a zoom out operation returning the display to the original zoom level. It is noted that the dates are written with lowercase months, likely also a localisation inconsistency.

During operation, the battery status in the toolbar updates with the approximate charge remaining in the battery. No predicted time is given, as this indication appears to be quite approximate. Approaching depletion as indicated by the icon above, the unit can shutdown gracefully at any moment. A manual shut-down is initiated with the power button which launches a dialogue which counts down from 10 seconds, requiring the “OK” selection to be made before the unit shuts down. This prevents inadvertent shutdown. A force shutdown is also available in case of a hard lock-up by holding the power button for several seconds.
The screenshot feature in the top toolbar can be used only when no overlay menus are present – many of the screens pictured in this review had to be captured over VNC as the screenshot button was either not present or inaccessible. Screenshots are stored only in the .BMP file format which is less space-efficient than more modern formats (such as .PNG) as it is not compressed.
Compared with some other products of this type, there seemed to be an omission from the DAS240-BAT in the form of thermocouple burnout detection which is offered by some competing units. This is potentially important where a thermocouple goes open circuit, as without this feature, the value could fluctuate like noise but still appear to be a reasonable reading.
During testing, the lack of software maturity also manifested itself in a hard lock-up of the software occasionally, especially when certain complex configurations were attempted and resulted in parameter corruption.
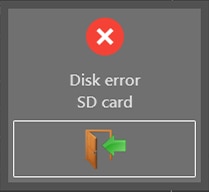
There were also occasions where the unit would boot but the storage medium was not detected, resulting in an empty file browser and a Disk error when recording was attempted.
Documentation & Included CD
The DAS240-BAT comes shipped with a CD-ROM labelled “Notice, User Manuals”. As optical disc drives are starting to become rare, it’s good to see that relevant documentation is available online as well. The included CD had a volume label dating it to 23rd November 2018.

The disc did not actually run on my computer due to a curious way of writing the autorun.inf which calls RUN.BAT which contained this script:
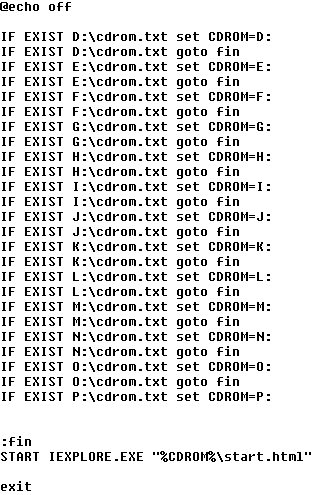
As my CD-ROM drive is R:, it never found the disc. It would also falsely detect a drive if it had cdrom.txt in its root directory. It also attempts to call Internet Explorer, so I suspect there’s a lot of improvements that can be made – perhaps using fully relative drive paths instead.
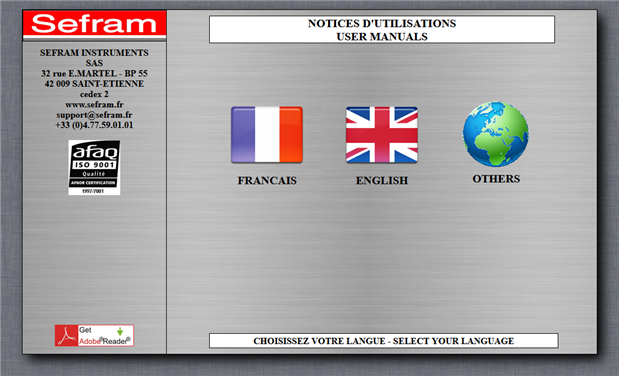
Exploring the disc showed that it has mostly manuals in different languages. Contrary to the user manual, I could not find any relevant software on the disc for the DAS240-BAT, so it’s probably best to skip using the disc entirely.
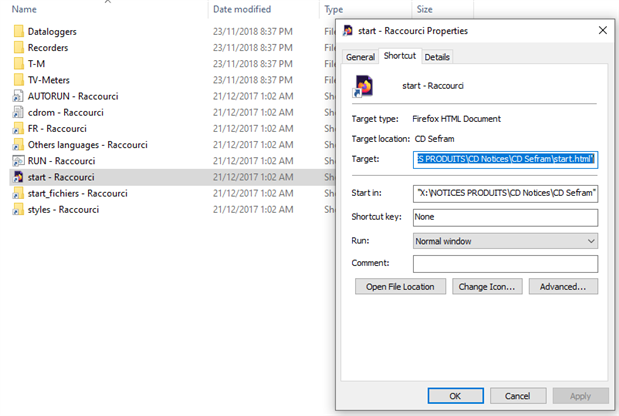
Curiously, the disc is also mastered with shortcut .lnk files on the disc in certain directories, which links to files on the X: drive on their computer. I suspect that not enough care went into the mastering of the disc, as it is also burned as a CD-XA (Mode 2 Form 1) disc rather than the more conventional Mode 1 format which is more compatible.
Unfortunately, the online resources for the DAS240-BAT are rather scattered. At the point of review, B&K Precision’s product page includes downloads including the manual, datasheet and DASLaB V1.1. However, Sefram’s product page for the non-battery version DAS240 has a more up-to-date DASLaB V1.2, along with LabVIEW Drivers. The firmware and a more up-to-date version of Sefram Viewer is located on the software updates page, which is separate to the product page. This is rather confusing, so I have asked B&K Precision to consolidate the downloads and ensure the latest version is supplied at all times.
The datasheet does double-duty as a brochure detailing key features and capabilities. Only the final page is dedicated to specifications, which are quite brief and missing in some key details such as the logic level input threshold, RPM accuracy, pulse count mechanism (edge/level) and minimum pulse width for pulse counting/frequency/RPM measurement. There are also some inconsistencies, including the 4A power supply specification which does not match the main unit or the supplied adapter and the claimed weight of 1.5kg is well below the measured 1.9kg. Finally, the list of options is also incomplete – notably, there is no Wi-Fi option listed which is otherwise alluded to in the documentation. I have requested B&K Precision to look into this and update the data where necessary.
The manual is fairly similar in this regard, as it is relatively brief and light on details. While it is relatively easy to read as a result, there are a number of poor expressions and minor typographical errors scattered throughout. The lack of detail can make it a little difficult to understand how to best utilise the more advanced functionality of the recorder or to ascertain whether a certain measurement task is possible, with one especially unfortunate error in the listed final Modbus TCP characteristic addresses as well which caused me some confusion during testing.
Aside from this, the recorder also ships with a calibration certificate. Having received the recorder on 30th December 2019, it was slightly disappointing to see the certificate dated 03/01/2019 meaning that the calibration would expire within a matter of days from unboxing. The certificate has a few French expressions as well, which is unusual to see. I contacted B&K Precision about this and was told that the certificate is mainly to confirm the recorder met specifications when shipped and there is no guarantee that the calibration is valid when the unit is received. It is up to the customer to undertake calibration as necessary, recommended at one-year intervals or more frequently. While this is understood, it is unfortunate, as some other manufacturers are willing to provide a clarification that the certificate will be valid for one-year after commissioning provided the instrument has been kept within the published environmental limits for storage.
Conclusion
The DAS240-BAT has a solid, chunky-feel that inspires confidence with its aluminium frame and large rubber bumpers. This is, however, tempered somewhat by the large 10” LCD touchscreen that feels otherwise unprotected, small gaps between the LCD and frame, slightly sharp case edges from poor finishing, plastic strap anchor points, plastic rivet construction and abundance of ventilation holes that may lead to dirt ingress over time. An optional case is available to protect the unit while in transit.
Its design is rather user friendly, placing all the important connections at the top edge of the unit, making it easier to manoeuvre. The LCD is bright and large, although the TN technology used limits viewing angles and the glossy finish reflects glare and fingerprint smudges more easily. User feedback from an onboard speaker provides positive assurance of input, with large touch targets on screen and a supplied capacitive-compatible stylus. The single-position kickstand allows for more comfortable usage when resting on a desk, but is not adjustable for the optimal angle and is liable to collapse when too much pressure is applied from the front.
The channel modules provide the DAS240-BAT with a large level of expandability and flexibility, allowing the unit to scale from 20 to 200 analog channels, connected by a 1m cable that has captive features. The channel input blocks themselves use detachable rising-clamp terminal blocks which can be individually labelled and pre-wired, making channel swapping a breeze. The modules themselves are somewhat pricey, making the prospect of leaving them on site less appealing. Likewise, with the separation of the channel input and the recorder unit, one handed relocation becomes a little tricky without applying undue tension to the connecting cable. Digital inputs and outputs do not share the same convenience, instead relying on a traditional DB-25 connector shell which the user must wire to their own needs. There is an optional break-out cable, but it is not exactly affordably priced.
When in use, the user interface responds well to user input, switching between displays relatively briskly. Basic operations can be achieved easily with careful attention to the user interface, with audible feedback given for some key operations such as starting or stopping recordings. However, I found the software on the unit to be its biggest Achilles heel. The software suffers from some strange design choices which take some getting used to – this includes the overuse of ambiguous iconography to depict choices, reversed OK/cancel button order, localisation issues with the text (e.g. Valid instead of Enable), confusing naming (e.g. Logical, Logical Function, Function Channel) and placing options in slightly odd locations (e.g. recorder lock in Additional Settings, record options in Trigger). The software felt like it was not well refined, with certain useful features not available – e.g. interval triggers and with some issues with complex features – e.g. combining channel math with a math channel results in channel configuration corruption and unexpected results, record length limits were rounded, switching between screens resulted in incorrect plot jumps, cursors would read incorrectly if zoomed in then out again, and more. Even simple features like disabling the feedback beeper would not persist after a reboot and would be reset if a self-calibration was performed. The relationship between the hardware capabilities (e.g. hardware voltage ranges) and the software capabilities (i.e. arbitrary defined range, minimum, maximum linked with plotting) was not made clear. Viewing of recordings was also limited to some degree, lacking any ability to perform vertical zoom or searching for a given digital or analog input condition, which could make looking for a particular event rather tedious. Zooming was limited to using buttons and cursors, with no gesture-based multi-touch support. It was also possible to cause the software on the recorder to crash into a hard lock situation or to fail to recognise its internal storage. In this regard, it seems that the DAS240-BAT’s hardware is capable, but the software still needs quite a few improvements before I would consider it completely reliable and user-friendly (especially for English-speaking users).
The supplied documentation consists of a CD-ROM and a calibration certificate. The CD-ROM contains user manuals in many languages, but does not appear to contain the software relevant to the DAS240-BAT. The disc itself has a number of odd quirks, such as not working on high-lettered CD-ROM drives, relying on Internet Explorer and containing shortcut .lnk files. In all, I would recommend avoiding the disc altogether, in favour of the online resources. The calibration certificate received was also within days of being one year old. When asking B&K Precision for clarification, they mentioned that the certificate was provided as proof that the recorder was functional and compliant as shipped but could not guarantee the certificate had any remaining validity when unpacked by the user. They recommend calibration at yearly intervals or less, subject to customer requirements. While this was understood, it is also slightly disappointing as some other manufacturers do offer assurances that provided the unit is stored within published specifications, that the certificate would be valid for a year from when the unit is put into use.
Online resources were rather scattered with different versions of software available from B&K Precision and Sefram’s websites. Downloads were split between product pages and software update pages. The published datasheet is both a brochure detailing key features and a table of specifications. It was a bit light on some key details, such as the logic level input threshold, RPM accuracy, pulse count mechanism (edge/level) and minimum pulse width for pulse counting/frequency/RPM measurement. There are also some inconsistencies, including the 4A power supply specification which does not match the main unit or the supplied adapter and the claimed weight of 1.5kg is well below the measured 1.9kg. Finally, the list of options is also incomplete. The manual is fairly similar in this regard, as it is relatively brief and light on details. While it is relatively easy to read as a result, there are a number of poor expressions and minor typographical errors scattered throughout. I think that this is also an area for improvement.
---
This post is part of the B&K Precision/Sefram DAS240-BAT Multi-Channel Recorder RoadTest Review.
Top Comments