


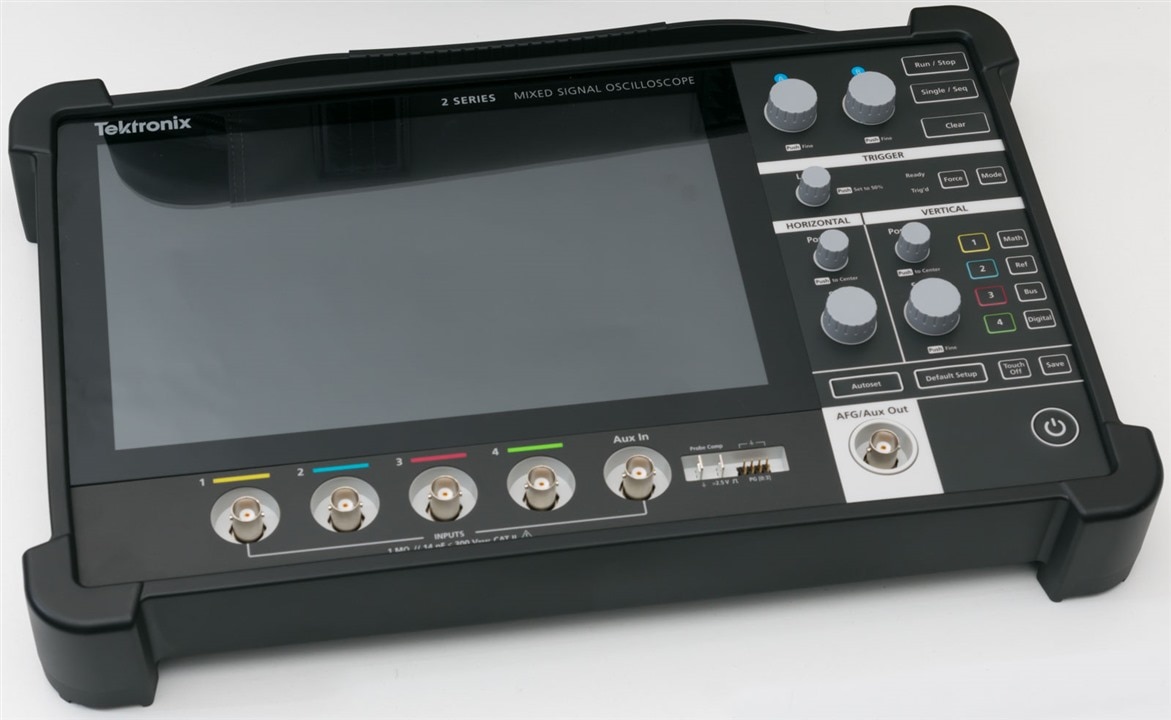
A key distinguishing feature of the 2-series MSO is the ability to go portable. This means you could, in theory, do your oscilloscope probing from almost anywhere.
Putting the MSO24 into 2-PC
I unboxed the 2-PC protective case in Chapter 2 earlier, so this will be a bit of a continuation. In order to set-up the 2-series in “portable mode”, I had to fit the protective rubber bumper.
It was a very secure fit, one that was quite tricky to achieve by hand and took several attempts. It is very tight, which is good, as the handle on the rubber bumper depends on this grip on the main unit. I wonder if there is any reinforcement on the handle and whether it will last in the long-run, as my experience with rubber is that it may fatigue and degrade over time.

While the ports are clear, one downside is that the rubber bumper interferes with the clearance of the oscilloscope on all sides, so it has to be removed if transitioning back to a desk-stand. A similar issue occurs if the unit is VESA mounted on a monitor arm – depending on the third-party arm, mounting and removal can be frustrating, as the mounting has to be undone to clear the mounting holes for use with the plastic kickstand included with 2-PC. This can make converting between desk and mobile a little tedious.
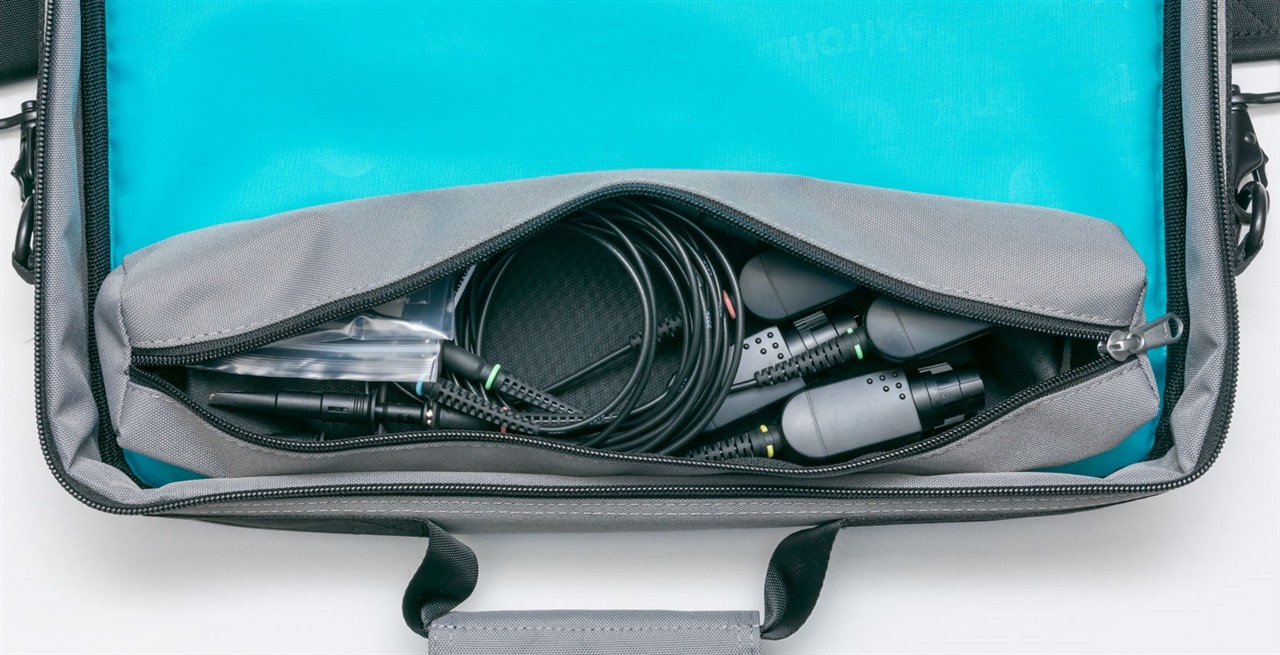
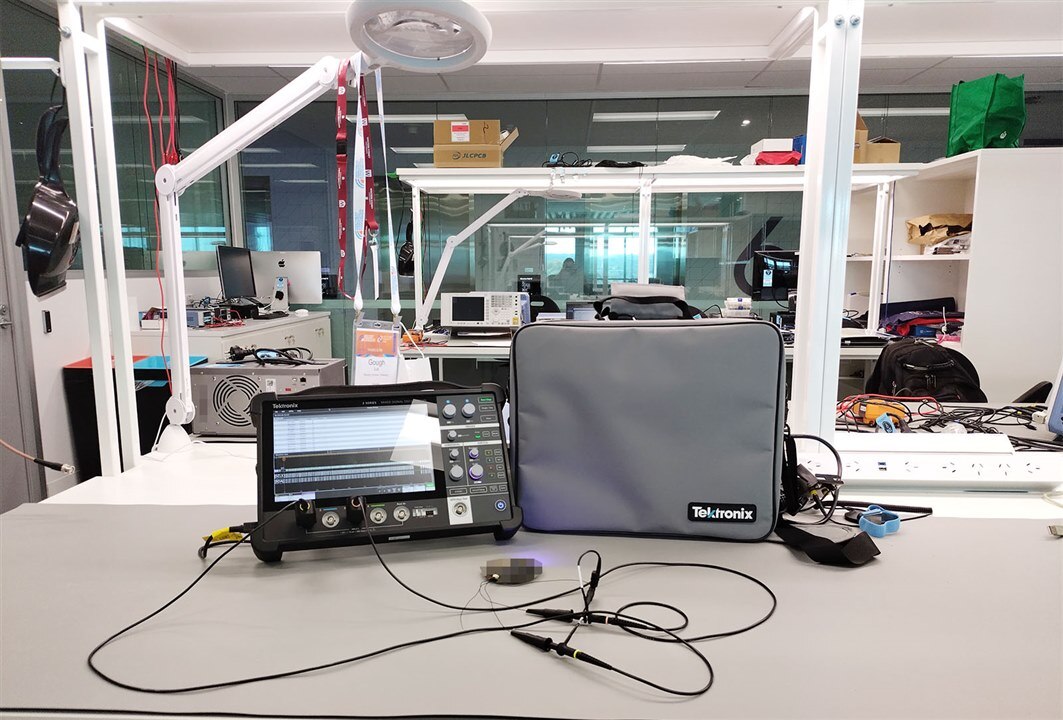
The pockets on the 2-PC carry case can now be filled. They are more generous in size than they look at first glance – all four 500MHz probes are nestled inside in one pocket.
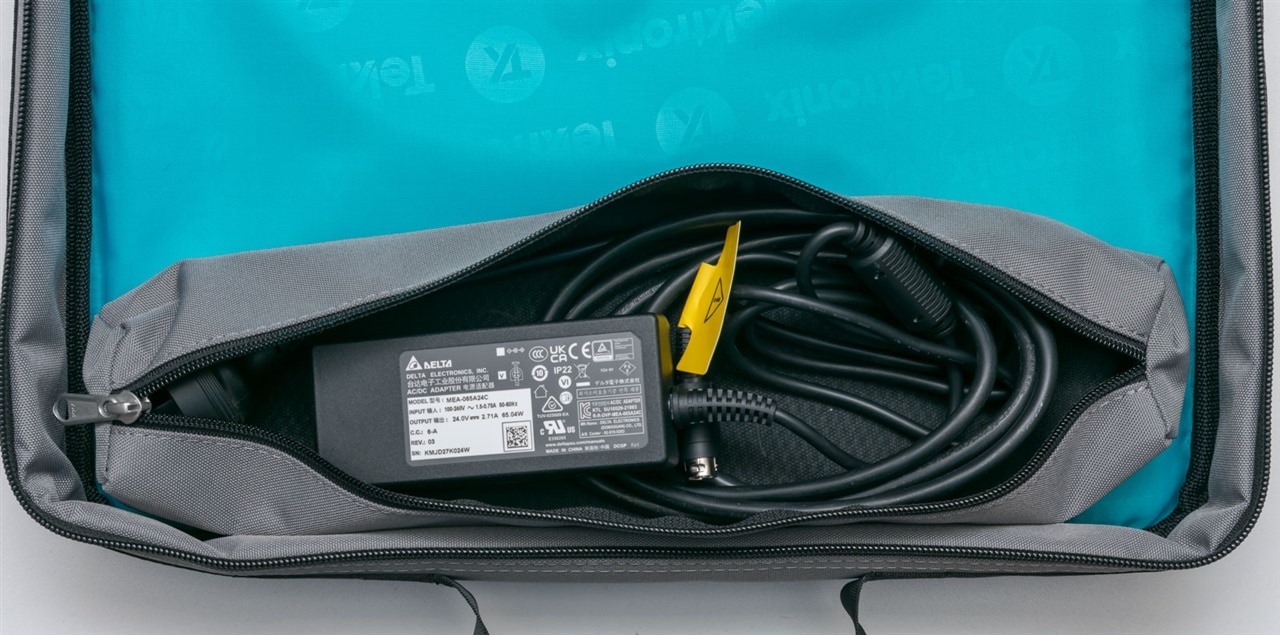
The power adapter and power cable is nestled in the other – no sweat!

In goes the oscilloscope and you’ll notice that there’s plenty of “depth” in the bag that isn’t filled. This is because it has been sized for the 2-BP/2-BATPK battery option which adds extra depth to the main unit.
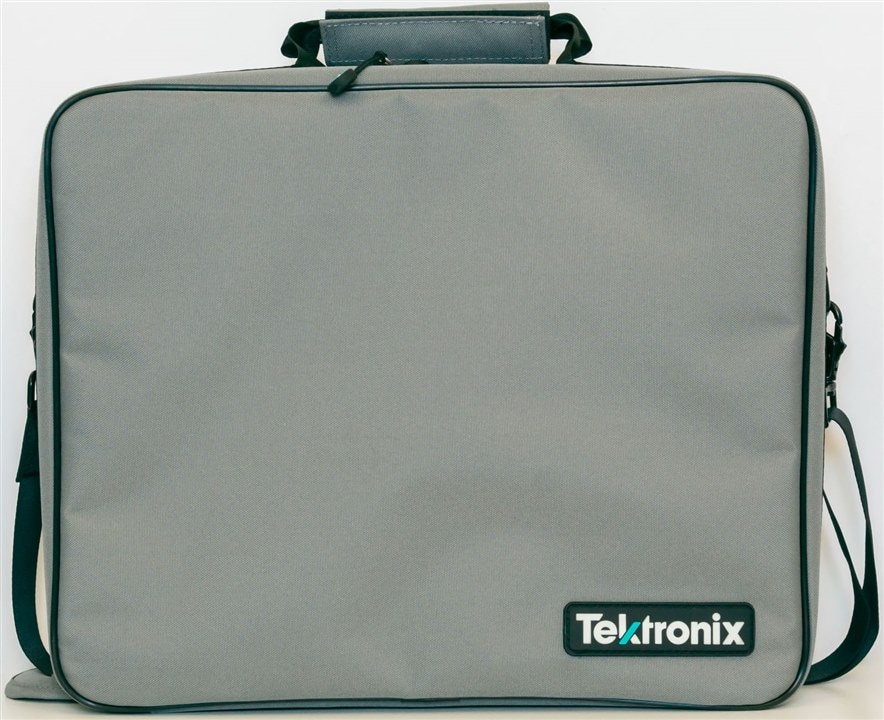
We’re all packed and ready to go. The bag definitely feels of excellent quality and should handle the rigours of transport with ease. One downside of the kit is the lack of any special protection for the screen – some oscilloscopes have a “hard cover” option that covers the front panel jacks, buttons and LCD. This would be especially handy as there have been a few times when I’m coiling up probe leads and the end of the probe goes flying into the air … risking a scratch or a dent on the screen. It would also perhaps reduce the chance of any rubbing causing fine scratches as well.
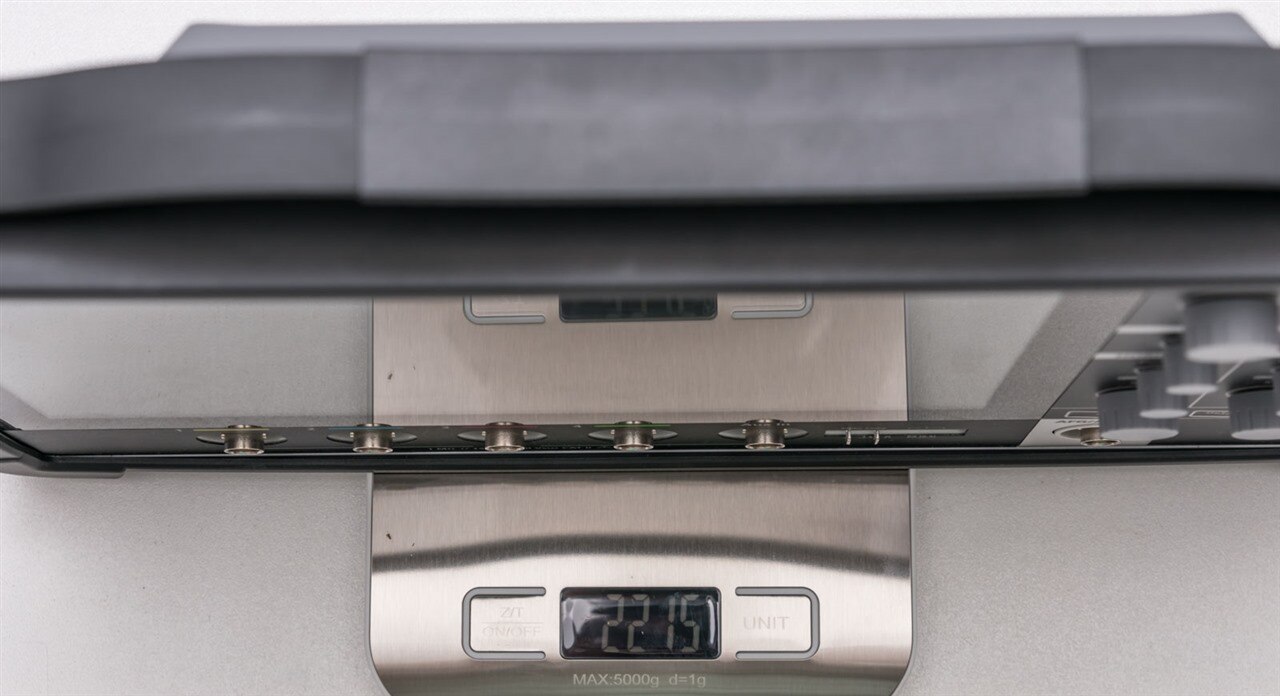
The MSO24 with the plastic kickstand and rubber bumper weighs 2.215kg.
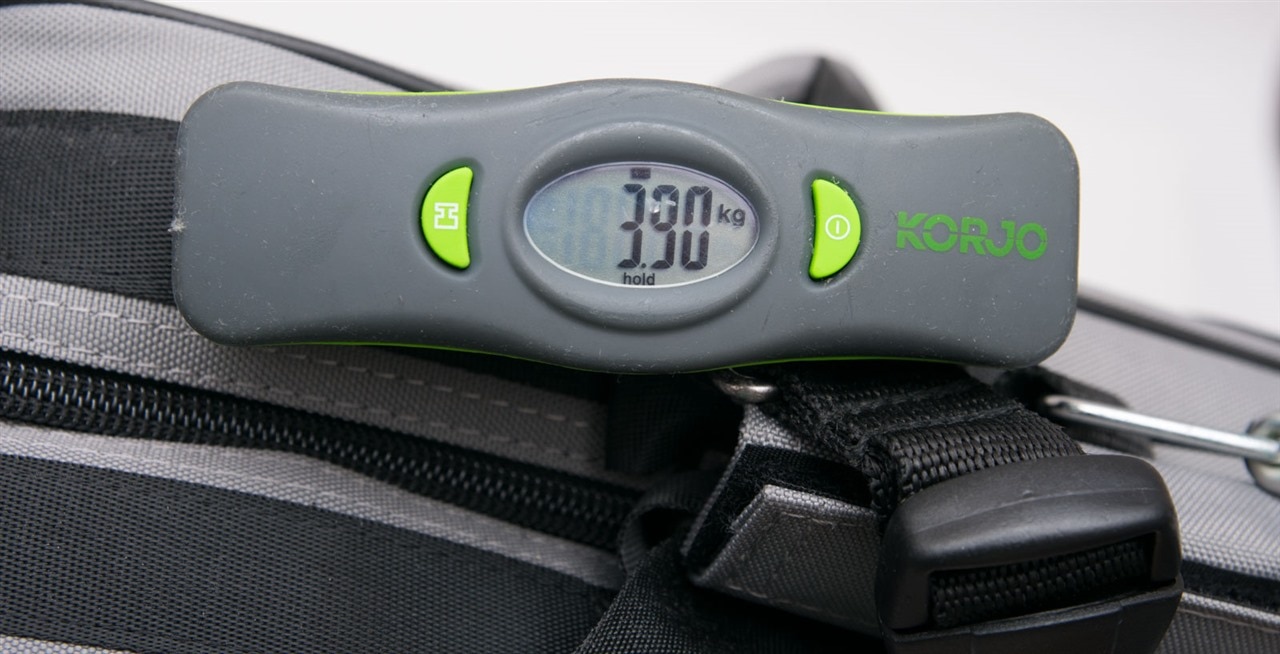
With the four 500MHz probes, power supply and power cable, in the satchel bag with the shoulder strap, it weighs 3.90kg. This is around a similar weight to an ordinary laptop in a laptop bag.
To Battery, or Not To Battery!
The 2-series MSO has the option for a two-slot hot-swappable battery attachment which mounts to four screw-holes on the back of the unit like a backpack.
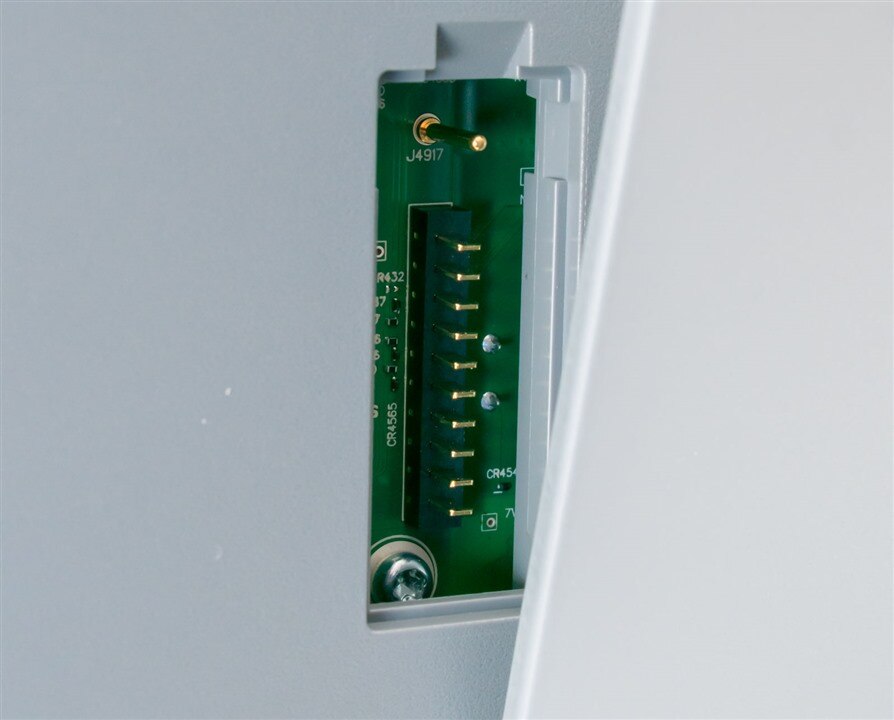
The attachment plugs into the main unit through a connector hidden behind the removable cover, which provides power as well as communication to the batteries.
The 2-BATPK (with instrument) option or 2-BP (separate) option comes with the attachment and a single battery, while TEKBAT-01 is an additional battery and TEKCHG-01 is a standalone charger. Each battery can run the unit for up to 4 hours.
Unfortunately, due to the shipping problems noted earlier, it was not possible to receive the 2-BP option and thus it was not possible to evaluate the kit on battery power. This does also leave some room within the 2-PC satchel bag so the oscilloscope can shuffle forwards and backwards a little.
Take Your ‘Scope to Work Day
I don’t know if you’ve heard, but the 13th October is “take your ‘scope to work” day. Actually, it isn’t … that was just a joke … but I certainly did do that.

The journey begins with a bus ride. The Tektronix 2-series waits patiently for the bus to arrive, basking in the warmth of the summer Australian sun.

As it doesn’t have legs … I’ll have to give it a hand to board the bus.

The next part of the trip is by train. The bag fits nicely in the single-seat of a Waratah train.
Walking around with the additional bag slung over my shoulder, the weight is noticeable and I did find myself wanting to be a little more gentle. Depending on how the bag was positioned, I found myself either swinging or almost kneeing the bag from time to time … not the best thing to do to a piece of sophisticated test equipment. But the straps held firm and there were no casualties despite the hour-and-a-half-long journey both-ways.
Scoping On Another Bench
While at work, I quietly took out the unit to do some scoping about. We have plenty of oscilloscopes at work … but the 2-series makes it possible to think about having an oscilloscope that moves with you.
Testing this concept out, the first thing was to do some checking of I2C communications on one of our prototype PCBs. I can’t share more than that … but perhaps you can already work out what it is.

It was not the best method of probing, but it got the job done. As there is no on-board Wi-Fi on the 2-series, I had to resort to using local USB drives to save data as Ethernet access is strictly controlled.
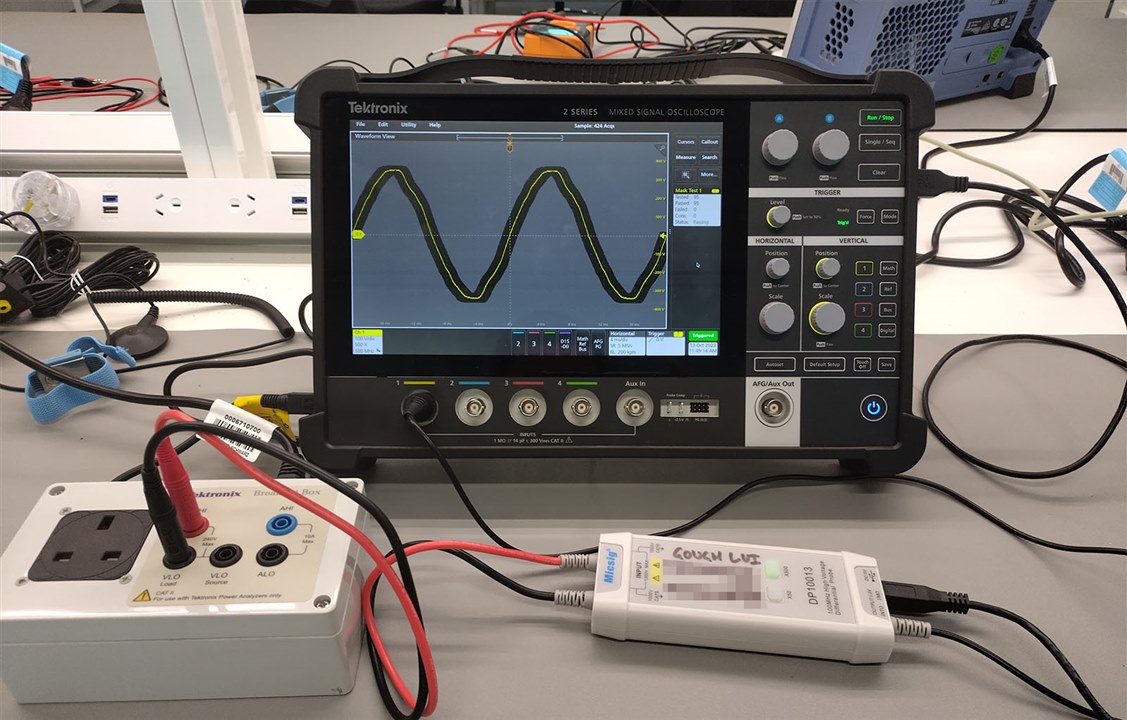
Being a little lazy, I set a massive record length and as the board was reading sensor data constantly, this resulted in a lot of decoded packets.
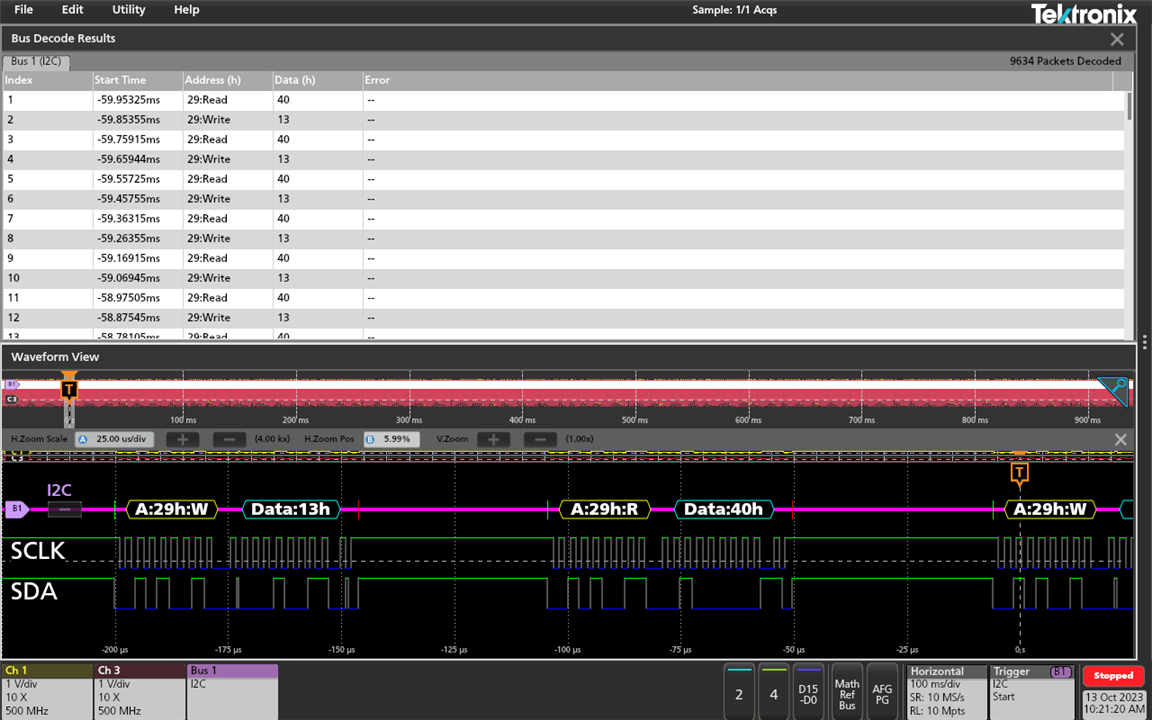
Performance did take a bit of a hit while decoding, but it still managed without fail. It seems important to have a sample rate of at least 10MS/s to get consistent decodes, as 5MS/s was giving me some strange errors. I also reduced the font size in the settings to the minimum of 12 so I could squeeze a little more onto the screen, while also exporting the bus table to a .csv file. Job done!
While there, I also decided to investigate the mains power as there have been reports of flickering lights. Using the break-out box from the PA1000 and a Micsig high-voltage differential probe powered from the USB port on the Tektronix 2-series, I left it to perform mask testing throughout the day as I attended to my work.
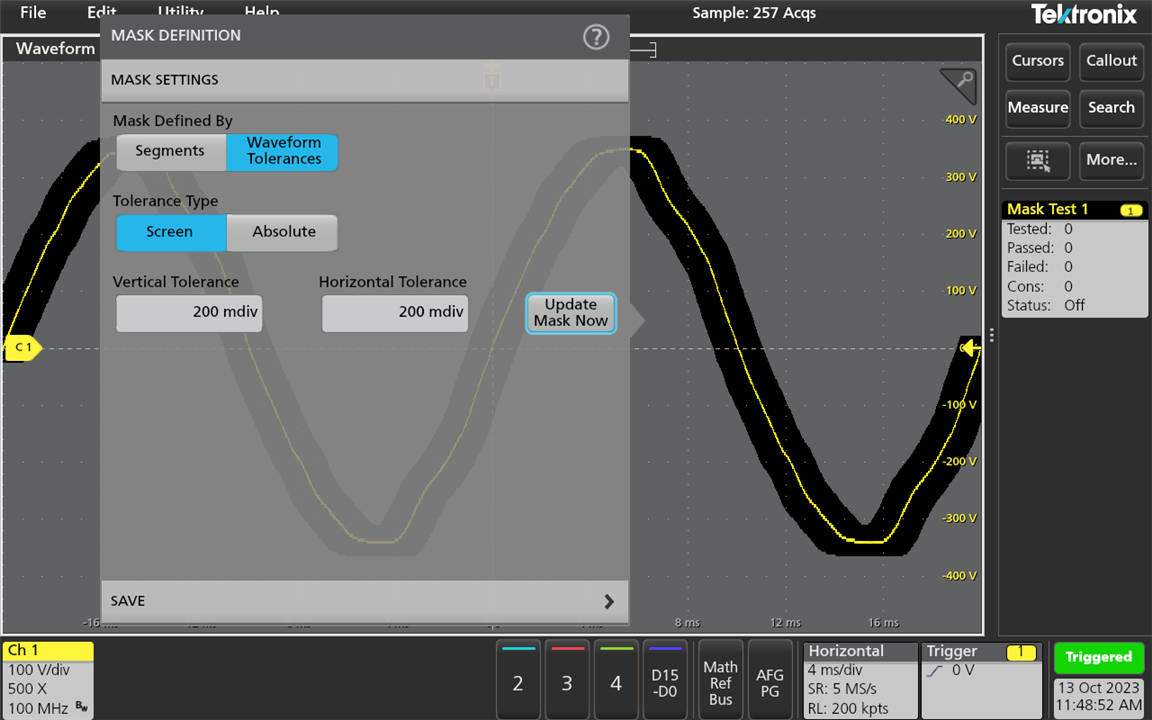
I found the best way to define a mask in this circumstance was to use the waveform tolerances option in this case, in part, because the 2-series doesn’t have a power analysis option. Then I set the “on event” to dump a screenshot and a waveform file to USB when the mask is violated.
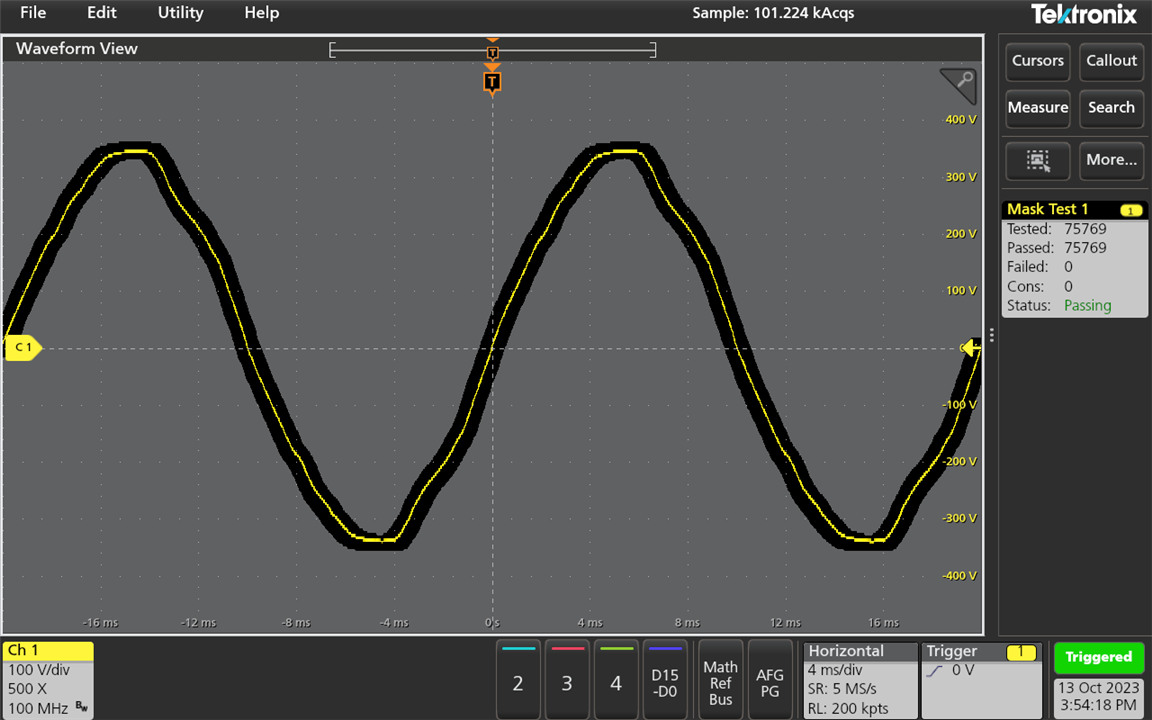
It seems that not many anomalies had occurred, as even with the tight mask, the waveform barely ever budged.
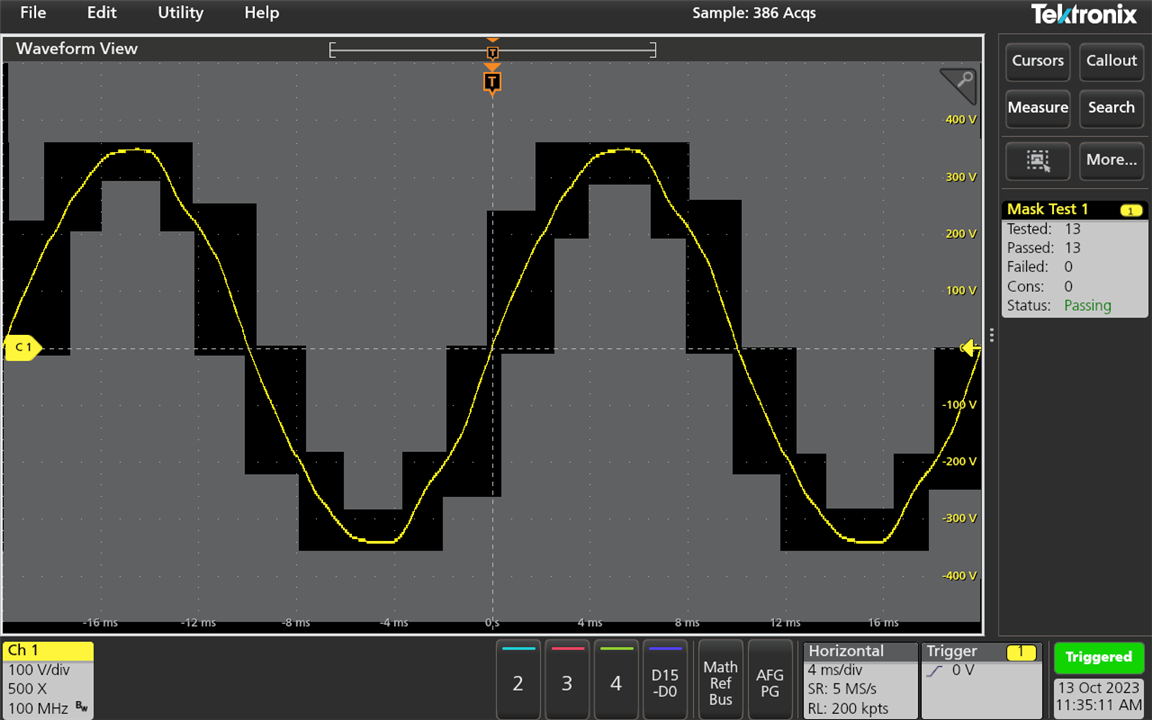
Masks can also be defined by shapes – a silly mask drawn by hand can be seen above.
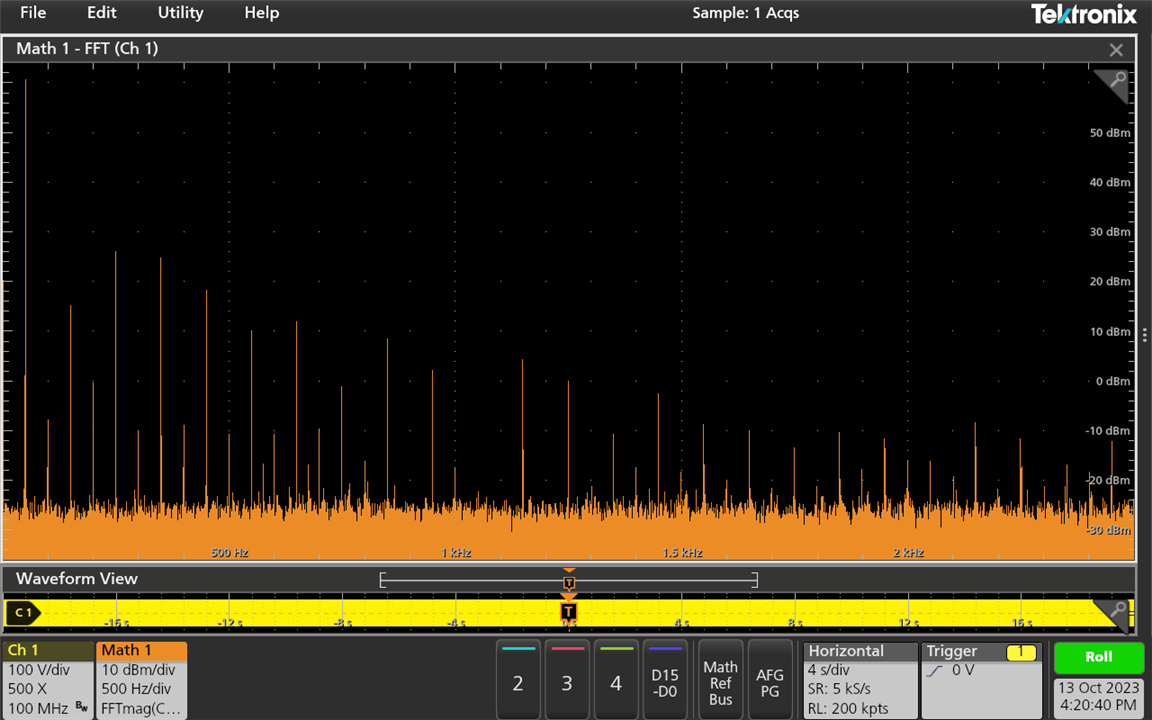
I also decided to grab an FFT of the waveform (and saved the data as .csv) before I left, because that mains waveform is quite non-sinusoidal in a consistent way! Flattening of the top is quite common, but this one also seems to have some “permanent” wiggles!
Overall, things went well on this “excursion” away from the home lab. The only downside was the glossy surface of the touch screen – this was quite a glare magnet, reflecting the LED batten lighting in our lab quite annoyingly!
Conclusion
Unlike most other oscilloscopes from the big brands, the 2-series MSO is portable by nature. Assembling the 2-PC option involves putting on a very tight rubber bumper for protection and a carry handle and screwing in a plastic kickstand that shares the top two VESA mount holes. The rubber bumper does cause some clearance issues with the desk stand, while the kickstand requires the VESA mounting holes to be clear, meaning that any mounting plates for VESA monitor arms must be removed. This does make the process of converting between benchtop and portable less convenient than one may initially envisage. I do wonder how well the TPU rubber handle will handle long-term use.
Then, it is a case of putting the unit and accessories into the bag. I felt the bag was genuinely of excellent quality with smooth zippers and nice lining material. The pockets were very well designed, easily accommodating the power adapter, power cable and full set of four probes. The bag was designed to accommodate the 2-series MSO with the 2-BP/2-BATPK battery option that increases the depth of the unit, so a unit without this option will potentially move about a little in the case. It is unfortunate that there isn’t anything specific to protect the front side LCD screen of the oscilloscope.
Unfortunately, this review does not cover the 2-BP/2-BATPK option due to problems shipping Lithium-Ion batteries internationally. This option would be installed on the rear of the 2-series MSO, using four screws and connecting to a port hidden behind a flap on the rear.
In the review configuration, the main unit with rubber bumper and kickstand weighed 2.215kg. When placed inside the bag with its carry strap, power supply, power cable, four 500MHz probes, the whole configuration weighed 3.90kg. This makes it roughly the same as an ordinary laptop in a carry bag.
The whole configuration withstood my public transportation journey on bus and train, taking one-and-a-half-hours each way, with a considerable walk as well. At times, the bag was swinging and was practically getting knee-d, but the oscilloscope survived and the bag (and strap) proved their durability. Having the unit on the bench, it was possible to do some I2C decoding and monitoring of AC power waveform with no problems except the glare reflections from the glossy surface of the touch screen. This proves this set-up is a practical portable oscilloscope with entry-level benchtop-grade functionality.
---
This blog is a part of the Tektronix 2-series MSO RoadTest Review.