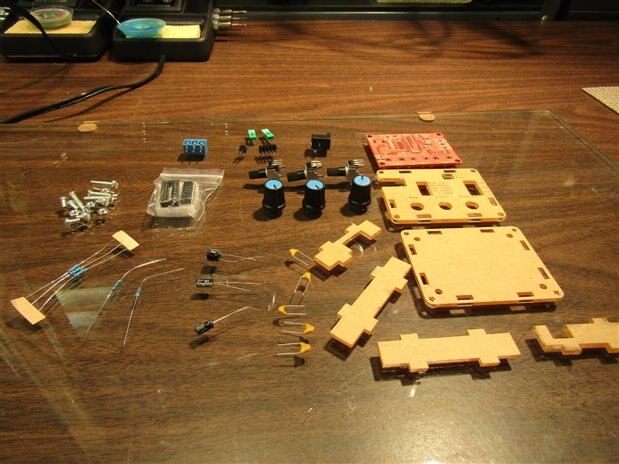
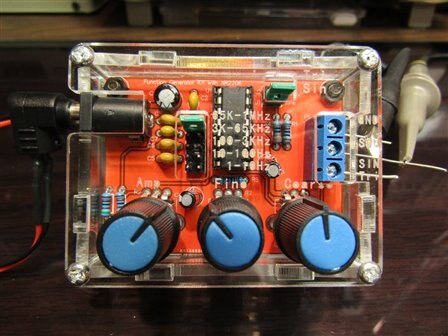
Every once in a while I find one of these irresistible buys from the Chinese sources. Such was the case when I came across this little Signal Generator Kit the other day from Banggood.
At the time I saw it they were having a sale of 23% off which brought the price down to $7.23. Also keep in mind that this also includes shipping from China to Wisconsin USA. I could not resist and ordered 2 of them. It took a little over two weeks for the package to arrive. I like the waiting time between when I order and when the package arrives. It reminds me of waiting for Christmas as a child. I have since learned that, many times, the waiting is actually more fun than the getting.
I also like the Chinese Kits as they always present a nice challenge due to the often poor instructions. It forces me to carefully analyze the kit and the parts. Most of the time they have a good screen print to the board so this becomes the primary guide along with the schematic if one is provided. This time there was both a good schematic and a well printed board. Another nice feature of this kit is that it came with a pre-cut and pre-printed plexiglass case. Here is a scan of the instructions so you can see the familiar instructions in Changlish.
Once of the first things to do is inventory the parts and identify the capacitor and resistor values.
Here is a closeup of the circuit board front and back:
And here is the board after population:
The heart and brains of the little Signal Generator is the XR2206 Signal generator chip. I was eager to see what type of quality and range I would get from the board so I finished assembly of the unit.
I took some regular stick on feet and cut holes in the middle to accommodate the screws that stuck out. The screws that were sent with the kit to mount the board to the back plexiglass were too short and I found that some washers were needed to make things line up and fit properly. I also had to put some threads in the plastic (M3.5 x 0.5) for the long screws that hold the front panel in place. While the plastic was closely sized to the threads experience has taught that failure to thread usually results in breaking the plexiglass. The unit is designed to work best with a 9V to 12V power supply. I had a 9 volt battery pack handy so this is what I used.
Here is the unit in operation:
Testing showed the actual range of the generator was from 600 milli Hz to a little better that 1.2 MHz. Square, Triangle, and Sine signal were available over the entire range. The range is selected by moving a jumper between header pins and the choice of triangle or sine waves is also selected by using a jumper between header pins. They have supplied some very nice little green header jumpers that are easily accessible from the front panel and are just about as convenient as a switch.
The jumpers show a little better in this picture. The left potentiometer controls the amplitude of the sine and triangle output. It is a little counter intuitive for me as it turns the signal down in a clockwise rotation and increases it with the counter clockwise turn. Perhaps it is a Chinese convention but I will have to think about it each time I use it. The amplitude of the square wave is fixed and not adjustable. The other two controls are for Coarse and Fine frequency adjustment. They work very well and allowed me to pull up any target frequency that I tried. In order to get good looking wave forms I had to back off the amplitude to stay below the level where they clipped. I have had a lot of fun waiting for these kits and also had a good time putting them together. To top it off they work a lot better than I expected for the reasonable price.
John


Top Comments
-

idanre1
-
Cancel
-
Vote Up
+3
Vote Down
-
-
Sign in to reply
-
More
-
Cancel
-

jw0752
in reply to idanre1
-
Cancel
-
Vote Up
+3
Vote Down
-
-
Sign in to reply
-
More
-
Cancel
-

idanre1
in reply to jw0752
-
Cancel
-
Vote Up
+2
Vote Down
-
-
Sign in to reply
-
More
-
Cancel
-

jw0752
in reply to idanre1
-
Cancel
-
Vote Up
0
Vote Down
-
-
Sign in to reply
-
More
-
Cancel
-

tech_nut81
in reply to jw0752
-
Cancel
-
Vote Up
0
Vote Down
-
-
Sign in to reply
-
More
-
Cancel
-

jw0752
in reply to tech_nut81
-
Cancel
-
Vote Up
0
Vote Down
-
-
Sign in to reply
-
More
-
Cancel
-

tech_nut81
in reply to jw0752
-
Cancel
-
Vote Up
+1
Vote Down
-
-
Sign in to reply
-
More
-
Cancel
Comment-

tech_nut81
in reply to jw0752
-
Cancel
-
Vote Up
+1
Vote Down
-
-
Sign in to reply
-
More
-
Cancel
Children