


I like to think of the parts and pieces in my shop as building blocks. I very seldom design my creations from the ground up. Like the Borg, I prefer to assimilate technology. Once I have a board or circuit that I find a useful building block I go to work on it and modify it and twist it to my purposes. One of the circuits with which I have had the most fun is a power supply module that was marketed as Hiland Power Supply Module. I do not know who was the original designer. The design has been taken over by the knock off community so that the module is usually available as a kit for $3 to $5 including postage from China.

Here is a board that I assembled yesterday just to experiment with. This kit was a knock off of the original Hiland design and I paid $3.50 delivered to my door from Banggood in China. Everything included in the kit is of reasonable quality except the TL081 Op Amps. While they have a TI stamp on them they are definitely not TI. For one thing they lack a functional Offset Circuit. I usually throw away the ones that come with the kit and put in 3 genuine TL081 from TI. The small blue trimmer in the lower right hand corner is the Offset Adjust for the Voltage control Op Amp directly above it. This allows the board to be adjusted to zero volts output when the voltage control is turned all the way down. The board is designed for a 24 VAC input and with deliver 0 to 31 Volts DC output. Depending on how solid the 24 V AC source is the board will deliver 3 Amps output. The module can operate in a constant voltage mode as well as a constant current mode.
The purpose of my experimentation with the board last night was to see what could be done to zero the current when the current limit control is turned all the way down. As the unit sat on my bench it would not go below
6.0 mA.
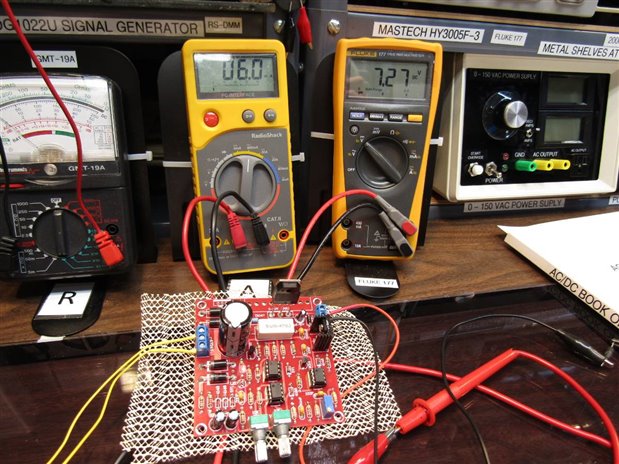
While I could turn the voltage down to zero and thus eliminate this residual I also wanted to be able to turn the current limit down to zero. Here is schematic that I reverse engineered and upgraded from a cruder schematic supplied by the seller.
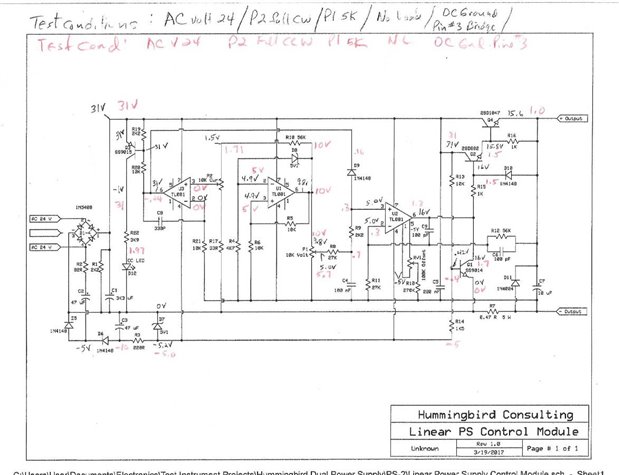
Over the years I have had several of these boards get damaged when my experiments went south. To assist with repair I have logged voltages for the unit when it is in the constant voltage mode (Black Notes) and when it is in the constant current mode (Red Notes). Since the voltage control TL081 had an offset trimmer I decided to see if a similar offset trimmer could be installed on the current control TL081. U3 is the current control TL081 and one can see from the schematic that the offset leads of the IC are not being used. I took a 100K trimmer and mounted it directly to the top of the TL081 and ran the trimmer wiper to the correct point on the circuit board. When the unit was powered up the current was at 13 mA but as soon as I began to adjust the trimmer it quickly came down and was able to be zeroed.
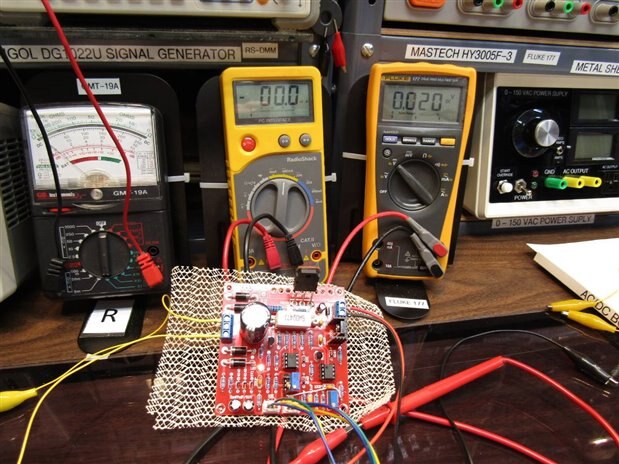
This made me very happy. Here is what the fix looked like:

As I mentioned this board has been very useful in my builds. I like to build bench power supplies and I like to twist the technology and this board in particular as I go. For example at one point I took out the power diodes and built a MOSFET Array controlled by an LT4320 Ideal Bridge onto the board and then fashioned a bench power supply around it. The Ideal Bridge IC was able to deliver a couple extra volts to the output. It was fun to learn this technology. Here is a link to that build:
Another time I decided to use switch mode power blocks as the input to the Hiland Boards. The SMPS would supply the 30 volts and the Hiland linear modules would provide a way to control the output voltage and current. This was an extra learning experience as I didn't realize at the time that the Hiland Module uses the AC input to generate a 5 volt negative rail that is necessary for the proper operation of the board. My switch mode supplied DC input would not produce the negative five volts needed. Fortunately Recom had a small DC to DC converter that would do the trick and the bench power supply proceeded to completion. Here is a link to that build:
In yet another project the board was used as a voltage reference. The Process Duration timer was designed to time the voltage drop in batteries and capacitors from full charge to a lower determined level. I could for example hook up a battery to a circuit and set the voltage reference of the Process Duration timer to watch the battery voltage level and stop timing when a threshold was crossed. This way I could set up the experiment and walk away, returning a day or more later to find that the Process Duration Timer had measured 13 hours for the battery to discharge. To this date I have built 2 Process Duration Timers and used the Highland board as the reference voltage source in both of them. Here is a link to the Process Duration Timer Build:
Another build where this board was used was the LED and Zener Diode Tester. In this case I modified the board so that it had a constant current limit of 1000 mA and the constant current control was a 10 turn pot. This gave me fine tuning of the current limit. With this unit I could preset my current limit to the test range of a Zener diode, connect the diode to the unit and then turn up the voltage until the junction of the diode would break down. At this point the Zener Voltage was able to be directly read off the tester's volt meter. I could also test and match LEDs using a similar method.
https://www.element14.com/community/people/jw0752/blog/2017/04/24/zener-led-tester
These are just a few of the builds where I have found this versatile board useful.
In case you decide to play with it yourself here are a few more useful ideas:
Install IC sockets for the TL081 so that you can service them more easily.
If you are going to use the board under power applications it is necessary to properly heat sink and cool the output transistor.
The board comes with a spot for a fixed linear regulator like a 7805 or a 7824 which is supplied with the kit so you can power a cooling fan from the board. I have used this feature for Fans and to power other circuits. Keep in mind however that the ground for this regulator is not the same as the output ground. If you tie the linear regulator ground to the main power output ground of the board you will bypass the current sense resistor which will cause the board to malfunction. I encountered this problem when I attempted to used a 7809 to power the Voltage and Current meter circuits. The two grounds got tied together in the meter and it took a while to sort out the problem.
The supplier Banggood has some heat sink and fan kits that are almost compatible with the board. As with most things a little adjusting and jury rigging is necessary to make it work like you will want.
Don't Forget to get some good TL081 Op Amps to replace the ones that come with the current batch of kits. At $0.55 each they are worth it.
https://www.newark.com/texas-instruments/tl081ip/ic-op-amp-jfet-input-dip8/dp/29AH7956?st=TL081
There is a simple builder manual that I have on pdf if anyone wants a copy message me your request and email.
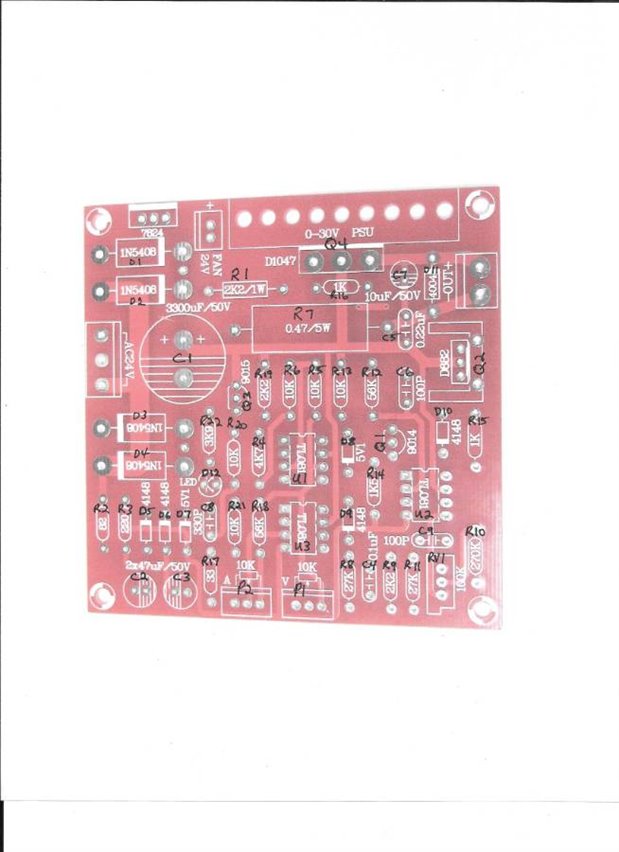
The PC board itself is good quality but it lacks reference numbers for the components. The values are marked for ease of assembly but if you need to service it or coordinate with the schematic this may be of help.
If you have already played with this board and if you have done some interesting things with it I would be happy if you posted your use and modification below.
Thanks for your interest.
John
Top Comments