element14 Community
element14 Community
    Register Log In
  • Site
  • Search
  • Log In Register
  • Community Hub
    Community Hub
    • What's New on element14
    • Feedback and Support
    • Benefits of Membership
    • Personal Blogs
    • Members Area
    • Achievement Levels
  • Learn
    Learn
    • Ask an Expert
    • eBooks
    • element14 presents
    • Learning Center
    • Tech Spotlight
    • STEM Academy
    • Webinars, Training and Events
    • Learning Groups
  • Technologies
    Technologies
    • 3D Printing
    • FPGA
    • Industrial Automation
    • Internet of Things
    • Power & Energy
    • Sensors
    • Technology Groups
  • Challenges & Projects
    Challenges & Projects
    • Design Challenges
    • element14 presents Projects
    • Project14
    • Arduino Projects
    • Raspberry Pi Projects
    • Project Groups
  • Products
    Products
    • Arduino
    • Avnet & Tria Boards Community
    • Dev Tools
    • Manufacturers
    • Multicomp Pro
    • Product Groups
    • Raspberry Pi
    • RoadTests & Reviews
  • About Us
    About the element14 Community
  • Store
    Store
    • Visit Your Store
    • Choose another store...
      • Europe
      •  Austria (German)
      •  Belgium (Dutch, French)
      •  Bulgaria (Bulgarian)
      •  Czech Republic (Czech)
      •  Denmark (Danish)
      •  Estonia (Estonian)
      •  Finland (Finnish)
      •  France (French)
      •  Germany (German)
      •  Hungary (Hungarian)
      •  Ireland
      •  Israel
      •  Italy (Italian)
      •  Latvia (Latvian)
      •  
      •  Lithuania (Lithuanian)
      •  Netherlands (Dutch)
      •  Norway (Norwegian)
      •  Poland (Polish)
      •  Portugal (Portuguese)
      •  Romania (Romanian)
      •  Russia (Russian)
      •  Slovakia (Slovak)
      •  Slovenia (Slovenian)
      •  Spain (Spanish)
      •  Sweden (Swedish)
      •  Switzerland(German, French)
      •  Turkey (Turkish)
      •  United Kingdom
      • Asia Pacific
      •  Australia
      •  China
      •  Hong Kong
      •  India
      •  Japan
      •  Korea (Korean)
      •  Malaysia
      •  New Zealand
      •  Philippines
      •  Singapore
      •  Taiwan
      •  Thailand (Thai)
      •  Vietnam
      • Americas
      •  Brazil (Portuguese)
      •  Canada
      •  Mexico (Spanish)
      •  United States
      Can't find the country/region you're looking for? Visit our export site or find a local distributor.
  • Translate
  • Profile
  • Settings
Personal Blogs
  • Community Hub
  • More
Personal Blogs
John Wiltrout's Blog Shop Tips -  Intrusive Meter Probe
  • Blog
  • Documents
  • Mentions
  • Sub-Groups
  • Tags
  • More
  • Cancel
  • New
  • Share
  • More
  • Cancel
Group Actions
  • Group RSS
  • More
  • Cancel
Engagement
  • Author Author: jw0752
  • Date Created: 4 Sep 2016 6:47 AM Date Created
  • Views 4679 views
  • Likes 14 likes
  • Comments 44 comments
  • probe_improvement
  • probe_tip
  • shop_tips
Related
Recommended

Shop Tips -  Intrusive Meter Probe

jw0752
jw0752
4 Sep 2016

I frequently work on circuit boards from Dental Equipment. Since these circuit boards are often used in wet or humid environments the manufacturers like to coat the boards in a thick layer of epoxy or other hard sealant. Probing these boards has always been a challenge as my meter probes would not penetrate the epoxy and I would get false readings on the components under test. The usual method for working with boards like this is to use probe tips that are very sharp and to push hard until a reading is registering on the meter. The sharper the tip the faster they dull and break and it is a nuisance to have to be constantly sharpening. In addition once you have sharpened and the nice nickel coating is gone the underlying brass is way to soft to hold a point. The final frustration with these very sharp tips is that it is easy to get stuck by them.


Tonight I assembled some parts and made some tips that solve the problem of penetrating the epoxy, are not dangerously sharp, are very durable, and are easily replaceable. To do this I am going to adapt another piece of Dental technology, the drill or bur that is used to cut tooth material. One particular bur numbered 557 is a good fit for my needs:


image


The 557 bur is about 1.5 mm in diameter and a little less than 2 cm long. The tip of the bur that usually cuts the tooth material is made of tungsten carbide and has flutes along its sides and has a sharp star pattern on the tip itself. My plan is to make a chuck for the dental burs and mount the chuck on a meter probe handle. I will have wires coming from the chucks back to pin jacks which will accept the tips of my normal meter probes. Now when I need to probe a board covered in epoxy I will attach the new probes to the meter probes and use the dental burs as the tips. Here is how the fabrication came together. Please excuse my poor machining which is 50% having very cheap tools and 50% having a poor machinist. Here is a picture of the assembled probe tip:


image


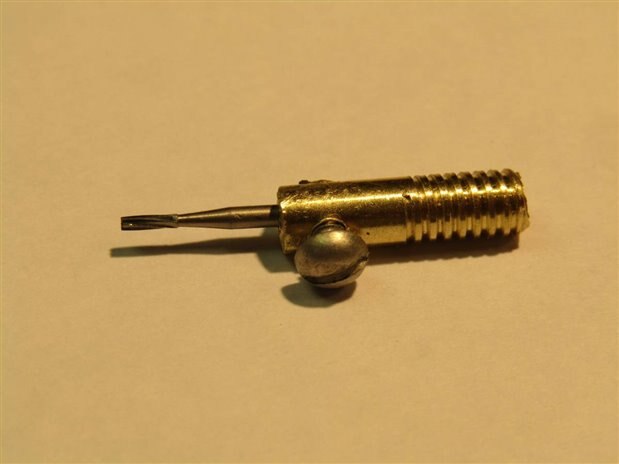
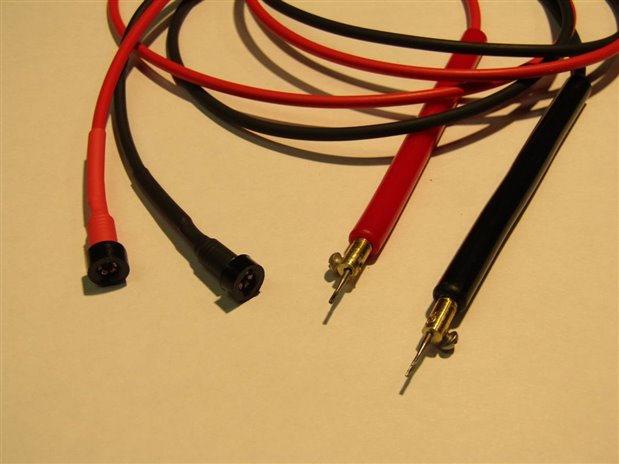
I have taken a piece of solid brass rod and threaded it so that it will screw into my probe handle. I next drilled a 1.5 mm hole down the center to accommodate the bur. Finally I cross drilled and tapped a hole for a set screw to retain the bur. Here are all the parts for the probe extensions before and after assembly;


image


image

Placing the bur on the epoxy above the pad or component that I want to probe and with light pressure and a slight twist the sharp points of the bur cut down to the metal and a dependable reading is obtained on the meter. These burs are very common and probably can be purchased from any dentist. You will find that even used burs will work well as the dentist uses the flutes on the sides to cut and we are mainly interested in the star flutes on the tip. The bur shaft is made of steel and the tips are tungsten carbide. This material has a higher resistance than the usual metal used for probe tips. My probe extensions and tips added about 0.1 ohm of series resistance which I can mentally add into my readings. It of course doesn't impact the voltage readings.


John

  • Sign in to reply

Top Comments

  • jw0752
    jw0752 over 9 years ago +6
    Here is one more iteration of the idea. I have made adapters to go one the tips of my meter probes and eliminated the extra wire. John
  • jw0752
    jw0752 over 8 years ago in reply to rachaelp +6
    Hi Rachael, Thank you very much for the report on how the non-slip tips made your measurement easier. I am still enthused about them and I continue to try to show them to people who I believe would find…
  • jw0752
    jw0752 over 9 years ago +5
    Update to this Blog: I have continued to work on this idea and to refine it. The goals that I had for this iteration of the idea are to modify a set of meter test probes so that the probe itself has a…
Parents
  • jw0752
    jw0752 over 9 years ago

    Update to this Blog:


    I have continued to work on this idea and to refine it. The goals that I had for this iteration of the idea are to modify a set of meter test probes so that the probe itself has a friction chuck whereby I can insert and remove the dental bur tips without having to have the bulky adapter or for the need of an Allen wrench to change the bur. Here is a picture of the black probe that I am going to modify. Notice that the tip is removed by unscrewing it from the sheath. The screw thread is a standard 10-32 USA thread.


    image


    I began by looking for a suitable friction grip chuck and mounting to replace the original point on the probe. The tips are dental burs and they are generally used to cut teeth in a dental drill so I went to my sons dental equipment repair shop and got some old parts from the mini turbines that are used in dental drills. Below I took a picture of a sequence of changes that I made to the parts called spindles and to the chuck which is inside the spindle. The picture on the left shows the spindle as it comes from the dental drill after the bearings and the turbine blades have been removed. In the second picture I have started to back the chuck out of the spindle with the chuck completely removed in the third step.  The fourth step shows the chuck flipped 180 degrees and screwed back into the spindle in number five. Since the threads do not continue very deep we hit a stop position. The final two pictures show the bur about to be inserted and then seated into the chuck.


    image


    The spindles come with a shoulder that will not be needed in the final construction so I will grind it off. Next I took a 10-32 screw and drilled a hole down the center of the screw and cut a section to slip over the chuck. Here is a picture of the spindle and chuck assembled with the screw threads compared to the original probe end.


    image


    In the final assembly the probe wire is soldered into the spindle and the unit is screwed back into the probe handle. The finishing touch is accomplished by adding some colored heat shrink. Here are what the finished probes with friction grip chucks for the probe tips looks like.


    image


    image


    John

    • Cancel
    • Vote Up +5 Vote Down
    • Sign in to reply
    • More
    • Cancel
Comment
  • jw0752
    jw0752 over 9 years ago

    Update to this Blog:


    I have continued to work on this idea and to refine it. The goals that I had for this iteration of the idea are to modify a set of meter test probes so that the probe itself has a friction chuck whereby I can insert and remove the dental bur tips without having to have the bulky adapter or for the need of an Allen wrench to change the bur. Here is a picture of the black probe that I am going to modify. Notice that the tip is removed by unscrewing it from the sheath. The screw thread is a standard 10-32 USA thread.


    image


    I began by looking for a suitable friction grip chuck and mounting to replace the original point on the probe. The tips are dental burs and they are generally used to cut teeth in a dental drill so I went to my sons dental equipment repair shop and got some old parts from the mini turbines that are used in dental drills. Below I took a picture of a sequence of changes that I made to the parts called spindles and to the chuck which is inside the spindle. The picture on the left shows the spindle as it comes from the dental drill after the bearings and the turbine blades have been removed. In the second picture I have started to back the chuck out of the spindle with the chuck completely removed in the third step.  The fourth step shows the chuck flipped 180 degrees and screwed back into the spindle in number five. Since the threads do not continue very deep we hit a stop position. The final two pictures show the bur about to be inserted and then seated into the chuck.


    image


    The spindles come with a shoulder that will not be needed in the final construction so I will grind it off. Next I took a 10-32 screw and drilled a hole down the center of the screw and cut a section to slip over the chuck. Here is a picture of the spindle and chuck assembled with the screw threads compared to the original probe end.


    image


    In the final assembly the probe wire is soldered into the spindle and the unit is screwed back into the probe handle. The finishing touch is accomplished by adding some colored heat shrink. Here are what the finished probes with friction grip chucks for the probe tips looks like.


    image


    image


    John

    • Cancel
    • Vote Up +5 Vote Down
    • Sign in to reply
    • More
    • Cancel
Children
  • DAB
    DAB over 9 years ago in reply to jw0752

    Nice update John.


    DAB

    • Cancel
    • Vote Up +2 Vote Down
    • Sign in to reply
    • More
    • Cancel
  • mcb1
    mcb1 over 9 years ago in reply to jw0752

    That looks like a commercially made unit ...well done.

    • Cancel
    • Vote Up +4 Vote Down
    • Sign in to reply
    • More
    • Cancel
element14 Community

element14 is the first online community specifically for engineers. Connect with your peers and get expert answers to your questions.

  • Members
  • Learn
  • Technologies
  • Challenges & Projects
  • Products
  • Store
  • About Us
  • Feedback & Support
  • FAQs
  • Terms of Use
  • Privacy Policy
  • Legal and Copyright Notices
  • Sitemap
  • Cookies

An Avnet Company © 2026 Premier Farnell Limited. All Rights Reserved.

Premier Farnell Ltd, registered in England and Wales (no 00876412), registered office: Farnell House, Forge Lane, Leeds LS12 2NE.

ICP 备案号 10220084.

Follow element14

  • X
  • Facebook
  • linkedin
  • YouTube