element14 Community
element14 Community
    Register Log In
  • Site
  • Search
  • Log In Register
  • Community Hub
    Community Hub
    • What's New on element14
    • Feedback and Support
    • Benefits of Membership
    • Personal Blogs
    • Members Area
    • Achievement Levels
  • Learn
    Learn
    • Ask an Expert
    • eBooks
    • element14 presents
    • Learning Center
    • Tech Spotlight
    • STEM Academy
    • Webinars, Training and Events
    • Learning Groups
  • Technologies
    Technologies
    • 3D Printing
    • FPGA
    • Industrial Automation
    • Internet of Things
    • Power & Energy
    • Sensors
    • Technology Groups
  • Challenges & Projects
    Challenges & Projects
    • Design Challenges
    • element14 presents Projects
    • Project14
    • Arduino Projects
    • Raspberry Pi Projects
    • Project Groups
  • Products
    Products
    • Arduino
    • Avnet Boards Community
    • Dev Tools
    • Manufacturers
    • Multicomp Pro
    • Product Groups
    • Raspberry Pi
    • RoadTests & Reviews
  • Store
    Store
    • Visit Your Store
    • Choose another store...
      • Europe
      •  Austria (German)
      •  Belgium (Dutch, French)
      •  Bulgaria (Bulgarian)
      •  Czech Republic (Czech)
      •  Denmark (Danish)
      •  Estonia (Estonian)
      •  Finland (Finnish)
      •  France (French)
      •  Germany (German)
      •  Hungary (Hungarian)
      •  Ireland
      •  Israel
      •  Italy (Italian)
      •  Latvia (Latvian)
      •  
      •  Lithuania (Lithuanian)
      •  Netherlands (Dutch)
      •  Norway (Norwegian)
      •  Poland (Polish)
      •  Portugal (Portuguese)
      •  Romania (Romanian)
      •  Russia (Russian)
      •  Slovakia (Slovak)
      •  Slovenia (Slovenian)
      •  Spain (Spanish)
      •  Sweden (Swedish)
      •  Switzerland(German, French)
      •  Turkey (Turkish)
      •  United Kingdom
      • Asia Pacific
      •  Australia
      •  China
      •  Hong Kong
      •  India
      •  Korea (Korean)
      •  Malaysia
      •  New Zealand
      •  Philippines
      •  Singapore
      •  Taiwan
      •  Thailand (Thai)
      • Americas
      •  Brazil (Portuguese)
      •  Canada
      •  Mexico (Spanish)
      •  United States
      Can't find the country/region you're looking for? Visit our export site or find a local distributor.
  • Translate
  • Profile
  • Settings
Personal Blogs
  • Community Hub
  • More
Personal Blogs
John Wiltrout's Blog Vacuum Chamber for Pulling Wires through a Sheath
  • Blog
  • Documents
  • Mentions
  • Sub-Groups
  • Tags
  • More
  • Cancel
  • New
  • Share
  • More
  • Cancel
Group Actions
  • Group RSS
  • More
  • Cancel
Engagement
  • Author Author: jw0752
  • Date Created: 5 Dec 2022 2:21 AM Date Created
  • Views 1989 views
  • Likes 15 likes
  • Comments 14 comments
  • dental_equipment
  • pulling_wires
  • shop_tips
Related
Recommended

Vacuum Chamber for Pulling Wires through a Sheath

jw0752
jw0752
5 Dec 2022

This is my first Blog in over a year so you will probably not see any improvement in my style or deliver from previous attempts.

I have a hobby business where I repair or recondition specific parts for various pieces of Dental Operatory Equipment. One of the items that I specialize in is a handpiece cord that goes between a machine called a Cavitron and a hand instrument that vibrates at 30 kHz. The dentist or hygienist uses this instrument to remove scale from the patients teeth. The cord itself has a soft vinyl plastic outer sheath and internally there are three 20 AWG conductors each with upwards of 100 strands of very fine copper wire. There is also a water line that provides coolant to the handpiece and also water to flush away the debris that is cleaned from the tooth. The handpiece for for one model of Cavitron looks like this.

image

The cord can fail is many ways but today I am going to talk about a situation where one or more of the internal wires or the water line must be replaced. This is a type of failure that I have struggled with over the years and have never come to a satisfactory solution. I have learned to inject talcum powder into the hose to allow the individual wires and hose to more easily slip against each other. I have soldered new wire to the old and used the old to pull the new into place. The water line replacement has been particularly difficult as it will stretch and act line a big rubber band. Getting a new water hose into position and getting the stretch out of it is practically impossible.

One of the techniques that I have tried without success is to inflate the outer vinyl sheath so that the wires and hose can more easily fit and slide. Unfortunately the wires and hose do not allow the sheath to be sealed and the inflation pressure easily escapes. While I was continuing to think about how to make it possible to deal with this problem the thought came to me that perhaps I could build a vacuum chamber around the hose and use this technique to inflate the hose with environmental air pressure. This would inflate the hose and still allow me to pass the wires and water line through the center of the vinyl sheath.

image

Here are some of the parts collected for this project. The plan is to use this section of 1/2 inch copper tubing as the vacuum chamber. I will install a barb in the side of the copper tubing and hook it to a vacuum pump so that I can draw the air out of it. There will be specially modified pipe caps for each end of the copper tubing to cap off the ends so that the vacuum is contained. The caps will also be modified so that the Vinyl sheath of the handpiece cord can be connected and stretched from one pipe cap to the other.

image   image

This will allow regular atmospheric pressure to enter the interior of the vinyl tubing and inflate it into the vacuum of the copper tubing.

image

This picture illustrates how the vinyl tubing is attached to the end cap. You can also see the vacuum port in this picture. The black vinyl tubing will run down the center of the copper tubing and have an identical connection at the other end. Since we are going to be pulling three wires and a water line through the vinyl tubing you can see the flare in the brass outer entrance. This is to prevent the wires and hose from scraping or snagging on the entrance pipe.

image

In this picture you can see that a thin lead wire has been pushed through the vinyl sheath. Prior to threading the thin wire I also used a little air pressure to blast a dusting of talcum powder through the vinyl tubing. Three of the special high strand wires have been soldered to the thin pull wire and a water line has been attached to the pull wire. Now it is time for the test to see if my idea and the last couple hours of vacuum chamber construction has been worth it. When I have pulled wire and tubing into a vinyl sheath in the past without a vacuum chamber I have had mixed results and it has usual taken an hour or more to get everything in usable position.

image  image

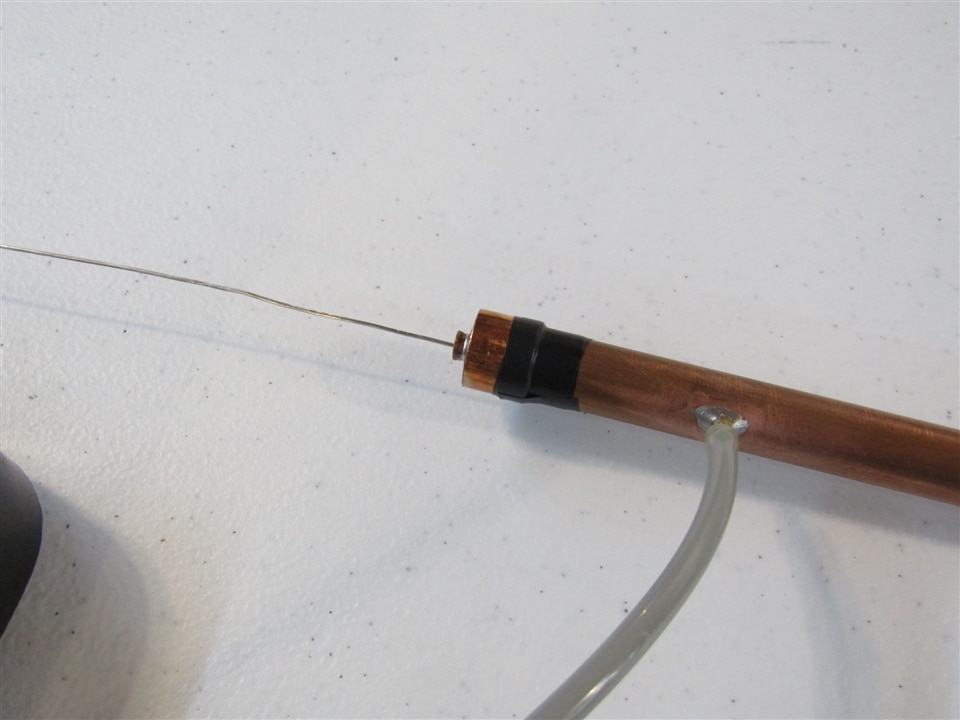
Here we see the other end of the copper tubing with the thin pull wire waiting to draw the three conductors and water line through the vinyl sheath. The vacuum pump has been turned on and is showing about 60 cm of Hg vacuum.

The thin wire is pulled and there is very minimal resistance as the three wires and water line slide into the vinyl sheath. I have never had this operation go so quickly or easily before. Once there are wires and water line sticking out of each end the vacuum chamber is disassembled and the copper end caps removed from the vinyl sheath.

image

Here is a picture of the hose after it has been removed from the vacuum chamber. The next step is to install the proper connectors to each end of the handpiece cord.

image  image

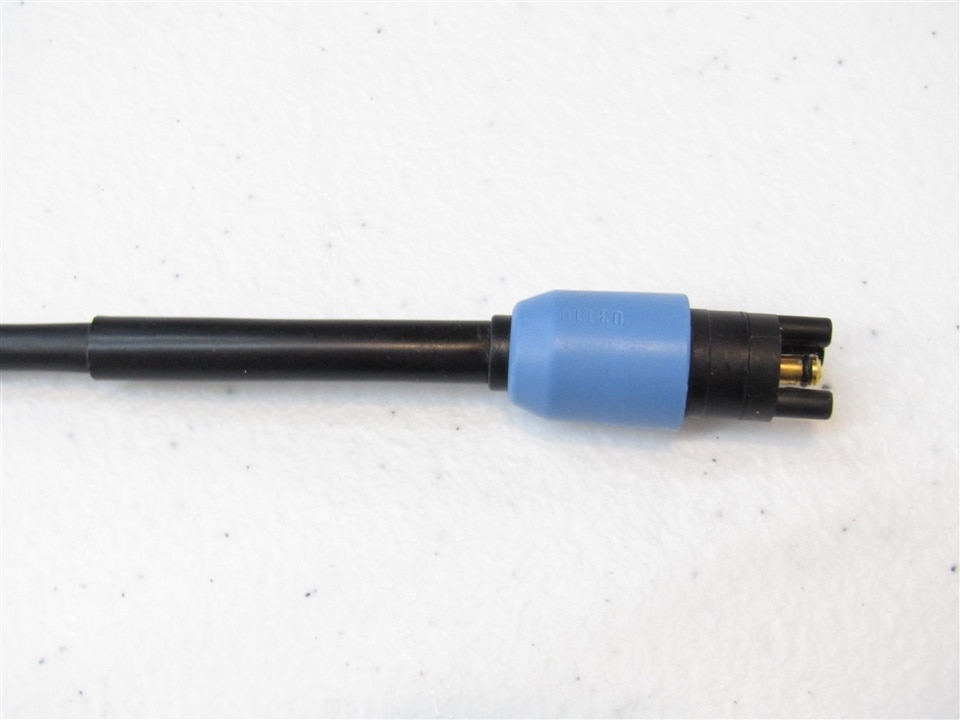
Here you can see the end of the vinyl hose has been installed and the wires and water line have been attached to the adapter. I found that the talcum powder and orderly layout of the wires and hose allowed me to pull the excess wire and water line back into the hose so that the end of the adapter could snap into the strain relief.

The final touches to the project involved the installation of a strain relief and header connector to the other end of the handpiece hose.

Even with the time needed to construct the vacuum chamber this has been one of the easiest rebuilds of a Cavitron hose that I have ever done. With all the parts at hand it amazes me that it only took 10 or more years for me to think of trying this approach. It is a good of example of how I become accustomed to working with problems and continue to struggle doing things the same way I have always done them even though there is probably a better way.

I will be glad to answer any questions and fill in more details if anyone is interested. Because of the size of the vacuum chamber and total layout it was difficult to photograph. Hopefully you can piece together the pictures above in your minds eye.

Thanks John

  • Sign in to reply

Top Comments

  • michaelkellett
    michaelkellett over 2 years ago +1
    Very neat. I wonder how they do it for new cables. The only similar arrangement I'm familiar with uses 20mm flexible conduit and is less than half full, easy enough to thread but no use at all for a…
  • Andrew J
    Andrew J over 2 years ago +1
    Great thinking. Threading lots of wires through a sheath is the Devil’s own job and I’ve never had to do it when replacing just one or two!
  • Fred27
    Fred27 over 2 years ago +1
    It's great that you discovered a new technique. I was expecting to see that sealing against the vacuum was as problematic as sealing for inflation. I'm glad that wasn't the case. Those cables really…
  • Alihaiderfarooq123
    Alihaiderfarooq123 over 1 year ago

    Do you have any video for its working?

    • Cancel
    • Vote Up 0 Vote Down
    • Sign in to reply
    • More
    • Cancel
  • jw0752
    jw0752 over 2 years ago in reply to dougw

    The flared tube is soldered into the end cap to make a seal. The flared tubes connect to the hose on each end so that there is no way for air to leak into the vacuum. Air pressure from the environment is effectively inside the hose and the vacuum is on the outside. I do have to put electrical tape around the pipe caps to make the seal to the copper pipe.

    • Cancel
    • Vote Up 0 Vote Down
    • Sign in to reply
    • More
    • Cancel
  • dougw
    dougw over 2 years ago

    Do you need to seal the tube to the endcap to prevent air leaking in or is the flared tube acting like a ferrule?

    • Cancel
    • Vote Up 0 Vote Down
    • Sign in to reply
    • More
    • Cancel
  • fmilburn
    fmilburn over 2 years ago

    Very ingenious. I’m always impressed with the breadth of your skills and knowledge. 

    • Cancel
    • Vote Up 0 Vote Down
    • Sign in to reply
    • More
    • Cancel
  • jw0752
    jw0752 over 2 years ago in reply to dougw

    I suspect there may be a few that read this blog and make their own. When they call me and ask I always do my best to help them. There seems to be plenty of work out there and if I get more than 2 or 3 hoses a week to fix my hands make me pay the price. Putting things together requires a bit of hand strength and pushing and pulling on small parts. I pulled the nail bed away from my thumb nail when I was making the hose illustrated in this blog. Not fun.

    • Cancel
    • Vote Up 0 Vote Down
    • Sign in to reply
    • More
    • Cancel
>
element14 Community

element14 is the first online community specifically for engineers. Connect with your peers and get expert answers to your questions.

  • Members
  • Learn
  • Technologies
  • Challenges & Projects
  • Products
  • Store
  • About Us
  • Feedback & Support
  • FAQs
  • Terms of Use
  • Privacy Policy
  • Legal and Copyright Notices
  • Sitemap
  • Cookies

An Avnet Company © 2025 Premier Farnell Limited. All Rights Reserved.

Premier Farnell Ltd, registered in England and Wales (no 00876412), registered office: Farnell House, Forge Lane, Leeds LS12 2NE.

ICP 备案号 10220084.

Follow element14

  • X
  • Facebook
  • linkedin
  • YouTube