element14 Community
element14 Community
    Register Log In
  • Site
  • Search
  • Log In Register
  • Community Hub
    Community Hub
    • What's New on element14
    • Feedback and Support
    • Benefits of Membership
    • Personal Blogs
    • Members Area
    • Achievement Levels
  • Learn
    Learn
    • Ask an Expert
    • eBooks
    • element14 presents
    • Learning Center
    • Tech Spotlight
    • STEM Academy
    • Webinars, Training and Events
    • Learning Groups
  • Technologies
    Technologies
    • 3D Printing
    • FPGA
    • Industrial Automation
    • Internet of Things
    • Power & Energy
    • Sensors
    • Technology Groups
  • Challenges & Projects
    Challenges & Projects
    • Design Challenges
    • element14 presents Projects
    • Project14
    • Arduino Projects
    • Raspberry Pi Projects
    • Project Groups
  • Products
    Products
    • Arduino
    • Avnet Boards Community
    • Dev Tools
    • Manufacturers
    • Multicomp Pro
    • Product Groups
    • Raspberry Pi
    • RoadTests & Reviews
  • Store
    Store
    • Visit Your Store
    • Choose another store...
      • Europe
      •  Austria (German)
      •  Belgium (Dutch, French)
      •  Bulgaria (Bulgarian)
      •  Czech Republic (Czech)
      •  Denmark (Danish)
      •  Estonia (Estonian)
      •  Finland (Finnish)
      •  France (French)
      •  Germany (German)
      •  Hungary (Hungarian)
      •  Ireland
      •  Israel
      •  Italy (Italian)
      •  Latvia (Latvian)
      •  
      •  Lithuania (Lithuanian)
      •  Netherlands (Dutch)
      •  Norway (Norwegian)
      •  Poland (Polish)
      •  Portugal (Portuguese)
      •  Romania (Romanian)
      •  Russia (Russian)
      •  Slovakia (Slovak)
      •  Slovenia (Slovenian)
      •  Spain (Spanish)
      •  Sweden (Swedish)
      •  Switzerland(German, French)
      •  Turkey (Turkish)
      •  United Kingdom
      • Asia Pacific
      •  Australia
      •  China
      •  Hong Kong
      •  India
      •  Korea (Korean)
      •  Malaysia
      •  New Zealand
      •  Philippines
      •  Singapore
      •  Taiwan
      •  Thailand (Thai)
      • Americas
      •  Brazil (Portuguese)
      •  Canada
      •  Mexico (Spanish)
      •  United States
      Can't find the country/region you're looking for? Visit our export site or find a local distributor.
  • Translate
  • Profile
  • Settings
Personal Blogs
  • Community Hub
  • More
Personal Blogs
Nate Chapman's Blog Pi Atrix Project
  • Blog
  • Documents
  • Mentions
  • Sub-Groups
  • Tags
  • More
  • Cancel
  • New
  • Share
  • More
  • Cancel
Group Actions
  • Group RSS
  • More
  • Cancel
Engagement
  • Author Author: Nate1616
  • Date Created: 26 Jun 2013 3:10 PM Date Created
  • Views 372 views
  • Likes 1 like
  • Comments 0 comments
Related
Recommended

Pi Atrix Project

Nate1616
Nate1616
26 Jun 2013

My son who is almost 3 years old wanted a computer that he could play on but also talk to me when I’m on the road for work.  I had and old Motorola Atrix Labdock laying around and have read that people are using these with the Raspberry Pi.  My goal is to tear down the Atrix and fit the Pi underneath with a custom case that will also house the Pi camera.  Now this is a work in progress so at this point I just have the pi hooked up externally for testing purposes only.  As I progress with this project I will post more.


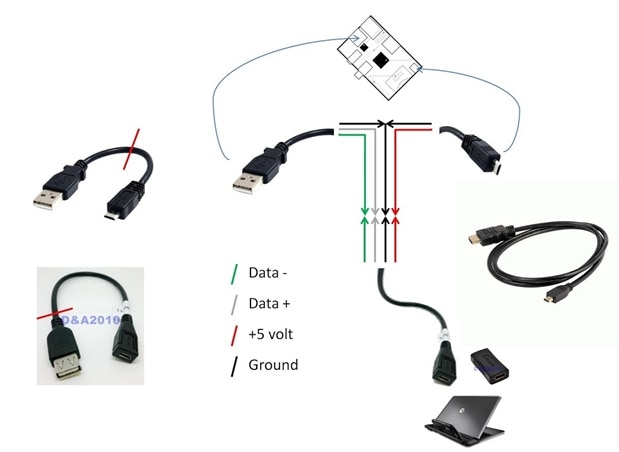
Here is the parts list and wiring diagram I used.

a)1 x Motorola Atrix Lapdock (try Amazon)
b) 1 x Micro HDMI Type D female to female adapter (try eBay)
c) 1 x Micro HDMI Type D male to HDMI 1.4 male cable (try Amazon)
d) 1 x Micro USB female to USB A female adapter cable (try eBay)
e) 1 x Normal Micro USB cable (like you already use to power the Pi)


image


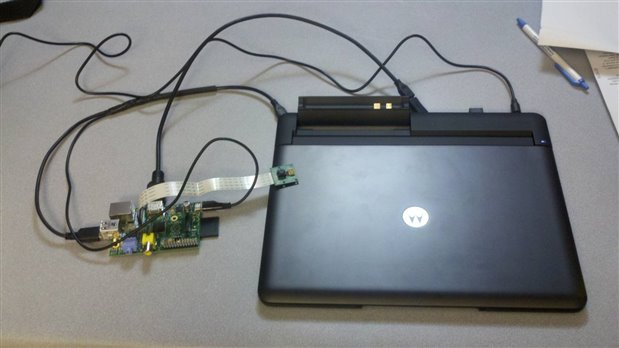
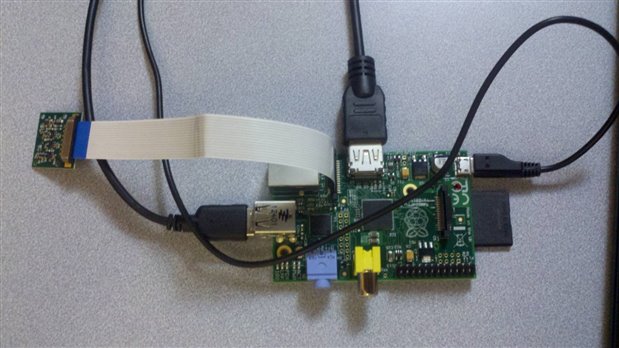
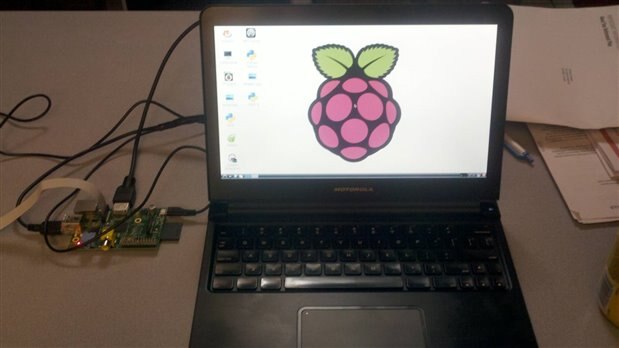
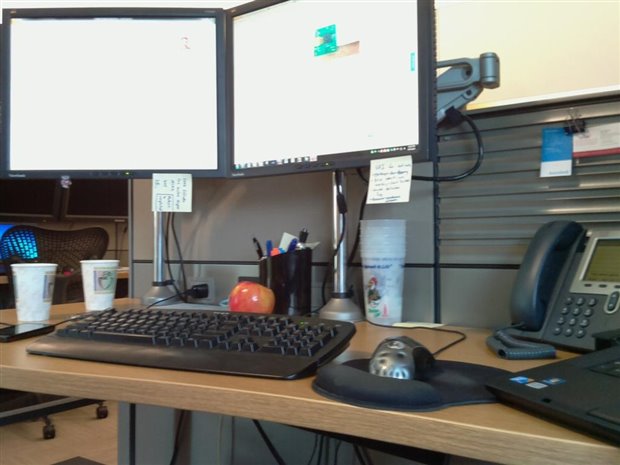
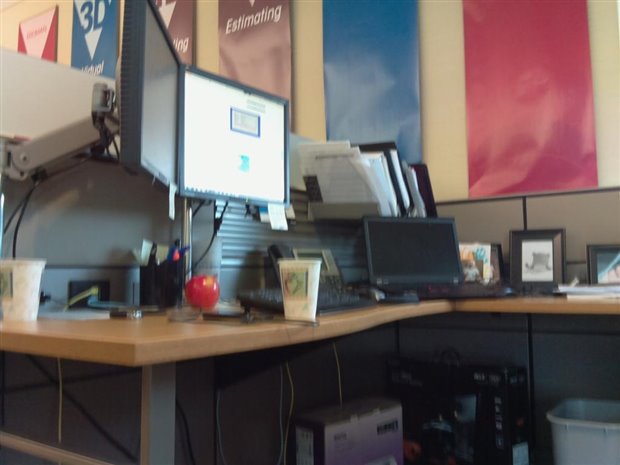
Here are a couple of images of the Pi running on the Atrix.

image

image

image

Here is a short description on how to hook up the camera.


Install the Raspberry Pi Camera module by inserting the cable into the Raspberry Pi. The cable slots into the connector situated between the Ethernet and HDMI ports, with the silver connectors facing the HDMI port.


Boot up your Raspberry Pi.

From the prompt, run "sudo raspi-config". If the "camera" option is not listed, you will need to run a few commands to update your Raspberry Pi. Run "sudo apt-get update" and "sudo apt-get upgrade"

image

Run "sudo raspi-config" again - you should now see the "camera" option.

image


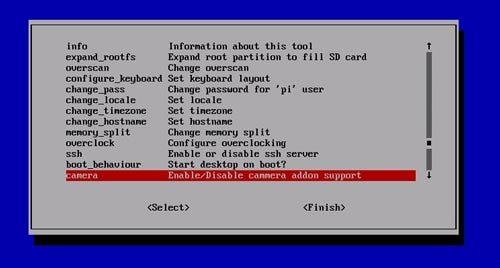
Navigate to the "camera" option, and enable it. Select “Finish” and reboot your Raspberry Pi.

I noticed after the “upgrade” was complete my screen icons where not showing.  The fix for this was changing the config.txt file to say “disable_overscan=1”

Here are a couple of images that I took using the pi camera.  I was surprised at the image quality that came out of this little camera. I look forward to seeing what kind of video this will produce.

image


image


I know some of this has been posted here before but would like to document my whole process so others can repeat.  My next post will show how to tear down the Atrix and build a case to incorporate the pi and camera.  Hope you all enjoy.

  • Sign in to reply
element14 Community

element14 is the first online community specifically for engineers. Connect with your peers and get expert answers to your questions.

  • Members
  • Learn
  • Technologies
  • Challenges & Projects
  • Products
  • Store
  • About Us
  • Feedback & Support
  • FAQs
  • Terms of Use
  • Privacy Policy
  • Legal and Copyright Notices
  • Sitemap
  • Cookies

An Avnet Company © 2025 Premier Farnell Limited. All Rights Reserved.

Premier Farnell Ltd, registered in England and Wales (no 00876412), registered office: Farnell House, Forge Lane, Leeds LS12 2NE.

ICP 备案号 10220084.

Follow element14

  • X
  • Facebook
  • linkedin
  • YouTube