


The Plan Continued.
- We need to pick an embedded CPU. The requirements are:

- It must handle all of the GPIO (see part 1 for the I/O Table), or about 20 pins.
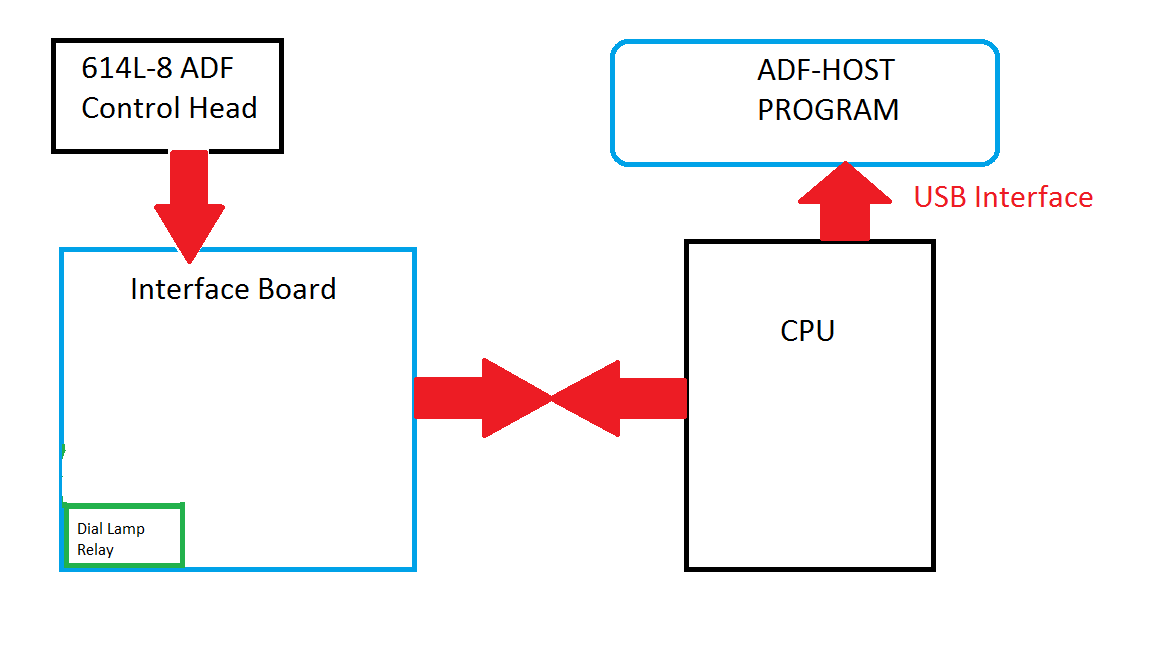
- It needs a USB interface for a data link to talk to the host.
- It needs to generate the BFO signal.
- It needs a PWM output to drive the meter.
- It needs to have a protocol designed for it. But I have to fit into the Radio SubSystem or RSS architecture.
- We need to design an interface card. It should have a relay for the Dial Lamps, and a connection to the Panel Lamp Dimmer. It should have a jack to connect the gain potentiometer to the audio system. It should also have an output for the ADF flags, in various instruments.
- We also need to replace the Syncro with a static or absolute digital encoder. It must be static as when the system powers up there is no guarantee where the dial will be tuned to. Remember this is just an AM radio.
- Here is a block diagram of the ADF system:
- Now we must get the Syncro out of the frame. Here is an abbreviated version, I will post some photos when I do the work.
(TM 11-5826-255-35 page 3-12):- Loosen two Dxus fasteners located on the rear cover, and slide the rear cover off the control unit.
- Remove three screws and three lock washers securing the retaining (rear) plate to the frame.
- Remove the fixed resistor from the retaining (rear) plate by removing the screw.
- Remove four screws and nuts securing the connector to the retaining (rear) plate.
- Remove the retaining (rear) plate.
- Loosen two setscrews on the collar, and remove spur gear from the shaft of helical gear. Note. If the setscrews cannot be reached, the tuning gear train must be disassembled.
- Loosen two setscrews on the collar and remove spur gears from the shaft of the transmitter synchro.
- line-through Remove collar.
- Loosen the three screws located around the transmitter synchro at the shaft end.
- Orient three rim-clinching clamps to permit removal of transmitter synchro and remove transmitter synchro.
- Remember re-assembly is just the reverse order. Make sure that you keep all of the screws, etc. in a nice safe place. What I like to do is to put the screws back where they came from.
keep tuned in, more to come
Cris ~
UPDATES:
- We will no longer use USB for communications we are now using CANaerospace via a CAN Module.
- We will not remove the Synchro steps 3 through 10 are not done. and we will use the Synchro.

