element14 Community
element14 Community
    Register Log In
  • Site
  • Search
  • Log In Register
  • Community Hub
    Community Hub
    • What's New on element14
    • Feedback and Support
    • Benefits of Membership
    • Personal Blogs
    • Members Area
    • Achievement Levels
  • Learn
    Learn
    • Ask an Expert
    • eBooks
    • element14 presents
    • Learning Center
    • Tech Spotlight
    • STEM Academy
    • Webinars, Training and Events
    • Learning Groups
  • Technologies
    Technologies
    • 3D Printing
    • FPGA
    • Industrial Automation
    • Internet of Things
    • Power & Energy
    • Sensors
    • Technology Groups
  • Challenges & Projects
    Challenges & Projects
    • Design Challenges
    • element14 presents Projects
    • Project14
    • Arduino Projects
    • Raspberry Pi Projects
    • Project Groups
  • Products
    Products
    • Arduino
    • Avnet & Tria Boards Community
    • Dev Tools
    • Manufacturers
    • Multicomp Pro
    • Product Groups
    • Raspberry Pi
    • RoadTests & Reviews
  • About Us
    About the element14 Community
  • Store
    Store
    • Visit Your Store
    • Choose another store...
      • Europe
      •  Austria (German)
      •  Belgium (Dutch, French)
      •  Bulgaria (Bulgarian)
      •  Czech Republic (Czech)
      •  Denmark (Danish)
      •  Estonia (Estonian)
      •  Finland (Finnish)
      •  France (French)
      •  Germany (German)
      •  Hungary (Hungarian)
      •  Ireland
      •  Israel
      •  Italy (Italian)
      •  Latvia (Latvian)
      •  
      •  Lithuania (Lithuanian)
      •  Netherlands (Dutch)
      •  Norway (Norwegian)
      •  Poland (Polish)
      •  Portugal (Portuguese)
      •  Romania (Romanian)
      •  Russia (Russian)
      •  Slovakia (Slovak)
      •  Slovenia (Slovenian)
      •  Spain (Spanish)
      •  Sweden (Swedish)
      •  Switzerland(German, French)
      •  Turkey (Turkish)
      •  United Kingdom
      • Asia Pacific
      •  Australia
      •  China
      •  Hong Kong
      •  India
      •  Japan
      •  Korea (Korean)
      •  Malaysia
      •  New Zealand
      •  Philippines
      •  Singapore
      •  Taiwan
      •  Thailand (Thai)
      •  Vietnam
      • Americas
      •  Brazil (Portuguese)
      •  Canada
      •  Mexico (Spanish)
      •  United States
      Can't find the country/region you're looking for? Visit our export site or find a local distributor.
  • Translate
  • Profile
  • Settings
Personal Blogs
  • Community Hub
  • More
Personal Blogs
NexGen Flight Simuator Nexgen: Flight Simulator: Hacking The CP-1252/ASN-128: Keyboard Switches
  • Blog
  • Documents
  • Mentions
  • Sub-Groups
  • Tags
  • More
  • Cancel
  • New
  • Share
  • More
  • Cancel
Group Actions
  • Group RSS
  • More
  • Cancel
Engagement
  • Author Author: phoenixcomm
  • Date Created: 28 Feb 2020 8:53 PM Date Created
  • Views 769 views
  • Likes 3 likes
  • Comments 2 comments
  • flight simulator
  • nexgen
  • cp-1252/asn-128
  • keyboard
  • hardware
  • hacking nexgen
Related
Recommended

Nexgen: Flight Simulator: Hacking The CP-1252/ASN-128: Keyboard Switches

phoenixcomm
phoenixcomm
28 Feb 2020

The factor keyboard was set up for scanning. I intend to fire off an interrupt when a key is pressed. This breaks my rule number 1: Do No Harm to the Equipment! But this piece of gear has been stripped before I got them. ( I have three of them. Good for spares!)image

ANALYSIS:

The switches are a To turn this keyboard into an interrupt based keypad from a keypad is run by scanning. You first have to remove all the scan lines. Then you can run a logic ground to each switch (daisy-chained). Next, I have to run a wire from each Normally Open  Contact to a connector.  Each of the switched must be pulled up to 5v via a resistor.

PROGRESS: imageAs shown in the first picture you see how it came from the factory. In the second picture, you see it without the scan lines but still remaining power lines for the Keycaps This alone took four or five hours. I  still have to unsolder the scan lines attached to the switch, the blue and yellow wires, see the photo below. Please note the Gray and White wires as they are the keycap lamps' power.
OriginalWithout Scan LinesSwitch
imageimageimage
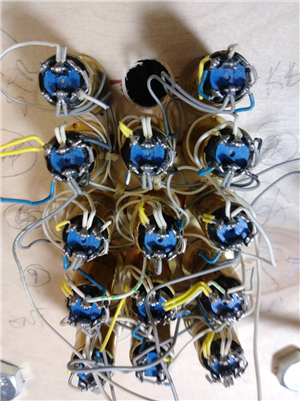
I still have to unsolder the yellow and blue wiresClose up of the switch's rear.

Next, after unsoldering the blue and yellow wires, I will have to cut strip and tin with my solder pot the new black ground wire which will daisy-chain from switch to switch. The plan is to do three rows and one column on the bottom to tie the columns together.

After that feat is done I will attach the data lines to the normally open contact.

Then put plastic tie-wraps all over to hold it in place: fins!

Addendum Jan 28, 2020 I have reached a point where all of the yellow wires. I am still in the middle of adding some ribbon cable to the switches which is terminated with a DB-25F this will work out as when finished I will have one wire per switch(14) this will be wired to pin 2 of the open contact. I will also have to daisy-chain a wire  to all of the pin 4s for ground (15). Then I can use 4pins +28v and 4pins -28v for keycap lamps. After all that is done I will have to prettify the wiring again.

  • Sign in to reply

Top Comments

  • DAB
    DAB over 6 years ago +1
    Nice update. It looks like they were trying to eliminate false switch pushes due to possible EMI issues. For your purpose, you can easily get around scanning with direct interrupts as long as you do not…
  • phoenixcomm
    phoenixcomm over 6 years ago in reply to DAB +1
    Yes, DAB you might be correct I. I am doing something much dirtier. The 14 key switches are feed into a priority encoder this generates a hardware interrupt, but my ISR handles, Keyboard Switches, 2x Rotary…
  • phoenixcomm
    phoenixcomm over 6 years ago in reply to DAB

    Yes, DAB you might be correct I. I am doing something much dirtier. The 14 key switches are feed into a priority encoder this generates a hardware interrupt, but my ISR handles, Keyboard Switches, 2x Rotary Switches, and two thumbwheel switch.  1 Just need two 4 bit ports + 1 hardware interrupt line.

    basically the Arduino get the interrupt and then grabs the port with which device wants to talk. then the Arduino reads the TriState nibble fins! 

    • Cancel
    • Vote Up +1 Vote Down
    • Sign in to reply
    • More
    • Cancel
  • DAB
    DAB over 6 years ago

    Nice update.


    It looks like they were trying to eliminate false switch pushes due to possible EMI issues.

    For your purpose, you can easily get around scanning with direct interrupts as long as you do not get any cross over issues.


    DAB

    • Cancel
    • Vote Up +1 Vote Down
    • Sign in to reply
    • More
    • Cancel
element14 Community

element14 is the first online community specifically for engineers. Connect with your peers and get expert answers to your questions.

  • Members
  • Learn
  • Technologies
  • Challenges & Projects
  • Products
  • Store
  • About Us
  • Feedback & Support
  • FAQs
  • Terms of Use
  • Privacy Policy
  • Legal and Copyright Notices
  • Sitemap
  • Cookies

An Avnet Company © 2026 Premier Farnell Limited. All Rights Reserved.

Premier Farnell Ltd, registered in England and Wales (no 00876412), registered office: Farnell House, Forge Lane, Leeds LS12 2NE.

ICP 备案号 10220084.

Follow element14

  • X
  • Facebook
  • linkedin
  • YouTube