element14 Community
element14 Community
    Register Log In
  • Site
  • Search
  • Log In Register
  • Community Hub
    Community Hub
    • What's New on element14
    • Feedback and Support
    • Benefits of Membership
    • Personal Blogs
    • Members Area
    • Achievement Levels
  • Learn
    Learn
    • Ask an Expert
    • eBooks
    • element14 presents
    • Learning Center
    • Tech Spotlight
    • STEM Academy
    • Webinars, Training and Events
    • Learning Groups
  • Technologies
    Technologies
    • 3D Printing
    • FPGA
    • Industrial Automation
    • Internet of Things
    • Power & Energy
    • Sensors
    • Technology Groups
  • Challenges & Projects
    Challenges & Projects
    • Design Challenges
    • element14 presents Projects
    • Project14
    • Arduino Projects
    • Raspberry Pi Projects
    • Project Groups
  • Products
    Products
    • Arduino
    • Avnet & Tria Boards Community
    • Dev Tools
    • Manufacturers
    • Multicomp Pro
    • Product Groups
    • Raspberry Pi
    • RoadTests & Reviews
  • About Us
  • Store
    Store
    • Visit Your Store
    • Choose another store...
      • Europe
      •  Austria (German)
      •  Belgium (Dutch, French)
      •  Bulgaria (Bulgarian)
      •  Czech Republic (Czech)
      •  Denmark (Danish)
      •  Estonia (Estonian)
      •  Finland (Finnish)
      •  France (French)
      •  Germany (German)
      •  Hungary (Hungarian)
      •  Ireland
      •  Israel
      •  Italy (Italian)
      •  Latvia (Latvian)
      •  
      •  Lithuania (Lithuanian)
      •  Netherlands (Dutch)
      •  Norway (Norwegian)
      •  Poland (Polish)
      •  Portugal (Portuguese)
      •  Romania (Romanian)
      •  Russia (Russian)
      •  Slovakia (Slovak)
      •  Slovenia (Slovenian)
      •  Spain (Spanish)
      •  Sweden (Swedish)
      •  Switzerland(German, French)
      •  Turkey (Turkish)
      •  United Kingdom
      • Asia Pacific
      •  Australia
      •  China
      •  Hong Kong
      •  India
      •  Korea (Korean)
      •  Malaysia
      •  New Zealand
      •  Philippines
      •  Singapore
      •  Taiwan
      •  Thailand (Thai)
      • Americas
      •  Brazil (Portuguese)
      •  Canada
      •  Mexico (Spanish)
      •  United States
      Can't find the country/region you're looking for? Visit our export site or find a local distributor.
  • Translate
  • Profile
  • Settings
Personal Blogs
  • Community Hub
  • More
Personal Blogs
NexGen Flight Simuator NexGen: Hacking: Loadmeter, Dual, Weston 248697
  • Blog
  • Documents
  • Mentions
  • Sub-Groups
  • Tags
  • More
  • Cancel
  • New
  • Share
  • More
  • Cancel
Group Actions
  • Group RSS
  • More
  • Cancel
Engagement
  • Author Author: phoenixcomm
  • Date Created: 21 Mar 2023 9:49 PM Date Created
  • Views 329 views
  • Likes 6 likes
  • Comments 0 comments
  • flight simulator
  • nexgen
  • diy cockpit
  • arduino mega 2560
  • 248697
  • hardware
  • dual
  • weston
  • software_design
  • Loadmeter
  • software
Related
Recommended

NexGen: Hacking: Loadmeter, Dual, Weston 248697

phoenixcomm
phoenixcomm
21 Mar 2023
image
image

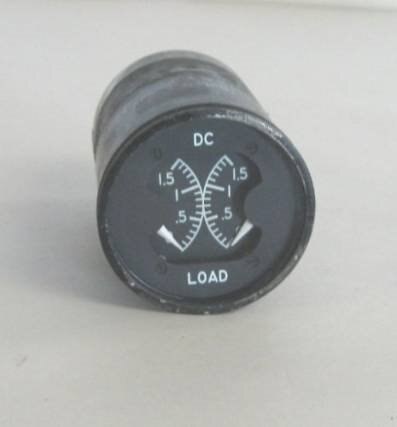
The Analysis: The Loadmeter is divided into 3 parts. Parts 1 and 2 are identical and are the meters. Part 3 is the lighting equipment. Let's talk about the meter for a minute.  The meter is most likely a D'Arsonval movement. . It consists of a movable coil placed within the field of a permanent magnet. image The Image on the left is from instrumentationtools.com/darsonval-movement/# So basically it is a little motor. That is the spring(s) hold the meter to 0 and when a voltage is applied to the coil, the meter is deflected. 
Now the meter scale is 0 to 1.5 in 15 ticks, so I have to come up with 15 values (resistors) essentially a voltage divider, but I think I will do it a little easier, and here's how. First I find the voltage to go to full scale with my adjustable power supply. I must pick a resistor value to set the full-scale defection from the Arduino's analog write. for this I will only use A(+) and B(-) connections to the meter. Remember I only have to do this for one meter, not both, as I will replicate the solution on the other side as well.
My Power Supply's output at 0 Vdc bounces the meter around, so this tack is a bust. Since the maximum voltage on the Arduino Mega's analogWrite() is 5 Vdc. I will use the map() function to control the voltage to the meter via the analogWrite(pin1, meter1) command where pin1 and meter1 are defined. So here is my codebase:

#define meter1
#define meter2
#define pin1 8
#define pin2 9

// CONSTANTS
#define 3// CONSTANTS0sec 30000;
#define inMin 0;
#define inMax 255;
#define outMin 0;
#define outMax 100;

void setup() {
Serial.begin (9600);}

void loop() {
for (inputVal = 0; inputValue < 256; inputValue++ ) {
delay( 30sec );
meter1 = map( inputVal, inMin, inMax, outMin, outMax);
analogWrite( pin1, meter1);

Serial.print( "Map Value = ");
Serial.println( meter1 );
}}
image

Later:

  • Sign in to reply
element14 Community

element14 is the first online community specifically for engineers. Connect with your peers and get expert answers to your questions.

  • Members
  • Learn
  • Technologies
  • Challenges & Projects
  • Products
  • Store
  • About Us
  • Feedback & Support
  • FAQs
  • Terms of Use
  • Privacy Policy
  • Legal and Copyright Notices
  • Sitemap
  • Cookies

An Avnet Company © 2025 Premier Farnell Limited. All Rights Reserved.

Premier Farnell Ltd, registered in England and Wales (no 00876412), registered office: Farnell House, Forge Lane, Leeds LS12 2NE.

ICP 备案号 10220084.

Follow element14

  • X
  • Facebook
  • linkedin
  • YouTube