


Wire, wire, wire; So here we go I have to straighten this mess up. The Problem: I have lots of Arduinos all over, and since I embraced NASA's EADIN Lite RS485 protocols for my RSS, and Now the Joystick, Throttles, etc. the hardware keeps piling up. 
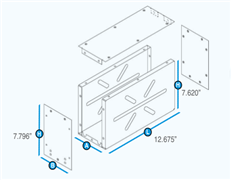
A Solution: I should do this like we do in aircraft, and that is to use ATR boxes (see note 1), the problem is that now its big bucks. And then the rack, not to mention the connectors. Sticker Shock.  There has to be a cheaper way. Hey, we're not flying, right?
The Solution: Please don't laugh. 
 |
|

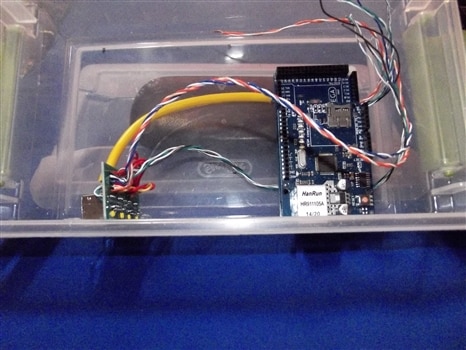
This box is a ubiquitous Sterilite Small Clip Box with Aquarium Latches - 11" L x 6-5/8" W x 2-3/4" H and can be had for less than $3.00 ea. This means that I can mount an 8.5" x 4" PCB in the bottom. Since I am standardizing on the Arduino Mega for my base unit. There is enough room on the long side for connectors. The problem is, well try to mount the damn thing. I really wish that they were built like the Launchpads from TI. Solutions waiting to bite me.
Arduino's come pre-assembled with headers, but you can find them with the headers un-installed. So basically you solder the headers that came with the Arduino to the PCB (let's call it a baseboard). Now you need to change the header on the Arduino itself to single level pins and plug it together. Then before you plug it together attach the mount (you have to mod it though) to the baseboard, and then bolt the baseboard into the box. Nice we just made a sandwich. 
 | ||
| J1 | J2 | |
| 1-2 | 1-2 | Data |
| 3-4 | 3-4 | Bus |
| 5-6 | 5-6 | DMon |
| 7 | x | PWR1 |
| x | 7 | PWR2 |
| 8 | 8 | Ground |
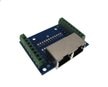
Now we need two interface connectors, for RS-485, as this is a daisy chain that means one in, one out. Originally I planned to use a USB(A) male-male jumpers, but as a requirement of 485 is that you use twisted pair wire. Now ethernet is 4 pairs of twisted pairs. I'm now buying them without the screw terminals installed.
This breakout module has No Magnetics.
Now a little, wire jumper the J1(1, 2) to J2(1, 2) this is the data pair. jumper J1(3, 4) to J2(3, 4) this is ground, and power. J1(5,6) to J2(5,6) is the data monitoring the Arduino. One leg must have a 400Ω resistor for current limiting ( less than 20ma ). J1(7) and J2 (7) is the power indication. J1(8) and J2(8) is the power lamps ground.
Indicator LEDs Operation:
- Both Data Monitor LED are bi-directional and slaved together. The color will change upon receiving or transmitting.
- Power LED on J1 is driven from an output pin from the Arduino.
- Power LED on J2 is driven from an output pin from the Arduino, only when it sees the box attached to J2.
Box Differences:
 |
 |
- Master has an Ethernet Connector. Converts RS-485 Slave data to Ethernet packets and perform housekeeping tasks of sorts.
- Slaves only communicate with the Master. The slave major responsibility is to pass data from/to the "device" ie a radio head, encode it, and pass it to the Master. There is also a 4-bit dip switch as to allow for box ids. This will allow the easier identification in the Host (Linux Box) IOP "Input-Output Processor", ie RSS-IOP software.
My world this first box is really ugly, I used a Dremel and tried to freehand it.  But I am working with a JIG to stabilize the polypro with a 1/8" scroll drill, and a 1/16" mill bit (nice hard edges) and next time, I have to nail it.
Stay Tuned More to Come.
~~ Cris 
Go To Part 2 ATR Box Universal Design
REVISIONS:
- Added "Part 2" Link.
 6/26/2018

NOTES:
- ATR or 'Aircraft Transport Radio' is a group of standards promulgated by ARINC.
- ARINC Aeronautical Radio, Incorporated
- NASA's EADIN Lite RS485 protocols
- EADIN Lite Gitub Repossitory


