element14 Community
element14 Community
    Register Log In
  • Site
  • Search
  • Log In Register
  • Community Hub
    Community Hub
    • What's New on element14
    • Feedback and Support
    • Benefits of Membership
    • Personal Blogs
    • Members Area
    • Achievement Levels
  • Learn
    Learn
    • Ask an Expert
    • eBooks
    • element14 presents
    • Learning Center
    • Tech Spotlight
    • STEM Academy
    • Webinars, Training and Events
    • Learning Groups
  • Technologies
    Technologies
    • 3D Printing
    • FPGA
    • Industrial Automation
    • Internet of Things
    • Power & Energy
    • Sensors
    • Technology Groups
  • Challenges & Projects
    Challenges & Projects
    • Design Challenges
    • element14 presents Projects
    • Project14
    • Arduino Projects
    • Raspberry Pi Projects
    • Project Groups
  • Products
    Products
    • Arduino
    • Avnet & Tria Boards Community
    • Dev Tools
    • Manufacturers
    • Multicomp Pro
    • Product Groups
    • Raspberry Pi
    • RoadTests & Reviews
  • About Us
    About the element14 Community
  • Store
    Store
    • Visit Your Store
    • Choose another store...
      • Europe
      •  Austria (German)
      •  Belgium (Dutch, French)
      •  Bulgaria (Bulgarian)
      •  Czech Republic (Czech)
      •  Denmark (Danish)
      •  Estonia (Estonian)
      •  Finland (Finnish)
      •  France (French)
      •  Germany (German)
      •  Hungary (Hungarian)
      •  Ireland
      •  Israel
      •  Italy (Italian)
      •  Latvia (Latvian)
      •  
      •  Lithuania (Lithuanian)
      •  Netherlands (Dutch)
      •  Norway (Norwegian)
      •  Poland (Polish)
      •  Portugal (Portuguese)
      •  Romania (Romanian)
      •  Russia (Russian)
      •  Slovakia (Slovak)
      •  Slovenia (Slovenian)
      •  Spain (Spanish)
      •  Sweden (Swedish)
      •  Switzerland(German, French)
      •  Turkey (Turkish)
      •  United Kingdom
      • Asia Pacific
      •  Australia
      •  China
      •  Hong Kong
      •  India
      •  Japan
      •  Korea (Korean)
      •  Malaysia
      •  New Zealand
      •  Philippines
      •  Singapore
      •  Taiwan
      •  Thailand (Thai)
      •  Vietnam
      • Americas
      •  Brazil (Portuguese)
      •  Canada
      •  Mexico (Spanish)
      •  United States
      Can't find the country/region you're looking for? Visit our export site or find a local distributor.
  • Translate
  • Profile
  • Settings
Personal Blogs
  • Community Hub
  • More
Personal Blogs
NexGen Flight Simuator Radio Set, Control Unit, C-3436A/ARN-30D (in ATR.polly)
  • Blog
  • Documents
  • Mentions
  • Sub-Groups
  • Tags
  • More
  • Cancel
  • New
  • Share
  • More
  • Cancel
Group Actions
  • Group RSS
  • More
  • Cancel
Engagement
  • Author Author: phoenixcomm
  • Date Created: 14 Jun 2019 1:51 AM Date Created
  • Views 418 views
  • Likes 2 likes
  • Comments 1 comment
  • diy cockpit
  • c-3436a/arn-30d
  • atr box
  • rs-485
  • mil-std 1130c
  • wire-wap
  • arduino
  • diy electronics
  • t-586b
Related
Recommended

Radio Set, Control Unit, C-3436A/ARN-30D (in ATR.polly)

phoenixcomm
phoenixcomm
14 Jun 2019

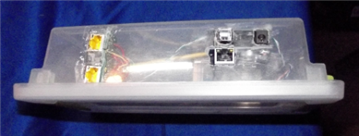
Here is what the current interface is; I have installed the prototype cards into an ATR.poly slave. It has 2 RJ45 for the RS-485 which is almost wired pin for pin. I use T-586B for my RJ45 (yellow RS-485) links downstream and upstream, as well as 2 DB-25 Wire-Wrap tails installed along on one of the long sides. I have also mounted an RS-485 to Android Converter which has been installed into two small female headers (these will be standard on the PCB).  The photo on the right below was my functional prototype. If you look at the left side of the photo you will see the DB-25 as well. The Molex connector in the foreground is a hard drive male connector and it will be soldered on to the PCB as well, I need to have 5volts for the Arduino, Ground, 24vdc for lights and its own ground.  image

image
image

As you can see from the photos this was my first attempt at an ATR.poly MASTER as the Master is the interface with an Ethernet connection. Also, you will notice the three groups of wire two at the top the other below:image

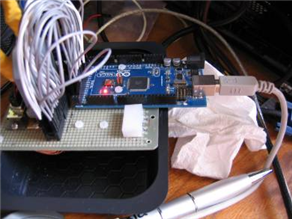
   One group is for data.

   The second Group is for Status lamps

   The third group I can't remember as my functional unit is packed as well as my Documentation.

When the PCB comes in then mess goes away. Instead, nothing is plugged into Arduino directly, like all of the RS-485 wires will just simply be soldered to the baseboard, into which the Arduino will just plug into. Around the Arduino, there will be male Wire-Wrap headers to take care of jumpers ie. between RS-485 module and Arduino itself. And life is good. BTW Wire-Wrap is not twisting two wires together. This technique provides a  gas-tight joint, just as reliable as a soldered joint. If you are interested in this method please refer to MIL-STD 1130C. Here is a picture of the tool.
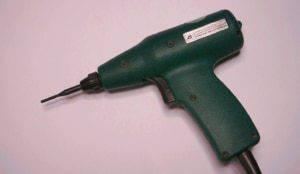
 image

  • Sign in to reply
Parents
  • DAB
    DAB over 6 years ago

    Now that brings back some memories.


    DAB

    • Cancel
    • Vote Up 0 Vote Down
    • Sign in to reply
    • More
    • Cancel
Comment
  • DAB
    DAB over 6 years ago

    Now that brings back some memories.


    DAB

    • Cancel
    • Vote Up 0 Vote Down
    • Sign in to reply
    • More
    • Cancel
Children
No Data
element14 Community

element14 is the first online community specifically for engineers. Connect with your peers and get expert answers to your questions.

  • Members
  • Learn
  • Technologies
  • Challenges & Projects
  • Products
  • Store
  • About Us
  • Feedback & Support
  • FAQs
  • Terms of Use
  • Privacy Policy
  • Legal and Copyright Notices
  • Sitemap
  • Cookies

An Avnet Company © 2026 Premier Farnell Limited. All Rights Reserved.

Premier Farnell Ltd, registered in England and Wales (no 00876412), registered office: Farnell House, Forge Lane, Leeds LS12 2NE.

ICP 备案号 10220084.

Follow element14

  • X
  • Facebook
  • linkedin
  • YouTube