


I gave up on the button issue for the time being, and started from scratch with a new project file to work on my clock display.
I created a new project pretty much using the exact steps as outlined in the document XL_STAR_Introduction.pdf in "part 8. Writing Your Own Code".
I used the diagram from part 7 of that document to learn how the orange star LEDs are connected.
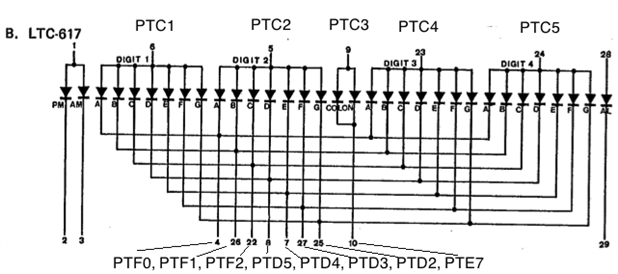
I then pulled up the diagram for my LTC-617D1G clock display and with a few test leads determined how the pins were numbered, and which side was anode and which was cathode.
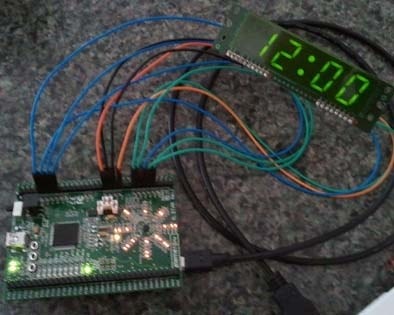
Using the two diagrams together, I assigned XL_Star pins to the display pins, and connected them using standard F-F patch wires (I had previously soldered headers onto the XL_Star and the clock display). The picture shows generally how they were connected, but the attached LTC-617 diagram has my pin connections listed.
Note that pin 1 on the clock display is at the bottom left, and every hole counts, even the ones that don't have any connections. In my case, "pins" 11 to 21 are just holes. And I left am/pm and alarm disconnected for now.
Then I started with the very basic code to turn on a single LED, which is attached as main_basic_led.c (renamed from main.c in my project)
Once I had that figured out, I went on to write the function to display a specific digit in one of the four positions.
For this basic clock display, each digit is just a 7 segment display, so I could have used a separate BCD to 7-seg chip, but that's more hardware I prefer to avoid. So I did the same thing in code.
You might have noticed from the LTC diagram that the 7 segments are all connected to the same 7 pins - this means only one digit can be shown at at time. So we need to put power to one of the top pins to select which of the clock digit positions is active.
I also added a function to show the colon in the middle.
Then I added a function to display a time, which shows all 4 digits and the colon in sequence, keeping each item lit for a brief amount of time using a small delay loop. Calling this function repeatedly in the main forever-for loop makes it look like all digits on the clock are displayed. In reality it flashes really fast, and if you increase the delays you'll see the flashing as it shows each individual clock digit.
I also noticed that digits with fewer LEDs lit were brighter than others, so I made the delay depend on how many LEDs are lit. For example, the colon, and the 1 have 2 LEDs lit, so it stays on for 200 loop counts. An 8 has 7 LEDs lit, so it stays on for 700 loop counts. This very basic approach actually seems to work well to make all the digits appear to have the same brightness.
I used a macro named DELAY to do the delay loop. Note that if you add any variable access or math, the loop will take longer as it takes clock cycles to do math and variable fetching and such. That's why I always set a variable that I pass into the macro, to keep the delay loop predictable.
And that's as far as I got this morning. The clock display doesn't actually display a time yet, so I set it to 12:00 to simulate the average VCR 
My wife says I need to make it flash on the 12:00 though, so I guess I need to figure out the timers next!
ps, the LTC-617 display is something I got in a grab-bag of displays a while back, so I assume they are cheap and plentiful (I have about 4 of them), and otherwise you can probably rip one out of an old clock radio.
Attached:
clock_running.jpg - a picture of the clock display running connected to the XL_Star board.
LTC-617 connections.png - the pin connections for the LTC display connected to the XL_Star board.
main_basic_led.c - the source code for lighting a single LED in the star, and it lights the colon if you have the clock display connected.
main_clock.c - the source code for lighting up digits on the clock display. Without the clock it lights up patterns in the star.