element14 Community
element14 Community
    Register Log In
  • Site
  • Search
  • Log In Register
  • Community Hub
    Community Hub
    • What's New on element14
    • Feedback and Support
    • Benefits of Membership
    • Personal Blogs
    • Members Area
    • Achievement Levels
  • Learn
    Learn
    • Ask an Expert
    • eBooks
    • element14 presents
    • Learning Center
    • Tech Spotlight
    • STEM Academy
    • Webinars, Training and Events
    • Learning Groups
  • Technologies
    Technologies
    • 3D Printing
    • FPGA
    • Industrial Automation
    • Internet of Things
    • Power & Energy
    • Sensors
    • Technology Groups
  • Challenges & Projects
    Challenges & Projects
    • Design Challenges
    • element14 presents Projects
    • Project14
    • Arduino Projects
    • Raspberry Pi Projects
    • Project Groups
  • Products
    Products
    • Arduino
    • Avnet & Tria Boards Community
    • Dev Tools
    • Manufacturers
    • Multicomp Pro
    • Product Groups
    • Raspberry Pi
    • RoadTests & Reviews
  • About Us
  • Store
    Store
    • Visit Your Store
    • Choose another store...
      • Europe
      •  Austria (German)
      •  Belgium (Dutch, French)
      •  Bulgaria (Bulgarian)
      •  Czech Republic (Czech)
      •  Denmark (Danish)
      •  Estonia (Estonian)
      •  Finland (Finnish)
      •  France (French)
      •  Germany (German)
      •  Hungary (Hungarian)
      •  Ireland
      •  Israel
      •  Italy (Italian)
      •  Latvia (Latvian)
      •  
      •  Lithuania (Lithuanian)
      •  Netherlands (Dutch)
      •  Norway (Norwegian)
      •  Poland (Polish)
      •  Portugal (Portuguese)
      •  Romania (Romanian)
      •  Russia (Russian)
      •  Slovakia (Slovak)
      •  Slovenia (Slovenian)
      •  Spain (Spanish)
      •  Sweden (Swedish)
      •  Switzerland(German, French)
      •  Turkey (Turkish)
      •  United Kingdom
      • Asia Pacific
      •  Australia
      •  China
      •  Hong Kong
      •  India
      •  Korea (Korean)
      •  Malaysia
      •  New Zealand
      •  Philippines
      •  Singapore
      •  Taiwan
      •  Thailand (Thai)
      • Americas
      •  Brazil (Portuguese)
      •  Canada
      •  Mexico (Spanish)
      •  United States
      Can't find the country/region you're looking for? Visit our export site or find a local distributor.
  • Translate
  • Profile
  • Settings
Personal Blogs
  • Community Hub
  • More
Personal Blogs
Nico teWinkel's Blog MBED.org with FRDM-KL25z vs my Favourite Arduino Tutorial
  • Blog
  • Documents
  • Mentions
  • Sub-Groups
  • Tags
  • More
  • Cancel
  • New
  • Share
  • More
  • Cancel
Group Actions
  • Group RSS
  • More
  • Cancel
Engagement
  • Author Author: ntewinkel
  • Date Created: 12 May 2013 7:40 PM Date Created
  • Views 1104 views
  • Likes 1 like
  • Comments 3 comments
  • tutorial
  • compare
  • frdm-kl25z
  • frdm–kl25z
  • arduino
  • codeexchange
Related
Recommended

MBED.org with FRDM-KL25z vs my Favourite Arduino Tutorial

ntewinkel
ntewinkel
12 May 2013

For the longest time, Arduino has been my favourite development environment simply because it is so easy to use.


Now, mbed.org and the FRDM-KL25z board are looking like they might become my new favourite.


The reason for that is based on my hobby needs: the board is very affordable and with mbed.org is very easy to setup and program. The fact that it's also faster and more capable and has a few extra options (LEDs and touch slider) are a nice bonus.


Those who may have read some of my comments in the Arduino forum might have noticed that I have a fondness for a certain Oomlout tutorial - to me, that tutorial is unbeatable because it's very well written, easy to follow, and shows how to use a set of common building blocks that prepare the student for a wide range of possible projects.

You can find it here: http://www.oomlout.com/a/products/ardx/

Thanks again, and hats off, to Oomlout!


That tutorial was written for Arduino, but I now want to apply it to my FRDM board to compare how easy (or difficult) it might be to get these basic circuits going with mbed and FRDM.


Getting Started

Freescale and Mbed.org make it easy to get started, by providing clear and easy steps specific to the FRDM-KL25z board:

https://mbed.org/handbook/mbed-FRDM-KL25Z-Getting-Started


One of the first things I noticed is that the environment looks different and perhaps a little more capable than the basic Arduino IDE, but at the same time if you open up main.cpp of the starting examples, you'll notice that it isn't any more difficult than Arduino.


For example, here is the Arduino Blink:

int led = 13;


// the setup routine runs once when you press reset:

void setup() {               

  // initialize the digital pin as an output.

  pinMode(led, OUTPUT);    

}


// the loop routine runs over and over again forever:

void loop() {

  digitalWrite(led, HIGH);   // turn the LED on (HIGH is the voltage level)

  delay(1000);               // wait for a second

  digitalWrite(led, LOW);    // turn the LED off by making the voltage LOW

  delay(1000);               // wait for a second

}


And here is the Mbed.org example:


#include "mbed.h"


DigitalOut myled(LED1);


int main() {

    while(1) {

        myled = 1;

        wait(0.2);

        myled = 0;

        wait(0.2);

    }

}


In mbed, you don't get the setup() and loop() bits, but instead you have one main() function. I feel that it simplifies things for me: the "while(1)" loop is the same as the Arduino loop(), and any code before that can be considered as setup() code.


The use of pins is also slightly different. Rather than setting a PinMode in setup and then using digitalWrite, mbed simplifies it by defining "myled" as being DigitalOut, and then simply assigning the value to it when required. So you define it as digital to begin with, rather than every time you use it.


The only question that brings up is that I'm not sure how mbed would handle the idea of switching a pin between input and output or analog and digital during use (but that might be an advanced topic anyway).


So at least for the Blink example, it's all pretty easy.


Lots of Examples

The other thing I noticed is that LOTS of examples are available for all kinds of hardware. So getting started on any similar project will be much easier.

I found that mbed.org is set up in a way that makes sharing code very easy to do - it also makes finding code samples very easy that way.

Have a look at what's available: https://mbed.org/cookbook/Homepage


But before diving into all those awesome examples, it might be a good idea to start with these easy examples:

http://mbed.org/handbook/mbed-FRDM-KL25Z-Examples

Note that you can simply click one button to import them into your own mbed compiler environment!


Now tell me about all those pins

The one thing I found a bit harder about the FRDM board is that the pins are not clearly marked on the board as they are on Arduino. The FRDM board has more "stuff" and more pins, so physically it just doesn't have the space to print all the pin numbers on the board.

That means you have to use the handy reference card that comes with it.

Or check out this page, which has a very nicely laid out picture that gives even more information: http://mbed.org/handbook/mbed-FRDM-KL25Z


One thing I'm still having trouble finding is what the pre-defined pins names are. The blink example uses LED1, for example, but I'd like to know what pin that connects to. I did find it in the User Manual, and maybe that's all that is needed. I think I was just hoping for an easy option within the compiler somewhere.


On that note, the Red LED is PTB18, the Green LED is PTB19, and the Blue LED is PTD1, which is also known as D13 (to match Arduino I suppose), and is pin 10 on J2.


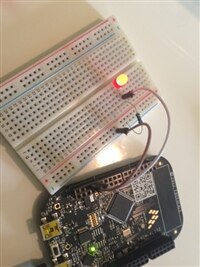
Now that I have that information, I can hook up my external LED to try out CIRC-01 from the Oomlout tutorial! (using the mbed HelloWorld example)


And success!


image

A couple of notes:

* The manual says that the Blue LED is pin 10 on J2, but the reference card marks that pin as 12. I went by the name PTD1, which worked.

* D13 is a nice touch - that's the same as Arduino image


That's it for now.


Cheers,

-Nico

  • Sign in to reply

Top Comments

  • DAB
    DAB over 12 years ago +1
    Great update Nico, I had looked at Mbed a long while ago, but did not know that they supported the Freedom board until you mentioned it. It looks like they did a good job of simplifying the command set…
  • shabaz
    shabaz over 12 years ago in reply to DAB +1
    Its really a game-changer, these boards are so easy to use and so low cost, that they are ideal for use around the home or lab for when you need a controller for testing out some hardware, or even for…
  • mcb1
    mcb1 over 12 years ago in reply to shabaz +1
    Nico I struggled with the pins, and designations. In the end I opened up the .h file (can't recall exactly) and they are there. From memory you can use LED1, LED2 and LED3. Watch out if you want to PWM…
  • mcb1
    mcb1 over 12 years ago in reply to shabaz

    Nico

    I struggled with the pins, and designations.


    In the end I opened up the .h file (can't recall exactly) and they are there.

    From memory you can use LED1, LED2 and LED3.


    Watch out if you want to PWM.

    You need to change the pin type from Digital, whereas the Arduino IDE only cares if its an input or output.


    Mark

    • Cancel
    • Vote Up +1 Vote Down
    • Sign in to reply
    • More
    • Cancel
  • shabaz
    shabaz over 12 years ago in reply to DAB

    Its really a game-changer, these boards are so easy to use and so low cost, that they are ideal for use around the home or lab for when you need a controller for testing out some hardware, or even for small-scale permanent projects and not bothering making a custom PCB becuase this board is already very compact and thin for squeezing into some space, and very cheap and powerful. To put it into perspective, it is about the size of a playing card, and probably 5 of them could stack into a playing card deck if you remove the rubber feet.

    • Cancel
    • Vote Up +1 Vote Down
    • Sign in to reply
    • More
    • Cancel
  • DAB
    DAB over 12 years ago

    Great update Nico,


    I had looked at Mbed a long while ago, but did not know that they supported the Freedom board until you mentioned it.


    It looks like they did a good job of simplifying the command set for the embedded users with a nice set of commands.


    I think the Freedom board just got a lot more useful for beginners.


    Thanks,

    DAB

    • Cancel
    • Vote Up +1 Vote Down
    • Sign in to reply
    • More
    • Cancel
element14 Community

element14 is the first online community specifically for engineers. Connect with your peers and get expert answers to your questions.

  • Members
  • Learn
  • Technologies
  • Challenges & Projects
  • Products
  • Store
  • About Us
  • Feedback & Support
  • FAQs
  • Terms of Use
  • Privacy Policy
  • Legal and Copyright Notices
  • Sitemap
  • Cookies

An Avnet Company © 2025 Premier Farnell Limited. All Rights Reserved.

Premier Farnell Ltd, registered in England and Wales (no 00876412), registered office: Farnell House, Forge Lane, Leeds LS12 2NE.

ICP 备案号 10220084.

Follow element14

  • X
  • Facebook
  • linkedin
  • YouTube