element14 Community
element14 Community
    Register Log In
  • Site
  • Search
  • Log In Register
  • Community Hub
    Community Hub
    • What's New on element14
    • Feedback and Support
    • Benefits of Membership
    • Personal Blogs
    • Members Area
    • Achievement Levels
  • Learn
    Learn
    • Ask an Expert
    • eBooks
    • element14 presents
    • Learning Center
    • Tech Spotlight
    • STEM Academy
    • Webinars, Training and Events
    • Learning Groups
  • Technologies
    Technologies
    • 3D Printing
    • FPGA
    • Industrial Automation
    • Internet of Things
    • Power & Energy
    • Sensors
    • Technology Groups
  • Challenges & Projects
    Challenges & Projects
    • Design Challenges
    • element14 presents Projects
    • Project14
    • Arduino Projects
    • Raspberry Pi Projects
    • Project Groups
  • Products
    Products
    • Arduino
    • Avnet Boards Community
    • Dev Tools
    • Manufacturers
    • Multicomp Pro
    • Product Groups
    • Raspberry Pi
    • RoadTests & Reviews
  • About Us
  • Store
    Store
    • Visit Your Store
    • Choose another store...
      • Europe
      •  Austria (German)
      •  Belgium (Dutch, French)
      •  Bulgaria (Bulgarian)
      •  Czech Republic (Czech)
      •  Denmark (Danish)
      •  Estonia (Estonian)
      •  Finland (Finnish)
      •  France (French)
      •  Germany (German)
      •  Hungary (Hungarian)
      •  Ireland
      •  Israel
      •  Italy (Italian)
      •  Latvia (Latvian)
      •  
      •  Lithuania (Lithuanian)
      •  Netherlands (Dutch)
      •  Norway (Norwegian)
      •  Poland (Polish)
      •  Portugal (Portuguese)
      •  Romania (Romanian)
      •  Russia (Russian)
      •  Slovakia (Slovak)
      •  Slovenia (Slovenian)
      •  Spain (Spanish)
      •  Sweden (Swedish)
      •  Switzerland(German, French)
      •  Turkey (Turkish)
      •  United Kingdom
      • Asia Pacific
      •  Australia
      •  China
      •  Hong Kong
      •  India
      •  Korea (Korean)
      •  Malaysia
      •  New Zealand
      •  Philippines
      •  Singapore
      •  Taiwan
      •  Thailand (Thai)
      • Americas
      •  Brazil (Portuguese)
      •  Canada
      •  Mexico (Spanish)
      •  United States
      Can't find the country/region you're looking for? Visit our export site or find a local distributor.
  • Translate
  • Profile
  • Settings
Personal Blogs
  • Community Hub
  • More
Personal Blogs
Nico teWinkel's Blog Nail Polish Short-proofing?
  • Blog
  • Documents
  • Mentions
  • Sub-Groups
  • Tags
  • More
  • Cancel
  • New
  • Share
  • More
  • Cancel
Group Actions
  • Group RSS
  • More
  • Cancel
Engagement
  • Author Author: ntewinkel
  • Date Created: 26 May 2018 11:57 PM Date Created
  • Views 3549 views
  • Likes 10 likes
  • Comments 18 comments
  • nail polish
  • conformal
  • heat_shrink_tube
  • conformal coating
Related
Recommended

Nail Polish Short-proofing?

ntewinkel
ntewinkel
26 May 2018

Hi all,


I just kind of randomly came across a thread discussing using nail polish to cover electrical connections to avoid shorts, especially for the backs of home made PCBs.

There are commercially available "conformal coatings" you can use, but they are somewhat more pricey, and I guess a fair bit more boring image


So I went to the dollar store yesterday and picked me up some of this!

image


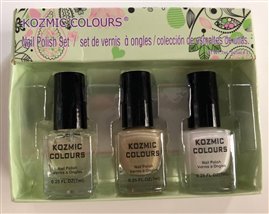
Only $1.50 (Canadian dollars even!)

I was thinking I might use it on a past or future PCB to coat the back.


This is the first time I've ever bought nail polish, which I think explains the conservative colours image

It says "Kozmic Colours", so just imagine the variety available! I thought I'd avoid the sparkly ones though, as I wasn't sure if that might be conductive.


Then today I soldered a light resistor onto some wires, and then wished I had remembered to put on some heat shrink tubes. The shrink tubes were aaaalll the way in the workshop and I was being lazy image

Then I realized I could probably use the nail polish for this!

imageimage


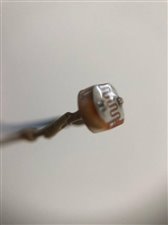
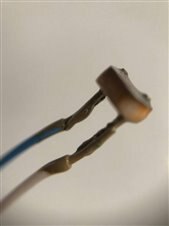
It looks like it does the trick - as you can see in the pictures, it has fully coated the exposed wires. It's easier than dealing with heat shrink tubing, and can be added as an afterthought. It's not as rugged as heat shrink tubing, but for many of these smaller light-duty cases it's perfect.


Next time - red and black!


Cheers,

-Nico


edit: I just did a quick resistance test, and I can clip the test leads right beside each other on a (coated) pin of the sensor with full resistance.

  • Sign in to reply

Top Comments

  • jw0752
    jw0752 over 7 years ago +5
    Hi Nico, I would be interested in learning more about its insulation value. I am sure you could increase the insulation value by putting multiple coats on it. If smell is any indication it should be pretty…
  • mcb1
    mcb1 over 7 years ago +4
    This is the first time I've ever bought nail polish Are you sure .... For higher power/mains systems I can't see it meeting any sort of voltage rating, but for low voltage, if it gets you out of a problem…
  • mcb1
    mcb1 over 7 years ago in reply to jw0752 +4
    I'm starting to get worried now that you boys are becoming proficient in buying and using nail polish. The proper coatings might be a worthwhile roadtest. What do you think rscasny ( about the road test…
Parents
  • 14rhb
    14rhb over 7 years ago

    Hi Nico,


    What a great idea...and they have their very own precision brush. I like the idea of red and black (maybe not on the same hand thoughimage ).


    In the past I've used Polyurethane varnish to seal PCBs and stop them corroding; but you need to find a brush, and afterwards clean it. Actually I sometimes use a sqaure of kitchen paper, roll it up and use that as it saves on cleaning a brush. If I've made my own PCB I sometimes don't remove the photoresist that has been hardened by UV light, as that leaves a nice protective layer on some of the board.


    On a project where I manually soldered WS2812 chains (as shown below) I once used some clear silicone sealant to protect the joints. See below but do not ever use silicone ! [Editted: see mcb1 helpful comment below]. Over than I added some black silicone to make it all look better and add a second layer of protection....

    image

    I didn't think it through as most cheap diy silicones release strong acetic acid whilst curing - that will gradually corrode the board. Another really bad fail on my choice was that the black silicone wasn't new. As it hadn't formed a solid plug of silicone in the cartridge I thought it was still OK....three days later my lovely hard work and project was still gooey image. I had to try and find something to remove the unset silicone but without damaging the PVC insulated cables or the clear lens on the WS2812 pixels. I searched the house for things to try which lead to this test:

    image

    In the end it was kitchen roll and stick to get the worst off, then kitchen roll and white spirit


    Rod

    • Cancel
    • Vote Up +2 Vote Down
    • Sign in to reply
    • More
    • Cancel
  • mcb1
    mcb1 over 7 years ago in reply to 14rhb
    do not ever use silicone !

    Yes well don't use the acid stuff.

    There is a range of non acidic RTV silicon, and some of it never actually sets hard.


    The issue with silicon is if it flexes too much it lifts and then water does get into the very thing you're trying to seal. image


    There is a RTV Silicon remover. It comes in a tube just like the other stuff


    For your application, I'd look at casting resin.

    You can add paint to make it coloured. (see it here What went wrong )


    Mark

    • Cancel
    • Vote Up +2 Vote Down
    • Sign in to reply
    • More
    • Cancel
Comment
  • mcb1
    mcb1 over 7 years ago in reply to 14rhb
    do not ever use silicone !

    Yes well don't use the acid stuff.

    There is a range of non acidic RTV silicon, and some of it never actually sets hard.


    The issue with silicon is if it flexes too much it lifts and then water does get into the very thing you're trying to seal. image


    There is a RTV Silicon remover. It comes in a tube just like the other stuff


    For your application, I'd look at casting resin.

    You can add paint to make it coloured. (see it here What went wrong )


    Mark

    • Cancel
    • Vote Up +2 Vote Down
    • Sign in to reply
    • More
    • Cancel
Children
  • 14rhb
    14rhb over 7 years ago in reply to mcb1

    Hi Mark,


    I was thinking about my post whilst washing the breakfast dishes and thought that very thing image so I'm glad you've added your comment mcb1 to ensure readers aren't entirely put off using silicone by my comment.


    I did actually try using a standard epoxy resin glue (2 part) on a shorter companion run of WS2812 lights to good effect; I had to use hot melt glue to hold each still on a base board, and then add the resin to one side, and when that was dry turn them over and do the other. Perhaps the resin I was using was too runny and I just need to try some different compounds out e.g. thicker and with a retardant. Another set of WS2812 I tried adding hot melt glue to and they also performed well during the few months they were outside in the rain.


    I used my WS2812 to make outdoor Christmas decorations and you are also correct in that eventually the rain/moisture got in: it was quite annoying to see a pixel down as they often stuck on or took out the downstream pixels. I've got a good 1/2 year to repair these decorations so thank you for the helpful link and suggestions.


    A 'dolop' of clear silicone did make a good diffuser of light on the top of each pixel.


    Rod

    • Cancel
    • Vote Up +2 Vote Down
    • Sign in to reply
    • More
    • Cancel
  • mcb1
    mcb1 over 7 years ago in reply to 14rhb

    thicker and with a retardant

    Resin is a chemical reaction, and the heat helps to set the two parts.

    Retardant is used to slow the process down, so if the temperature is too high, it will help to regulate the process.

    The amount of the activator will also change the process speed, so you can experiment a little.


    For one of my set of indicators, it was very cold overnight, so I had to apply a lamp over it to keep it warm overnight and ensure it went off.


    Your decorations idea is great, and it lends itself to making a jig, where a hole would hold the led, allow wiring it and then to help expoxy it.

    You could use bluetac or something plyable to place around the wires, and a simple cardboard circle to go around the base to hold the expoxy in while it sets.


    If you want some very small brushes, go down to your local automotive paint supplier, and see if they have some touch-up brushes.

    imageimage

    Next to a AAA battery.

    I was surprised that Microsoft made such a useful product, that didn't need constant updates and ran reliably for years ....image


    Mark

    • Cancel
    • Vote Up +4 Vote Down
    • Sign in to reply
    • More
    • Cancel
element14 Community

element14 is the first online community specifically for engineers. Connect with your peers and get expert answers to your questions.

  • Members
  • Learn
  • Technologies
  • Challenges & Projects
  • Products
  • Store
  • About Us
  • Feedback & Support
  • FAQs
  • Terms of Use
  • Privacy Policy
  • Legal and Copyright Notices
  • Sitemap
  • Cookies

An Avnet Company © 2025 Premier Farnell Limited. All Rights Reserved.

Premier Farnell Ltd, registered in England and Wales (no 00876412), registered office: Farnell House, Forge Lane, Leeds LS12 2NE.

ICP 备案号 10220084.

Follow element14

  • X
  • Facebook
  • linkedin
  • YouTube