


My house has a lot of automations - I've automated pretty much all of my main lights to go on and off on schedules, using smart switches and plugs. I can ask Alexa to turn things on or off just by blurting things out. I can even control some lights at the house we are renovating. Pretty cool stuff, but also super handy. It saves me the walk-around to turn things on and off, it saves me re-programming timers as the seasons change, but mostly I guess it saves me from forgetting things
It kind of started before smart switches were a thing - I had a timer switch for my outside garage lights for quite some time, to provide a bit of security lighting. I had timers for the deck lights too. Very limited, but saved me dealing with them on a daily basis.
But then BC Hydro, our electricity supplier, invited us to join in a home automation trial to gather data on how it might save energy, as well as how it might help them offset peak demand loads (very interesting trials for that actually). They installed several light switches around the house, gave us some smart plugs, and installed smart thermostats for our baseboard heaters.
We really enjoyed the automations that came with that initial installation, so we've expanded on it since then.
My wife was very hesitant about it when I first brought it up, but it didn't take long for her to notice the benefits too - she was the first to point out when a switch later failed!
So over the last several years pretty much everything is automated now.
But then we decided to install a heat pump.
For our area on the West Coast, heat pumps can be very energy efficient, especially compared to baseboard heaters, and as a bonus they give the option of air conditioning in the summer.
To my surprise, the Daikin heat pump we had installed did not include any proper thermostat or proper automation ability!
It has a very complicated way of programming different temperatures for different times of day, but it doesn't allow programming of fan speeds, and that's a huge one for us - the Daikin fan is very noisy, especially compared to our silent baseboard heaters, for our quiet corner of town. They have a "night mode" which is much quieter, but you have to manually use the remote control to change to that fan speed. There isn't a way to easily switch between night mode and automatic - it takes repeated presses through all 5 or 6 fan speeds.
Over the last few years I've tried automating it using some off-the-shelf smart Wi-Fi IR remotes, but none of the 3 that I tried include support for night mode fan speed, and they didn't include support for the swing feature, which directs air to the different corners of the space better. For a while I used one just to turn on the heat before waking up, but we would always forget to turn it down at night. And being the spoiled automated-house nerds we are, that was just not acceptable 
And thus, this project!
I found some Arduino IR libraries online that fully support my Daikin heat pump, and I have a few spare Wemos D1 Mini boards that support WiFi, and are small enough to tuck away in a corner somewhere.
It didn't take long to get a prototype up and running actually - my main issue was that the IR LED didn't seem to give enough power to reach the heat pump.
After some researching and asking here on element14, I learned why: I wasn't getting enough power to the LED because I was using resistor values from the average "blink a red LED" tutorials which don't allow enough current to really get a good IR signal. Some people also suggested using multiple LEDs to get more light out.
The circuit I ended up using is derived from this Adafruit example, except that I only want the transmit part of it: https://learn.adafruit.com/building-an-infrared-transmitter-and-receiver-board
More details in this discussion: /technologies/internet-of-things/f/forum/50669/resistor-rating-for-ir-led-for-wifi-iot-remote
Here is my simplified version of that circuitry. I'm using 2 same LEDs because that's what I have, but the Adafruit example recommends using one narrow-beam and one wide-beam IR LED for better coverage.
The added notes for the transistors were for my benefit of remembering their pinouts and current ratings while soldering up the pieces later, but it might be helpful for others as well so I left it in 
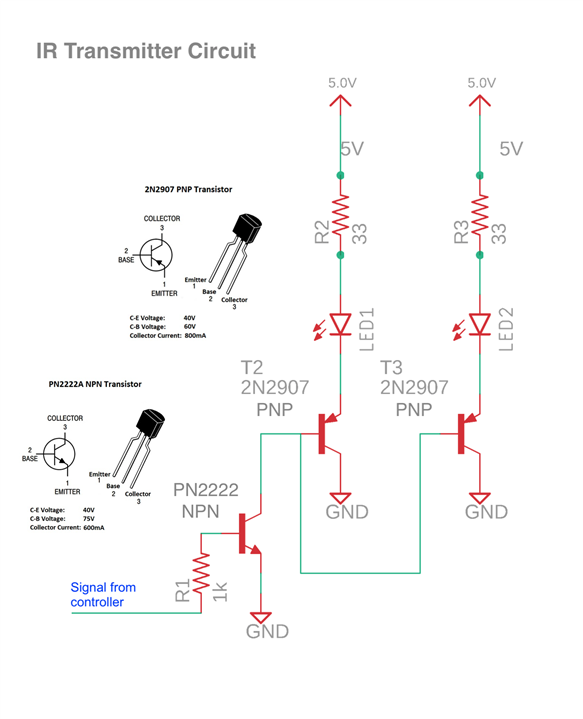
The schematic shows 33 ohm resistors, but I used 22 ohms to get a little more power. Adafruit says you can leave them out altogether, but I worried that might burn out the IR LEDs or overheat the transistors if something went wrong - it should be ok as long as it doesn't run too often, which remote controls generally don't do. Smaller value resistors will allow more current for brighter IR signals but that might overheat the resistors if something goes wrong. My worry was that a software glitch might cause continues sending, so I went with the safer route. According to my math this can send continuously without it overheating, but do your own math and testing and all that to ensure your own safety of course.
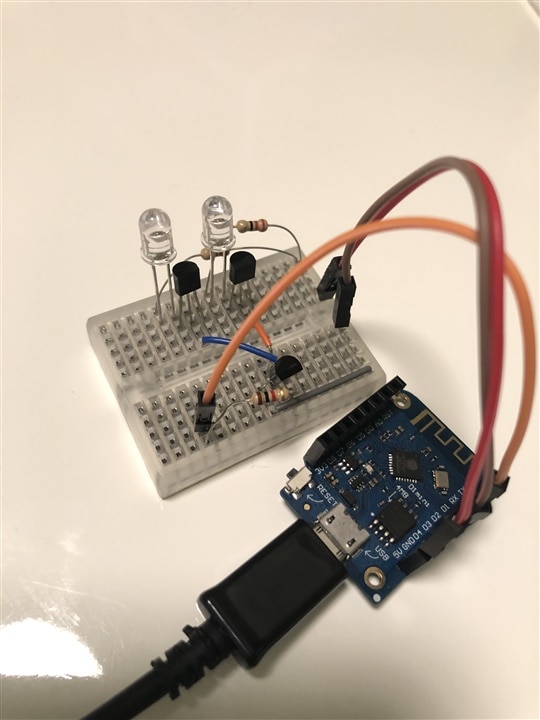
This is what it looks like on a breadboard:
That worked well, so I went ahead and 3D-printed a little enclosure for it. The next trick being how to fit the parts inside that little box!
I also wanted a bit more control, and to see what was going on - partly for debugging, but also when using it, so I needed a few extra bits to make that happen.
To keep it simple I added only one button to manually switch between day mode and night mode, which is also good for testing that the heat pump was receiving the signal from where I placed this project on the shelf.
I added 2 LEDs to indicate when it was sending day mode (orange) and night mode (blue), as my heat pump itself doesn't display anything. For these LEDs, I drilled little indentations from the inside of the lid, but not all the way through - so from the outside you can't see them except when they light up.
I hard-coded the automations (for now) - at 8am it turns on the heat, and at 11pm it turns down the heat. The Arduino sketch includes some magic for the Wemos to connect to a time server, which also means it has to connect to the Internet.
This can take a bit of time, so I have it flash both indicator LEDs while connecting and setting up, and then alternately flashing them for a few seconds when setup has completed successfully.
Here is my workbench with the tiny things coming together:

I tried using SMD components on a small bit of perf-board, but that went terribly wrong. I think it was partly because my SMD transistors were too different - they were mosfets instead of the basic BJTs, and I think that probably required circuit modifications... or else I just screwed it up some other way, which is entirely possible!
Thankfully, the through-hole parts were still small enough and easy enough to solder together without supports, and I was able to tuck them into the case.
I used cheap dollar-store nail polish to coat the wires to avoid shorts. Helpful hint - do that AFTER testing... so I've heard from a friend 

The result looks pretty cool. Here I have both lights on for testing. The IR LEDs are sticking out the top - I used some other cheap LEDs to melt holes through the lid by heating up the legs and pushing through. This allows the IR LEDs to be bent around a bit to point towards the target.

I've been using it like that for about a little while now, and it has been nicely reliable
The only trouble I ran into was that I started this project when it was much colder outside, so as spring weather arrived the hard-coded values made it a little too warm in the house!
And then Daylight savings time meant my timezone offset needed adjusting - the heat turned on and off an hour too late.
But it was easy enough to bring the little box back to my desk and reprogram it with the new values. At the same time I also added a pre-warm step an hour before the wake-up step.
That was yesterday morning, and I thought it was about time I let you know what I've been up to, thus this post
Next steps:
* Today I hope to add a web-based UI to allow me to update at least the temperatures, and hopefully also the times, and a web-based control button or two.
-> I'm not sure yet if I'll implement this directly on the Wemos (I'm pretty sure it can handle that easily enough), or if I want to use MQTT for that, maybe via NodeRed on Raspberry Pi that I'm currently already using to monitor my outdoor sensors.
* Next I also hope to add Alexa control
-> I've seen some examples of how this can be done for switches on Arduino/Wemos, so that can be a basic start. Ultimately it would be great to also set the temperature for it that way.
-Nico
Top Comments