


I've been looking for a camera board that I could use with the PSoC 62S2 dev board for the Low Power IoT challenge. This dev board does not have a dedicated camera interface and I haven't seen any examples using a camera. vlasov01 suggested that I look at the Edge Impulse example that uses the Arduino Nano 33 BLE Sense with the OV7675 camera: adding sight to your sensors . This is the same hardware used in the arduino-tiny-machine-learning-kit minus the shield that provides the camera connection. I could only get an OV7670 quickly from Amazon, so I decided to try that. It appears that the OV7670 is essentially the same as the OV7675 - just a slightly larger sensor, but with the same VGA (640x480) resolution with 2 fewer pins on the header (the pins are NC anyway)..
I probably should have spent a bit more time thinking about the interface. I am planning to use an E-Ink display shield with the PSoC 62S2 as I mentioned in my getting stated post: Low Power IoT Design Challenge - Getting Started . With that shield installed, there are only a few pins available on the Arduino Header:

and pins not on the Arduino header are pretty much consumed by the dev board peripherals. The OV7670 (and OV7675) use 14 GPIO pins in addition to the I2C pins, so this camera won't be viable for my project.
Good news is that the OV7670 is really inexpensive (2 for $8.99) and I should be able to use it with my Nano 33 BLE Sense board and the Edge Impulse and Arduino tinyML tutorials. Don't want to go down a rat hole, but thought I'd give it a quick look.
Without the Arduino Tiny Machine Learning shield, the hookup is a little painful - needs 18 jumper wires to a solderless breadboard  .
.
Here's the hookup diagram and connection table for the OV7675 from the Edge Impulse site (Pins 19 and 20 are 17 and 18 on the OV7670).


And here's my unit hooked up.

The Edge Impulse setup has been pretty well covered in other posts, so I won't go into any detail here. Basically, to set up data capture you download firmware for your device and scripts are provided to flash the device. Scripts are provided for Windows, Linux and Mac.

After flashing the device, you just need to run the edge-impulse-daemon to connect the device to your Cloud Dashboard.

Here is the Data Acquisition view in the Dashboard
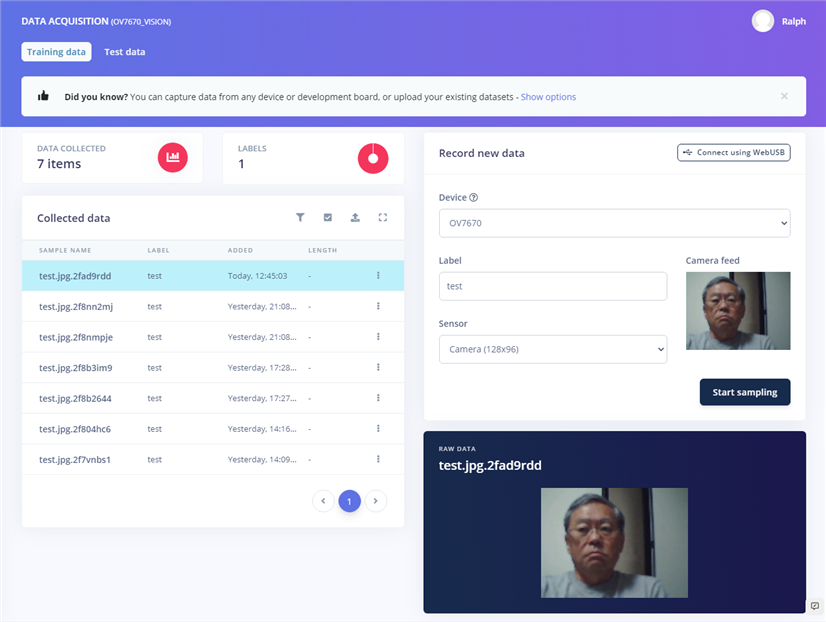
There's a lot of latency getting the image to the Dashboard and I see a lot of motion artifacts probably due to the rolling shutter on this sensor. The firmware is set up for 2 different Camera resolutions - QQVGA (160x120) and a smaller 128x96 format. I expect that's because the higher resolutions are too slow for this data acquisition method. I chose to use the lowest resolution to reduce the latency.

Here's a quick clip that shows the latency and motion blur:
I'll design a simple image classification model to test how well inferencing works with this setup. I think because of the motion artifacts, that I'll use static images. I'll post about that later.
I also noticed that edX has an online HarvardX course on Deploying TinyML that uses the Arduino Tiny Machine Learning Kit: https://www.edx.org/course/deploying-tinyml . I think that I'll check that out.
Top Comments