


I'm currently participating in the Low Power IoT Challenge. I am trying to find a low power camera that I can use with the PSoC 62S2. I've tried the OV7670: Arduino Nano 33 BLE Sense with OV7670 Camera . I've ruled that one out because it requires more pins than I have available for its 8 bit parallel data interface.
The HM01B0 is a monochrome 324x324 camera that has a flexible data interface that can be 1-bit, 4-bit, or 8-bits wide. The module that I'm using from Arducam: arducam-camera-module-for-raspberry-pi-pico uses the 1-bit interface and only uses 8 of the 16 available pins on the PCB (you could change to a 16 pin header to get the additional data width). The pin connection to the RPi Pico is shown below. It uses an I2C interface for configuration (actually an SCCB interface - so requires tweaking). And in this mode requires 4 pins for the data interface - Pixel Clock, Horizontal Sync, Vertical Sync, and Pixel Data. So, I could possibly use this with the PSoC 62S2 pins that I have available. Since the data width is only a single bit there's the obvious concern about the frame rate of the interface. I'm used to using high resolution color cameras with high speed serial interfaces, so it's a mental attitude adjustment to use lower resolution monochrome cameras to save power. The HM01B0 utilizes 1-2 mW compared to 50-60 mW for the OV7570. And I consider the OV7670 to be a relatively low power camera.

I decided to try the HM01B0 in the RPi Pico configuration first before I try anything new (I'll save that for the Low Power IoT Challenge - if I decide to try to use it).
Here's a picture of my test setup:

Arducam has created a board package and examples for the Arduino IDE to make it more user friendly. Of course it wasn't that friendly, I immediately ran into a problem because they reused some of the names that were used by another third party board package by Earle Philhower that I'm using for some of my other RP2040 boards. I ended up having to uninstall that other package (you have to manually delete the files) to get it to work. They also currently appear to have a problem with their SPI and LCD libraries, so I removed them for my test. I should mention that Arducam has another product the Pico4ML which has an RPi Pico plus an LCD screen and camera arducam-pico4ml-tinyml-dev-kit-rp2040-board-w-qvga-camera-lcd-screen-onboard-audio-b0330… . This board package is really for that product, but they use it for the camera demo since it has compatible components.
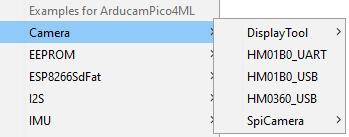
There are quite a few examples that come with this board package (I'm not sure how many of them work):

I using the Camera HM01B0_USB example which sends a camera image preview over the USB-UART to my PC which uses a Processing sketch to display the image.
Here's the example program that's uploaded to the Pico:
HM01B0_USB.ino
#include <stdio.h>
#include "pico/stdlib.h"
#include "arducampico.h"
uint8_t header[2] = {0x55,0xAA};
uint8_t image[96*96]={0};
struct arducam_config config;


void setup(){
  Serial.begin(115200);
  gpio_init(PIN_LED);
  gpio_set_dir(PIN_LED, GPIO_OUT);
  config.sccb = i2c0;
  config.sccb_mode = I2C_MODE_16_8;
  config.sensor_address = 0x24;
  config.pin_sioc = PIN_CAM_SIOC;
  config.pin_siod = PIN_CAM_SIOD;
  config.pin_resetb = PIN_CAM_RESETB;
  config.pin_xclk = PIN_CAM_XCLK;
  config.pin_vsync = PIN_CAM_VSYNC;
  config.pin_y2_pio_base = PIN_CAM_Y2_PIO_BASE;
  config.pio = pio0;
  config.pio_sm = 0;
  config.dma_channel = 0;
  arducam_init(&config);
}
void loop()
{
  gpio_put(PIN_LED, !gpio_get(PIN_LED));
  arducam_capture_frame(&config,image);
  Serial.write(header,2);
  delay(5);
  Serial.write(image,96*96);
}
And the Processing sketch:
preview.pde
/*
  This sketch reads a raw Stream of RGB565 pixels
 from the Serial port and displays the frame on
 the window.

 Use with the Examples -> CameraCaptureRawBytes Arduino sketch.

 This example code is in the public domain.
 */


import processing.serial.*;
import java.nio.ByteBuffer;
import java.nio.ByteOrder;


Serial myPort;


// must match resolution used in the sketch
final int cameraWidth = 96;
final int cameraHeight = 96;
final int cameraBytesPerPixel = 1;
final int bytesPerFrame = cameraWidth * cameraHeight * cameraBytesPerPixel;


PImage myImage;
byte[] frameBuffer = new byte[bytesPerFrame];
byte[] header = new byte[3];
byte[] score = new byte[2];


void setup()
{


  size(320, 320);


  // if you have only ONE serial port active
  //myPort = new Serial(this, Serial.list()[0], 9600);          // if you have only ONE serial port active


  // if you know the serial port name
  myPort = new Serial(this, "COM17", 115200);                    // Windows
  //  myPort = new Serial(this, "/dev/ttyUSB0", 921600);            // Linux
  // myPort = new Serial(this, "/dev/cu.usbmodem14401", 9600);     // Mac


  // wait for full frame of bytes
  myPort.buffer(bytesPerFrame);
  myImage = createImage(cameraWidth, cameraHeight, GRAY);

  fill(255, 0, 0);
}


void draw()
{
  image(myImage, 0, 0, 320, 320);
}
int state = 0;
int read = 0;
int result = 0;
int startbyte;
void serialEvent(Serial myPort) {
  if (read == 0) {
    startbyte = myPort.read();
    if (startbyte == 0x55) {
      state = 1;
    }
    if (startbyte == 0xAA && state == 1) {
      read = 1;
    }
    if (startbyte == 0xBB && state == 1) {
      result = 1;
    }
  }
  if (result == 1) {
     myPort.readBytes(score);
     result = 0;
  }
  if (read ==1) {
    // read the saw bytes in
    myPort.readBytes(frameBuffer);
    // access raw bytes via byte buffer
    ByteBuffer bb = ByteBuffer.wrap(frameBuffer);
    bb.order(ByteOrder.BIG_ENDIAN);
    int i = 0;
    while (bb.hasRemaining()) {

      // read 16-bit pixel
      short p = bb.getShort();
      int p1 = (p>>8)&0xFF;
      int p2 = p&0xFF;
      // convert RGB565 to RGB 24-bit
      int r = p1;//((p >> 11) & 0x1f) << 3;
      int g = p1;//((p >> 5) & 0x3f) << 2;
      int b = p1;//((p >> 0) & 0x1f) << 3;


      // set pixel color
      myImage .pixels[i++] = color(r, g, b);
      r = p2;//((p >> 11) & 0x1f) << 3;
      g = p2;//((p >> 5) & 0x3f) << 2;
      b = p2;//((p >> 0) & 0x1f) << 3;


      // set pixel color
      myImage .pixels[i++] = color(r, g, b);
    }
    read = 0;
  }
  myImage .updatePixels();
}
The camera preview is running at pretty low resolution (96x96), so there are a lot of pixel artifacts. Here's a snapshot taken over the interface:

And a short video. Responsiveness isn't bad at this low resolution.
I did try playing with the capture resolution but didn't quite get the expected results, although at higher resolutions the update rate was awful. I'll admit to not being very good with using Processing and to make things worse the documentation available for this camera isn't very good. I'll need to do more internet searching - I have not found the register definitions yet (couldn't figure out how to flip the image - even though the camera has that capability).
If I use this camera I'm sure it will require a lot of tweaking, but definitely meets the low power requirement  .
.
Top Comments