


I've used the OOB (Out-of-Box) Demo to familiarize myself with the Rapid IoT kit and I thought that I'd describe its functionality and provide a short critique before I move on to creating my own programs.
The OOB Demo allows you to configure the settings on the device and to try out all of the sensors. It also allows you to connect to either an iOS or Android phone/tablet using apps that are provided. And you can also connect to a Rapid IoT Dashboard in the cloud by using the WiFi connection of the phone/tablet or a Thread router/gateway.
The Rapid IoT device has 4 capacitive touch buttons (T1-T4) that are located under the faceplate at the 4 sides of the screen. These buttons allow you to navigate through the various screens of the OOB Demo.
There are also 4 pushbutton switches (SW1-SW4), two on each side of the case. These buttons allow you to make selections on the various screens.
Along the top of the screen (from left->right) there is an RGB LED, the ambient light sensor, and blue and white status LEDs.
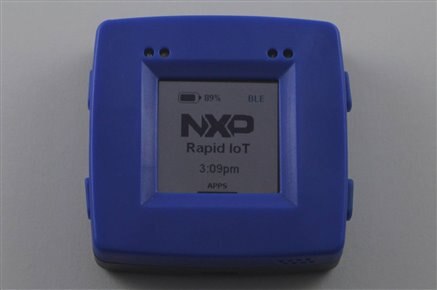

Starting at the Welcome Screen you can traverse to 4 other sections listed below. The demo is fairly intuitive. A short bar will appear on the top/bottom/left/right to indicate if you can traverse to an additional screen using the appropriate touch button.
Demo App sections:
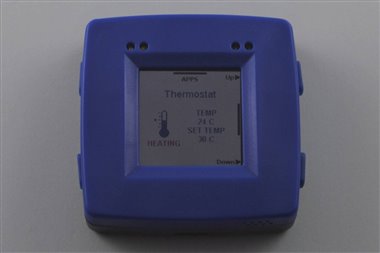
Applications: (display various sensors)
Thermostat
Humidity
Ambient light
Pressure
Air quality
LP Motion Detection
Fall Detection
Tap Counter
RGB LED Controller
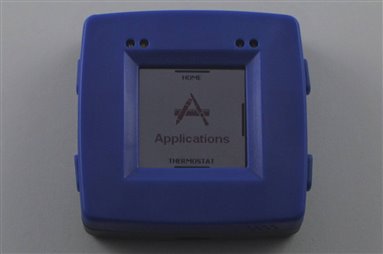

Settings: (enable functionality)
Bluetooth (mutually exclusive with Thread)
Thread
NFC
Buzzer
Backlight
Sensor Tag
Reset
Services:
Version
Get App (QR codes for iOS and Android apps)
Sensor Selection: (enable/disable sensors)
Temp/Humid
Light
Pressure
Air Quality
Accel/Mag
Gyro
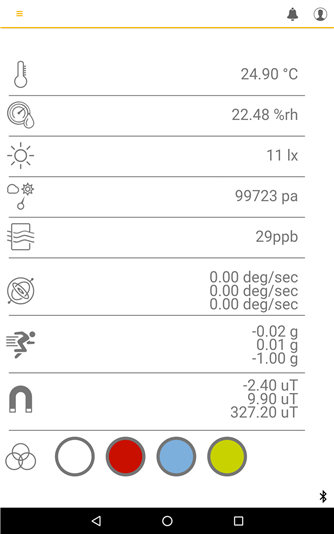
In the previous blog I had connected The Rapid IoT device to my iPhone 6 via Bluetooth. I had read on the NXP Rapid IoT community website that people were having lots of issues connecting to their Android devices via Bluetooth so I decided to try to connect my Nexus 7 tablet. I also had problems pairing the Rapid IoT with the tablet. The tablet could see the Rapid IoT device but would not pair. It requested a pairing code (didn't do that with the iPhone) and even though I used the prescribed 999999 code, it refused to pair. I had read that people had tried resetting the Rapid IoT and it only helped some of them. I am somewhat persistent and I was able to pair the tablet after 8 attempts. I did not do anything different in any of those attempts. Not sure what caused the last one to work. After pairing, the experience is pretty much the same as the iPhone. The screenshots of the sensor readings are virtually identical.
NFC tag:
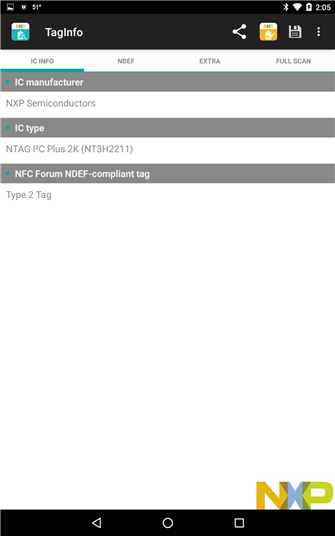
Since I have NFC capability on the Nexus tablet I decided to try reading the NFC tag in the Rapid IoT device using the NXP NFC Reader app that I have on the tablet.
Happily, this just worked and indicated that it is a 2K Type 2 tag.
Rapid IoT Dashboard:
The final thing that I wanted to try with the OOB Demo was to connect to the cloud and display the Rapid IoT sensor data.
I logged into my account at NXP: https://rapid-iot-studio.nxp.com/ , found my Rapid IoT device on the dashboard and added a few sensors to a datagraph widget.
Everything was very straightforward and I had no issues but I did notice that on subsequent attempts that if you re-provision your device (disconnect and reconnect to phone/tablet) that you will have a different new device instance. I guess this makes sense but you need to delete the previous devices or the dashboard gets to be confusing.

Comments on the OOB Demo application:
I think NXP did a pretty good job of creating a demo program that allows users to try out the Rapid IoT device and its ecosystem. Sort of kick the tires before trying to write your own application. That being said, I wish that they had made it a bit more user friendly. I don't have a Thread router/gateway so I wasn't able to check that functionality.
Here's a list of points that I think they could/should improve:
1) Add a power down or power off control (use one of the pushbuttons at the Welcome screen). The Rapid IoT has a very small 240mAh LiPo battery. The default setting in the OOB Demo will cause the battery to be depleted in under 2 hours. That means that while you are playing with it you almost have to always keep it tethered to USB power. The other problem is that the battery will run to empty if you forget and that isn't good for the battery although I guess the case isn't hard to open to replace the battery (hope it is widely available).
2) Add a disable feature for the capacitive touch buttons. The device is small enough that if you carry it around that you almost always will contact one of the buttons and navigate away from the screen that you are on. Maybe this isn't that big a deal for the Demo program since the settings toggle is all on the side pushbuttons.
3) Put the sensor enable/disable function on the same screen as the sensor display. I think this would improve the usability a lot.
4) Fix the Android pairing issue, whatever that is.
So, a short list. Probably 1 & 4 are the most important. I hope there isn't something inherent in the hardware that made the implementation come out this way. I guess I'll figure that out as I try to program it.