element14 Community
element14 Community
    Register Log In
  • Site
  • Search
  • Log In Register
  • Community Hub
    Community Hub
    • What's New on element14
    • Feedback and Support
    • Benefits of Membership
    • Personal Blogs
    • Members Area
    • Achievement Levels
  • Learn
    Learn
    • Ask an Expert
    • eBooks
    • element14 presents
    • Learning Center
    • Tech Spotlight
    • STEM Academy
    • Webinars, Training and Events
    • Learning Groups
  • Technologies
    Technologies
    • 3D Printing
    • FPGA
    • Industrial Automation
    • Internet of Things
    • Power & Energy
    • Sensors
    • Technology Groups
  • Challenges & Projects
    Challenges & Projects
    • Design Challenges
    • element14 presents Projects
    • Project14
    • Arduino Projects
    • Raspberry Pi Projects
    • Project Groups
  • Products
    Products
    • Arduino
    • Avnet & Tria Boards Community
    • Dev Tools
    • Manufacturers
    • Multicomp Pro
    • Product Groups
    • Raspberry Pi
    • RoadTests & Reviews
  • About Us
    About the element14 Community
  • Store
    Store
    • Visit Your Store
    • Choose another store...
      • Europe
      •  Austria (German)
      •  Belgium (Dutch, French)
      •  Bulgaria (Bulgarian)
      •  Czech Republic (Czech)
      •  Denmark (Danish)
      •  Estonia (Estonian)
      •  Finland (Finnish)
      •  France (French)
      •  Germany (German)
      •  Hungary (Hungarian)
      •  Ireland
      •  Israel
      •  Italy (Italian)
      •  Latvia (Latvian)
      •  
      •  Lithuania (Lithuanian)
      •  Netherlands (Dutch)
      •  Norway (Norwegian)
      •  Poland (Polish)
      •  Portugal (Portuguese)
      •  Romania (Romanian)
      •  Russia (Russian)
      •  Slovakia (Slovak)
      •  Slovenia (Slovenian)
      •  Spain (Spanish)
      •  Sweden (Swedish)
      •  Switzerland(German, French)
      •  Turkey (Turkish)
      •  United Kingdom
      • Asia Pacific
      •  Australia
      •  China
      •  Hong Kong
      •  India
      •  Japan
      •  Korea (Korean)
      •  Malaysia
      •  New Zealand
      •  Philippines
      •  Singapore
      •  Taiwan
      •  Thailand (Thai)
      •  Vietnam
      • Americas
      •  Brazil (Portuguese)
      •  Canada
      •  Mexico (Spanish)
      •  United States
      Can't find the country/region you're looking for? Visit our export site or find a local distributor.
  • Translate
  • Profile
  • Settings
Personal Blogs
  • Community Hub
  • More
Personal Blogs
Ralph Yamamoto's Blog Summer of tinyML - Himax and Edge Impulse
  • Blog
  • Documents
  • Mentions
  • Sub-Groups
  • Tags
  • More
  • Cancel
  • New
  • Share
  • More
  • Cancel
Group Actions
  • Group RSS
  • More
  • Cancel
Engagement
  • Author Author: ralphjy
  • Date Created: 14 Jul 2021 4:20 PM Date Created
  • Views 1506 views
  • Likes 9 likes
  • Comments 0 comments
  • summer of tinyml
  • himax
  • himax we-i plus
  • tinyml vision challenge
  • edge impulse
  • vision ai
Related
Recommended

Summer of tinyML - Himax and Edge Impulse

ralphjy
ralphjy
14 Jul 2021

As I mentioned in my previous post Summer of tinyML , Hackster.io has been running a series webinars on tinyML in conjunction with their tinyML Vision Challenge.


I missed a webinar last month that covered using the Himax WE-I Plus AI Development board with the Edge Impulse framework: tinyML Vision Challenge - Himax & Edge Impulse, but i was able to watch it on YouTube: https://www.youtube.com/watch?v=6tmCEzNSIas


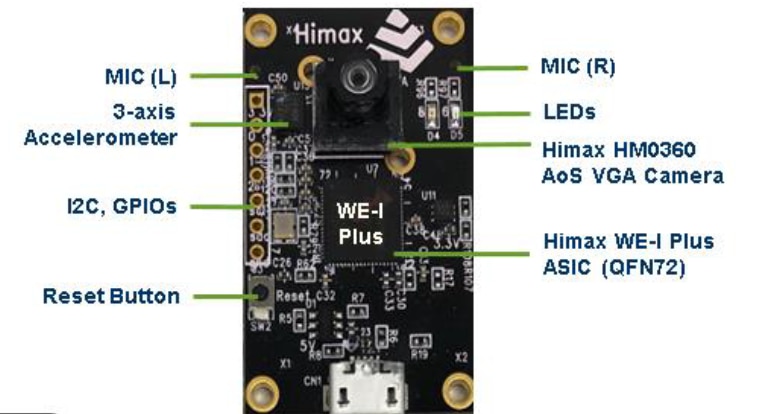
I had purchased a WE-I Plus board from SparkFun https://www.sparkfun.com/products/17256  a few months ago, but never got the opportunity to try it out.


The WE-I Plus has a nice set of features for Edge AI on a compact 40mm x 27mm PCB.  It has a HM0360 monochrome VGA (640x480) camera, dual PDM microphones, LSM9DS1 IMU, plus Red and Green LEDs.  The IO is somewhat limited - one I2C port and 3 GPIOs.  It uses a 400MHz HX6537 ASIC with a 32-bit processor and FPU.


image


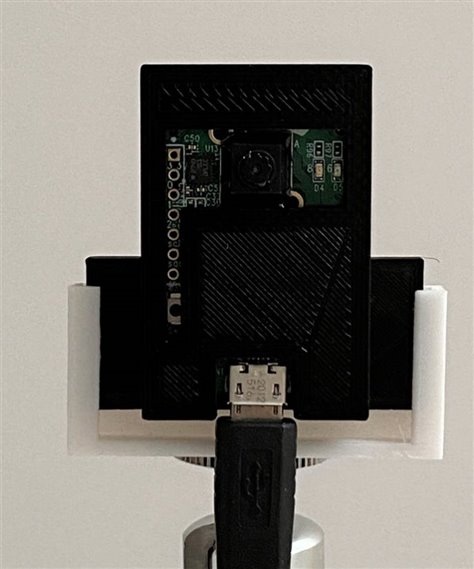
The first step was to print a quick housing so that I could tripod mount the board for ease of use.

image


Out-of-box, the WE-I Plus is loaded with Person Detection firmware that runs on power up.  I used Putty to connect to the USB Serial Port to observe the detection output.  A short clip shows the person score change from negative to positive as I move into the camera frame.  I'm not sure what the absolute value is indicating.

You don't have permission to edit metadata of this video.
Edit media
x
image
Upload Preview
image


The board is fully supported by Edge Impulse, so the quickest way to get started is to download the data capture firmware from Edge Impulse and flash it using their loader script.  To run the scripts, you need to have the Edge Impulse CLI installed.  This is well documented in their getting started guide https://docs.edgeimpulse.com/docs/himax-we-i-plus .


I am using Windows so I used the flash_windows.bat script.  Here is the downloaded directory with the scripts and firmware image.

image


I already had the CLI previously installed, but that turned out to be an issue because I had an outdated version that did not have the Himax included.

image

But that was easy to update using the error message from the daemon.

image


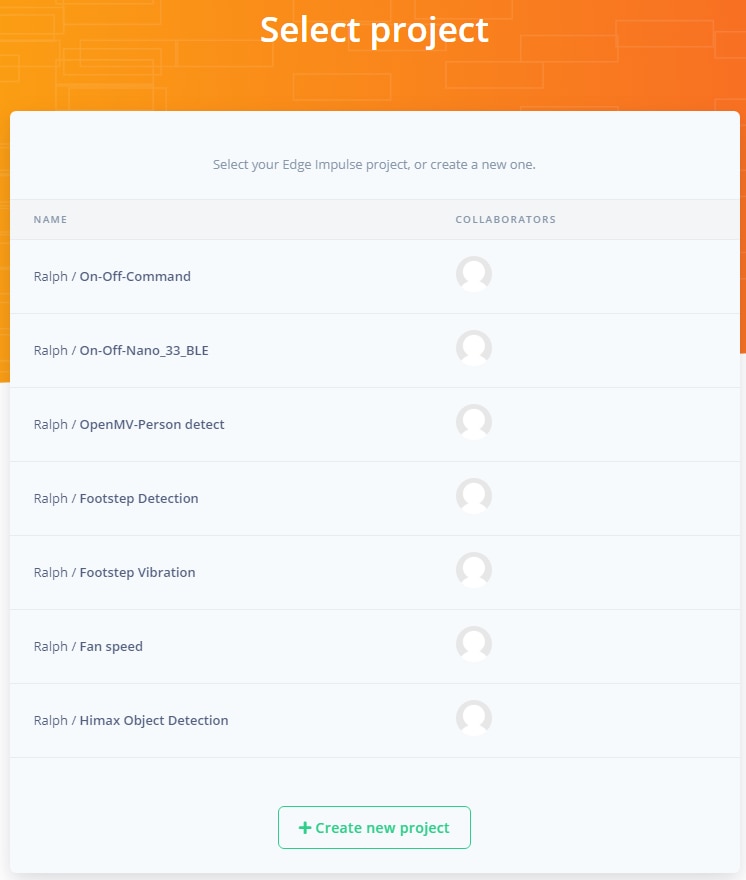
The next step is to log into edgeimpulse.com and create a new project.  In this case I created one named Himax Object Detection.

image


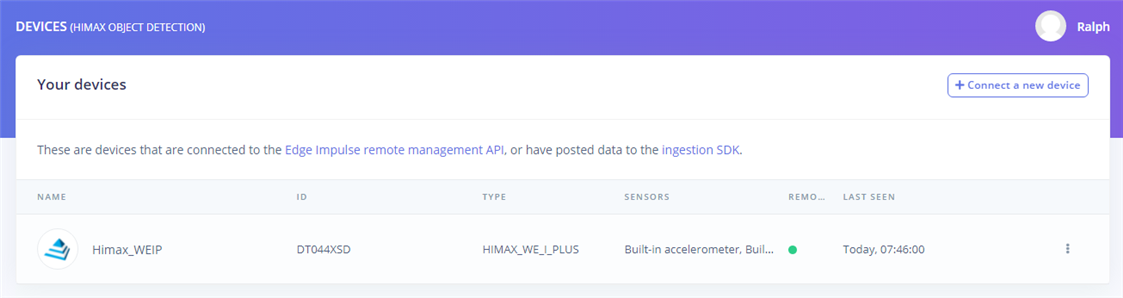
Now at the Command prompt you can start the edge-impulse-daemon which will connect the device to your project.  The first time you start the daemon, it will ask for your edge impulse credentials (name,pw) and which project to connect the device to.  In this case, I've connected previously but not named the device - so it just asks for the device name.  If I wanted to connect to a different project I could have started the daemon with the --clean option.

image


The device will now be connected to the project in my edge impulse dashboard.

image


The next step is to collect some data.  In the Data Acquisition window you get the choice of connected device and available sensors.

image


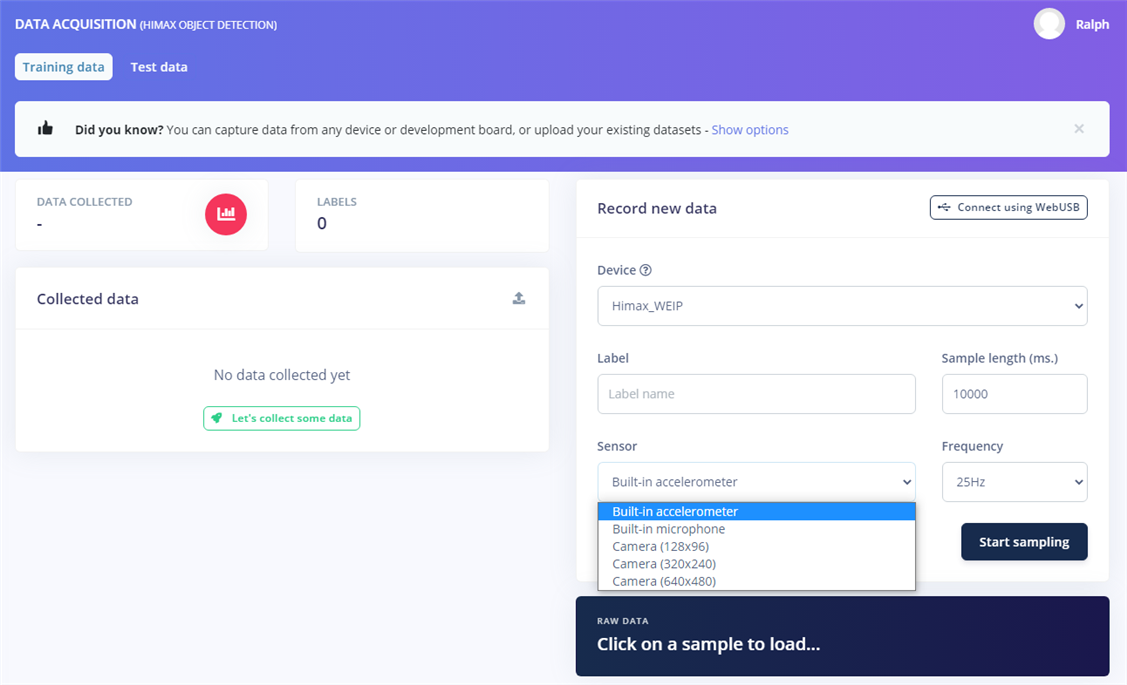
I'll select a sample of the Camera at 640x480 resolution.  It will give me a live preview in the Camera feed window.  Then I just need to label the data (Ralph) and hit the Start sampling button.

image


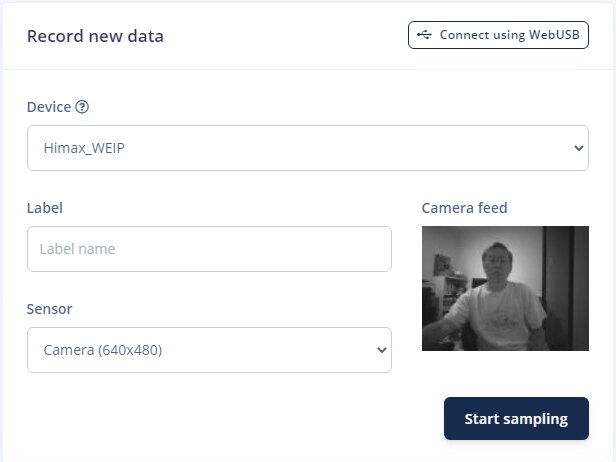
And after a few seconds of upload time, I get the data sample.

image


Now that data acquisition is working, I need to design a test and collect some labeled data.  In the next post I'll look at Impulse (Model) design and deployment.

  • Sign in to reply
element14 Community

element14 is the first online community specifically for engineers. Connect with your peers and get expert answers to your questions.

  • Members
  • Learn
  • Technologies
  • Challenges & Projects
  • Products
  • Store
  • About Us
  • Feedback & Support
  • FAQs
  • Terms of Use
  • Privacy Policy
  • Legal and Copyright Notices
  • Sitemap
  • Cookies

An Avnet Company © 2026 Premier Farnell Limited. All Rights Reserved.

Premier Farnell Ltd, registered in England and Wales (no 00876412), registered office: Farnell House, Forge Lane, Leeds LS12 2NE.

ICP 备案号 10220084.

Follow element14

  • X
  • Facebook
  • linkedin
  • YouTube