element14 Community
element14 Community
    Register Log In
  • Site
  • Search
  • Log In Register
  • About Us
  • Community Hub
    Community Hub
    • What's New on element14
    • Feedback and Support
    • Benefits of Membership
    • Personal Blogs
    • Members Area
    • Achievement Levels
  • Learn
    Learn
    • Ask an Expert
    • eBooks
    • element14 presents
    • Learning Center
    • Tech Spotlight
    • STEM Academy
    • Webinars, Training and Events
    • Learning Groups
  • Technologies
    Technologies
    • 3D Printing
    • FPGA
    • Industrial Automation
    • Internet of Things
    • Power & Energy
    • Sensors
    • Technology Groups
  • Challenges & Projects
    Challenges & Projects
    • Design Challenges
    • element14 presents Projects
    • Project14
    • Arduino Projects
    • Raspberry Pi Projects
    • Project Groups
  • Products
    Products
    • Arduino
    • Avnet Boards Community
    • Dev Tools
    • Manufacturers
    • Multicomp Pro
    • Product Groups
    • Raspberry Pi
    • RoadTests & Reviews
  • Store
    Store
    • Visit Your Store
    • Choose another store...
      • Europe
      •  Austria (German)
      •  Belgium (Dutch, French)
      •  Bulgaria (Bulgarian)
      •  Czech Republic (Czech)
      •  Denmark (Danish)
      •  Estonia (Estonian)
      •  Finland (Finnish)
      •  France (French)
      •  Germany (German)
      •  Hungary (Hungarian)
      •  Ireland
      •  Israel
      •  Italy (Italian)
      •  Latvia (Latvian)
      •  
      •  Lithuania (Lithuanian)
      •  Netherlands (Dutch)
      •  Norway (Norwegian)
      •  Poland (Polish)
      •  Portugal (Portuguese)
      •  Romania (Romanian)
      •  Russia (Russian)
      •  Slovakia (Slovak)
      •  Slovenia (Slovenian)
      •  Spain (Spanish)
      •  Sweden (Swedish)
      •  Switzerland(German, French)
      •  Turkey (Turkish)
      •  United Kingdom
      • Asia Pacific
      •  Australia
      •  China
      •  Hong Kong
      •  India
      •  Korea (Korean)
      •  Malaysia
      •  New Zealand
      •  Philippines
      •  Singapore
      •  Taiwan
      •  Thailand (Thai)
      • Americas
      •  Brazil (Portuguese)
      •  Canada
      •  Mexico (Spanish)
      •  United States
      Can't find the country/region you're looking for? Visit our export site or find a local distributor.
  • Translate
  • Profile
  • Settings
Arduino Tutorials
  • Products
  • Arduino
  • Arduino Tutorials
  • More
  • Cancel
Arduino Tutorials
Blog Build a sub-£5 ambient backlight for a TV / PC Monitor
  • Blog
  • Forum
  • Documents
  • Events
  • Polls
  • Files
  • Members
  • Mentions
  • Sub-Groups
  • Tags
  • More
  • Cancel
  • New
Join Arduino Tutorials to participate - click to join for free!
  • Share
  • More
  • Cancel
Group Actions
  • Group RSS
  • More
  • Cancel
Engagement
  • Author Author: Matt
  • Date Created: 25 Feb 2019 1:55 PM Date Created
  • Views 1646 views
  • Likes 13 likes
  • Comments 4 comments
  • arduino_tutorials
  • arduino tutorials
Related
Recommended

Build a sub-£5 ambient backlight for a TV / PC Monitor

Matt
Matt
25 Feb 2019

I nearly bought this kind of thing, but then realised I had all the parts I needed to make it myself, which is half the fun, right?! image


This video shows it in action;


You don't have permission to edit metadata of this video.
Edit media
x
image
Upload Preview
image


What I'm using in this build is;


PartApprox Price
24 LED Ring£2
Arduino Nano£1.75
Breadboard, button, potentiometer, and wires£1.25


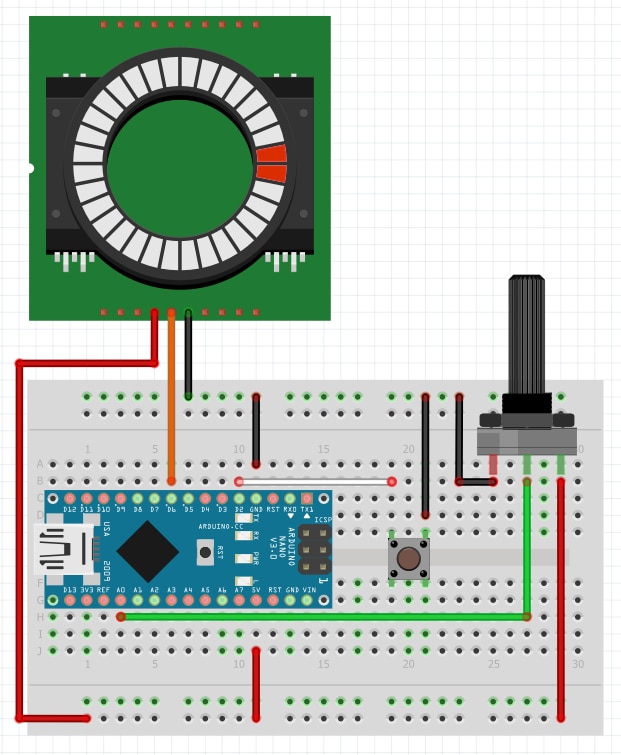
The components are wired up like this;


image


And here's the code (uses the Adafruit neopixel library);


#include <Adafruit_NeoPixel.h>
#ifdef __AVR__
  #include <avr/power.h>
#endif

#define PIN 6 // pin on the Arduino is connected to the LED ring
#define NUMPIXELS 24 // Number of pixels on the LED ring
#define POT_PIN 0 // Potentiometer pin
#define BUTTON_PIN 2 // Button pin

Adafruit_NeoPixel pixels = Adafruit_NeoPixel(NUMPIXELS, PIN, NEO_GRB + NEO_KHZ800);

int showType = 0;
bool oldState = HIGH;

void setup() {

  pinMode(BUTTON_PIN, INPUT_PULLUP); // Declare pushbutton as input
  pixels.begin(); // This initializes the NeoPixel library.
  
}

void loop() {

  // Read the potentiometer value and translate to how many pixels we want to illuminate
  int value = analogRead(POT_PIN);
  value = map(value, 0, 1023, 0, 25);

  // Switch colours if the button is pressed
  bool newState = digitalRead(BUTTON_PIN);
  if (newState == LOW && oldState == HIGH) {
  delay(20); // Short delay to debounce button.

  // Check if button is still low after debounce.
  newState = digitalRead(BUTTON_PIN);
  if (newState == LOW) {
// Cycle through different colour schemes
  showType++;
  if (showType > 8) showType=0;
  }
  }
  oldState = newState; // Set the last button state to the old state.
  
  uint32_t color = pixels.Color(255,255,255); // default to white when first booted

  if (showType==1) color = pixels.Color(0,0,255); // blue
  if (showType==2) color = pixels.Color(0,255,0); // green
  if (showType==3) color = pixels.Color(255,0,0); // red
  if (showType==4) color = pixels.Color(0,127,255);
  if (showType==5) color = pixels.Color(255,127,0);
  if (showType==6) color = pixels.Color(255,0,127);
  if (showType==7) color = pixels.Color(0,255,255);
  if (showType==8) color = pixels.Color(127,127,255);

  // Illuminate X pixels depending on how far the potentiometer is turned
  for(int i=0;i<NUMPIXELS;i++){
  if (i<value) {
  pixels.setPixelColor(i, color);
  } else {
  pixels.setPixelColor(i, pixels.Color(0,0,0)); // Don't show anything
  }
  }
  
  pixels.show(); // This sends the updated pixel configuration to the hardware.
 
}


And here's the end result!


image

image

  • Sign in to reply

Top Comments

  • Matt
    Matt over 6 years ago in reply to shabaz +4
    Thanks Shabaz! Since it took about an hour to put together, it was a good one to show to my daughter (7) so that she could see how I built up each part of the project.. start with checking the LED ring…
  • DAB
    DAB over 6 years ago +4
    Nice project. DAB
  • shabaz
    shabaz over 6 years ago +3
    Hi Matt, Great project! Very cool use of the analog control to adjust brightness digitally by controlling number of lit LEDs : ) I always love seeing the control solutions that people dream up.. I'm addicted…
  • DAB
    DAB over 6 years ago

    Nice project.


    DAB

    • Cancel
    • Vote Up +4 Vote Down
    • Sign in to reply
    • More
    • Cancel
  • genebren
    genebren over 6 years ago

    A very nice DIY project.  ice that you were sharing the details with your daughter.  Well done!

    Gene

    • Cancel
    • Vote Up +3 Vote Down
    • Sign in to reply
    • More
    • Cancel
  • Matt
    Matt over 6 years ago in reply to shabaz

    Thanks Shabaz! Since it took about an hour to put together, it was a good one to show to my daughter (7) so that she could see how I built up each part of the project.. start with checking the LED ring works, then test the potentiometer, then link that to the ring, then add support for the button.

    • Cancel
    • Vote Up +4 Vote Down
    • Sign in to reply
    • More
    • Cancel
  • shabaz
    shabaz over 6 years ago

    Hi Matt,


    Great project! Very cool use of the analog control to adjust brightness digitally by controlling number of lit LEDs : )

    I always love seeing the control solutions that people dream up..  I'm addicted to such minimal but elegant and intuitive user-interfaces!

    it's an interesting challenge to hide underlying complexity and make it so easy to use.

    • Cancel
    • Vote Up +3 Vote Down
    • Sign in to reply
    • More
    • Cancel
element14 Community

element14 is the first online community specifically for engineers. Connect with your peers and get expert answers to your questions.

  • Members
  • Learn
  • Technologies
  • Challenges & Projects
  • Products
  • Store
  • About Us
  • Feedback & Support
  • FAQs
  • Terms of Use
  • Privacy Policy
  • Legal and Copyright Notices
  • Sitemap
  • Cookies

An Avnet Company © 2025 Premier Farnell Limited. All Rights Reserved.

Premier Farnell Ltd, registered in England and Wales (no 00876412), registered office: Farnell House, Forge Lane, Leeds LS12 2NE.

ICP 备案号 10220084.

Follow element14

  • X
  • Facebook
  • linkedin
  • YouTube