


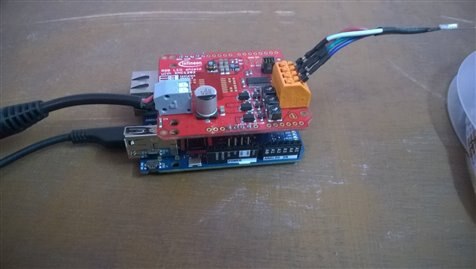
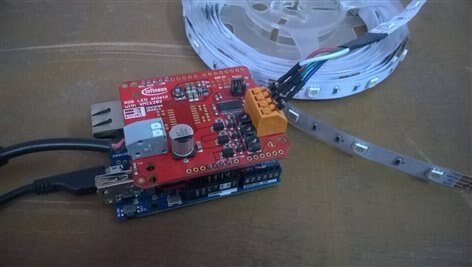
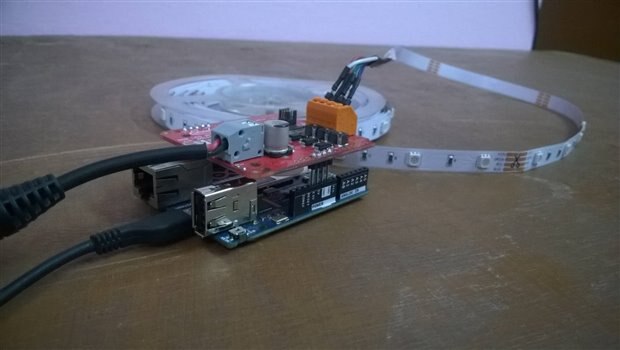
Hello Everyone, This is my forth blog post for the Internet Of Holiday Lighting Road Test, in this post I will explain how did I managed to perform to change the color of RGB led strip with a Web Browser . The setup is really simple it's just the Arduino YUN , the Infineon RGB shield and A RGB Strip.
Below ars pictures of the setup :
The Sketch ( Program ) is based upon the "MailboxReadMessage" example in the " Bridge " library, and the demo code for the Infineon RGB shield, The arduino is always ready to receive messages from a local computer in the same Wi-Fi network, and what I did was to read the message and equate it to predefined colors. example : I just had to type "192.168.1.17/mailbox/red"
to turn the red LED on. Below is the full code :
#define ADDRESS                    0x15EUL

  #define INTENSITY_RED              0x11U
  #define INTENSITY_GREEN            0x12U
  #define INTENSITY_BLUE     0x13U
  #define INTENSITY_RGB              0x14U
  #define CURRENT_RED                0x21U
  #define CURRENT_GREEN              0x22U
  #define CURRENT_BLUE               0x23U
  #define CURRENT_RGB                0x24U
  #define OFFTIME_RED                0x41U
  #define OFFTIME_GREEN              0x42U
  #define OFFTIME_BLUE     0x43U
  #define WALKTIME                   0x50U
  #define DIMMINGLEVEL               0x60U
  #define FADERATE                   0x61U

  #define READ_INTENSITY_RED         0x81U
  #define READ_INTENSITY_GREEN       0x82U
  #define READ_INTENSITY_BLUE        0x83U
  #define READ_CURRENT_RED           0x84U
  #define READ_CURRENT_GREEN         0x85U
  #define READ_CURRENT_BLUE          0x86U
  #define READ_OFFTIME_RED           0x87U
  #define READ_OFFTIME_GREEN         0x88U
  #define READ_OFFTIME_BLUE          0x89U
  #define READ_WALKTIME              0x8AU
  #define READ_DIMMINGLEVEL          0x8BU
  #define READ_FADERATE              0x8CU


  #define SAVEPARAMETERS             0xA0U

  #define BCCUMODID                  0x50030008U
  #define CHIPID                     0x40010004U
  #define REDINTS                    0x500300A0U // BCCU_CH5
  #define REDINT                     0x500300A4U
  #define BLUEINTS                   0x50030078U
  #define STARTWALK                  0x50030018U

  #include <Wire.h>
  #include <Mailbox.h>


  char string;
  unsigned int c[2] = {0};
  unsigned int d[4] = {0};
  unsigned int on = 0;
  unsigned int message = 0;
  unsigned long redcurr = 0;
  unsigned long greencurr = 0;
  unsigned long bluecurr = 0;
  unsigned long redoff = 0;
  unsigned long greenoff = 0;
  unsigned long blueoff = 0;
  unsigned long redint = 0x00;
  unsigned long greenint = 0x00;
  unsigned long blueint = 0x00;
  unsigned long fadetime = 0x00;
  unsigned long walk = 0x00;
  unsigned long brightness = 1;


void setup() {


    Serial.begin(9600);
   pinMode(13, OUTPUT);
  digitalWrite(13, LOW);
  // Initialize Bridge and Mailbox
  Bridge.begin();
  Mailbox.begin();
  digitalWrite(13, HIGH);
    Wire.begin();

    while (on != 1) // Wait for shield to respond, keep setting the values till it does
    {
      I2CWRITE2BYTES (ADDRESS, FADERATE, 0x0000); // Immediate fade
      I2CWRITE2BYTES (ADDRESS, DIMMINGLEVEL, 0x0000); // 0% brightness level
      on = I2CREAD(ADDRESS, READ_DIMMINGLEVEL); // Request for brightness level
      if (message == 1 && on == 0) // If message received and dimming level = 0%, "message" is set in the I2CREAD function
      {
        message = 0;
        on = 1; // break out of loop
      }
    }

    // now we will chane the values again and wait till there being red back
    while (redcurr != 0x15 || greencurr != 0x15 || bluecurr != 0x15 || redoff != 0x38 || greenoff != 0x39 || blueoff != 0x38 || brightness != 0)
    {
        I2CWRITE6BYTES (ADDRESS, INTENSITY_RGB, 0x0000, 0x000, 0x0000); // Off Light
  // Ensure that parameters are set up correctly. Read back and check. If wrong, write and read again.
        redcurr = I2CREAD (ADDRESS, READ_CURRENT_RED); // Read the red current intensity
  greencurr = I2CREAD (ADDRESS, READ_CURRENT_GREEN); // Read the green current intensity
  bluecurr = I2CREAD (ADDRESS, READ_CURRENT_BLUE); // Read the blue current intensity
  redoff = I2CREAD (ADDRESS, READ_OFFTIME_RED); // Read the off-time of the red channel
  greenoff = I2CREAD (ADDRESS, READ_OFFTIME_GREEN); // Read the off-time of the green channel
  blueoff = I2CREAD (ADDRESS, READ_OFFTIME_BLUE); // Read the off-time of the blue channel
  brightness = I2CREAD (ADDRESS, READ_DIMMINGLEVEL); // Read the dimming level

        I2CWRITE2BYTES (ADDRESS, OFFTIME_RED, 0x38); // Set off-time of red channel to 0x38
  I2CWRITE2BYTES (ADDRESS, OFFTIME_GREEN, 0x39); // Set off-time of green channel to 0x39
  I2CWRITE2BYTES (ADDRESS, OFFTIME_BLUE, 0x38); // Set off-time of blue channel to 0x38
  I2CWRITE2BYTES (ADDRESS, CURRENT_RED, 0x15); // Set current intensity of red channel to 0x15
  I2CWRITE2BYTES (ADDRESS, CURRENT_GREEN, 0x15); // Set current intensity of green channel to 0x15
  I2CWRITE2BYTES (ADDRESS, CURRENT_BLUE, 0x15); // Set current intensity of blue channel to 0x15
  I2CWRITE2BYTES (ADDRESS, DIMMINGLEVEL, 0x0000); // LEDs all off as any intensity * 0 will = 0
    }

    delay(100); // OK, so were getting response from the infineon so read back values from slave and print them
    Serial.print("Red Int: ");     redint = I2CREAD (ADDRESS, READ_INTENSITY_RED); // request from shield red colour intensity
    Serial.print("Green Int: ");   greenint = I2CREAD (ADDRESS, READ_INTENSITY_GREEN); // request from shield green colour intensity
    Serial.print("Blue Int: ");    blueint = I2CREAD (ADDRESS, READ_INTENSITY_BLUE); // request from shield blue colour intensity
    Serial.print("Red Curr: ");    redcurr = I2CREAD (ADDRESS, READ_CURRENT_RED); // request from shield peak current reference of red channel
    Serial.print("Green Curr ");   greencurr = I2CREAD (ADDRESS, READ_CURRENT_GREEN); // request from shield peak current reference of green channel
    Serial.print("Blue Curr: ");   bluecurr = I2CREAD (ADDRESS, READ_CURRENT_BLUE); // request from shield peak current reference of blue channel
    Serial.print("Red PWM: ");     redoff = I2CREAD (ADDRESS, READ_OFFTIME_RED); // request from shield off-time of red channel
    Serial.print("Green PWM: ");   greenoff = I2CREAD (ADDRESS, READ_OFFTIME_GREEN); // request from shield off-time of green channel
    Serial.print("Blue PWM: ");    blueoff = I2CREAD (ADDRESS, READ_OFFTIME_BLUE); // request from shield off-time of blue channel
    Serial.print("Walk: ");        walk = I2CREAD (ADDRESS, READ_WALKTIME); // request from shield walk-time
    Serial.print("Brightness: ");  brightness = I2CREAD (ADDRESS, READ_DIMMINGLEVEL); // request from shield brightness level
    Serial.print("FadeTime: ");    fadetime = I2CREAD (ADDRESS, READ_FADERATE); // request from shield fade rate

    // now setup for test

    I2CWRITE2BYTES (ADDRESS, OFFTIME_RED, 0x38); // Set off-time of red channel to 0x38
    I2CWRITE2BYTES (ADDRESS, OFFTIME_GREEN, 0x39); // Set off-time of green channel to 0x39
    I2CWRITE2BYTES (ADDRESS, OFFTIME_BLUE, 0x38); // Set off-time of blue channel to 0x38
    I2CWRITE6BYTES (ADDRESS, CURRENT_RGB, 0x80, 0x80, 0x80); // Set current of red channel to 0x80 = 780mA
    I2CWRITE2BYTES (ADDRESS, FADERATE, 0x0000); // Fade Rate between intensities --> 0.0s
    I2CWRITE2BYTES (ADDRESS, WALKTIME, 0x0000); // walk time between colors = 0s
    I2CWRITE6BYTES (ADDRESS, INTENSITY_RGB, 0x0555, 0x0555, 0x0555); // low level White Light
    I2CWRITE2BYTES (ADDRESS, DIMMINGLEVEL, 0x0FFF); // Maximum dimming level means inensity settings are directly used
    I2CWRITE6BYTES (ADDRESS, INTENSITY_RGB, 0x0, 0x0, 0x0);


}

  // the loop routine runs over and over again forever:
  void loop() {
    String msg;


  // if there is a message in the Mailbox
  if (Mailbox.messageAvailable()){
    // read all the messages present in the queue
    while (Mailbox.messageAvailable())
    {
      Mailbox.readMessage(msg);
    //  Serial.println(msg);
    if (msg=="red"){
        I2CWRITE6BYTES (ADDRESS, INTENSITY_RGB, 0x0fff, 0x0, 0x0); // red
      delay(100);
      }
      else if (msg=="off"){
        I2CWRITE6BYTES (ADDRESS, INTENSITY_RGB, 0x000, 0x0, 0x0); // red
      delay(100);
      }
      else if (msg=="green"){
        I2CWRITE6BYTES (ADDRESS, INTENSITY_RGB, 0x0, 0x0fff, 0x0); // red
      delay(100);
      }
      else if (msg=="blue"){
        I2CWRITE6BYTES (ADDRESS, INTENSITY_RGB, 0x0, 0x0, 0x0fff); // red
      delay(100);
      }
      else if (msg=="white"){
        I2CWRITE6BYTES (ADDRESS, INTENSITY_RGB, 0x0fff, 0x0fff, 0x0fff); // red
      delay(100);
      }
      else if (msg=="cyan"){
        I2CWRITE6BYTES (ADDRESS, INTENSITY_RGB, 0x0, 0x0fff, 0x0fff); // red
      delay(100);
      }
      else if (msg=="purple"){
        I2CWRITE6BYTES (ADDRESS, INTENSITY_RGB, 0x0fff, 0x0, 0x0fff); // red
      delay(100);
     }
      else if (msg=="yellow"){
       I2CWRITE6BYTES (ADDRESS, INTENSITY_RGB, 0x0fff, 0x0999, 0x0); // red
      delay(100);
    }
        else if (msg=="orange"){
        I2CWRITE6BYTES (ADDRESS, INTENSITY_RGB, 0x0fff, 0x0444, 0x0); // red
      delay(100);
    }
      else if (msg=="aqua"){
        I2CWRITE6BYTES (ADDRESS, INTENSITY_RGB, 0x0, 0x0888, 0x0fff); // red
      delay(100);
    }
      else if (msg=="pink"){
        I2CWRITE6BYTES (ADDRESS, INTENSITY_RGB, 0x0fff, 0x0, 0x0888); // red
      delay(100);
    }
    else if (msg=="teal"){
        I2CWRITE6BYTES (ADDRESS, INTENSITY_RGB, 0x0, 0x0fff, 0x0888); // red
      delay(100);
    }

  delay(1000);
    }
  }
}


// Infineon functions follow
/*
  Parameters (IN): int Address - Address of RGB LED Shield, Default 0x15E
                   int Command - Defined I2C Commands i.e. INTENSITY_RED, INTENSITY_GREEN, INTENSITY_BLUE
                   unsigned int Data - 16bit data to be written to slave
  Parameters (OUT): None
  Return Value: None
  Description: This function will write 2 bytes of word to the I2C bus line
  */

  void I2CWRITE2BYTES (int Address, int Command, unsigned int Data)
  {
    unsigned int upperByte, lowerByte; // Separate 4 byte data into 2 byte values
    lowerByte = Data;
    upperByte = Data >> 8;

    unsigned int lowerSLAD = (unsigned int) (Address & 0x00FF); // Putting address into correct format
    unsigned int upperSLAD = Address >> 8;
    upperSLAD |= 0x79; // First 5 bits 11110 and last bit '1' for a write

    Wire.beginTransmission(byte(upperSLAD)); // Start I2C transmission
    Wire.write(byte(lowerSLAD)); // address lower 8 bits of i2c address
    Wire.write(byte(Command)); // write command
    Wire.write(byte(upperByte)); // write data
    Wire.write(byte(lowerByte));
    Wire.endTransmission(true);

  }
   /*
  Parameters (IN): int Address - Address of RGB LED Shield, Default 0x15E
                   int Command - Defined I2C Commands i.e. INTENSITY_RGB, CURRENT_RGB
                   unsigned int DataOne, unsigned int DataTwo, unsigned int DataThree - Three 16bit data to be written to slave
  Parameters (OUT): None
  Return Value: None
  Description: This function will write 6 bytes of word to the I2C bus line
  */

  void I2CWRITE6BYTES (unsigned int Address, unsigned int Command, unsigned int DataOne, unsigned int DataTwo, unsigned int DataThree) // DataOne: Red, DataTwo: Green, DataThree: Blue
  {
    unsigned int upperByte, lowerByte; // Split each Data parameter into upper and lower 8 bytes because I2C format sends 8 bytes of data each time
    lowerByte = DataOne;
    upperByte = DataOne >> 8;

    unsigned int lowerSLAD = (unsigned int) (Address & 0x00FF);
    unsigned int upperSLAD = Address >> 8;
    upperSLAD |= 0x79; // First 5 bits 11110 and last bit '1' for a write

    Wire.beginTransmission(byte(upperSLAD)); // Red
    Wire.write(byte(lowerSLAD));
    Wire.write(byte(Command));
    Wire.write(byte(upperByte));
    Wire.write(byte(lowerByte));
    lowerByte = DataTwo;
    upperByte = DataTwo >> 8;
    Wire.write(byte(upperByte));
    Wire.write(byte(lowerByte));
    lowerByte = DataThree;
    upperByte = DataThree >> 8;
    Wire.write(byte(upperByte));
    Wire.write(byte(lowerByte));
    Wire.endTransmission(true);

  }

/*
  Parameters (IN): int Address - Address of RGB LED Shield, Default 0x15E
                   int Command - Defined I2C Commands i.e. DMX16Bit
                   unsigned int DataOne, unsigned int DataTwo, unsigned int DataThree, usigned int DataFour, unsigned int DataFive - Three 16bit data to be written to slave
  Parameters (OUT): None
  Return Value: None
  Description: This function will write 12 bytes of word to the I2C bus line
  */

  void I2CWRITE12BYTES (unsigned int Address, unsigned int Command, unsigned int DataOne, unsigned int DataTwo, unsigned int DataThree, unsigned int DataFour, unsigned int DataFive, unsigned int DataSix) // DataOne: Red, DataTwo: Green, DataThree: Blue
  {
    unsigned int upperByte, lowerByte;
    lowerByte = DataOne;
    upperByte = DataOne >> 8;

    unsigned int lowerSLAD = (unsigned int) (Address & 0x00FF);
    unsigned int upperSLAD = Address >> 8;
    upperSLAD |= 0x79; // First 5 bits 11110 and last bit '1' for a write

    Wire.beginTransmission(byte(upperSLAD));
    Wire.write(byte(lowerSLAD));
    Wire.write(byte(Command)); // write command
    Wire.write(byte(upperByte)); // write 2 bytes
    Wire.write(byte(lowerByte));

    lowerByte = DataTwo;
    upperByte = DataTwo >> 8;
    Wire.write(byte(upperByte)); // write next two bytes
    Wire.write(byte(lowerByte));

    lowerByte = DataThree;
    upperByte = DataThree >> 8;
    Wire.write(byte(upperByte));
    Wire.write(byte(lowerByte));


    lowerByte = DataFour;
    upperByte = DataFour >> 8;
    Wire.write(byte(upperByte));
    Wire.write(byte(lowerByte));


    lowerByte = DataFive;
    upperByte = DataFive >> 8;
    Wire.write(byte(upperByte));
    Wire.write(byte(lowerByte));


    lowerByte = DataSix;
    upperByte = DataSix >> 8;
    Wire.write(byte(upperByte));
    Wire.write(byte(lowerByte));
    Wire.endTransmission(true);

  }

   /*
  Parameters (IN): int Address - Address of RGB LED Shield, Default 0x15E
                   int Command - Defined read I2C Commands i.e. READ_INTENSITY_RED, READ_INTENSITY_GREEN, READ_INTENSITY_BLUE
  Parameters (OUT): None
  Return Value: Requested data from Shield will be sent back
  Description: This function will request 2 bytes of word from the shield
  */

  unsigned int I2CREAD (unsigned int Address, unsigned int Command) // Returns data sent by slave
  {
    int i = 0;
    unsigned int lowerSLAD = (unsigned int) (Address & 0x00FF);
    unsigned int upperSLAD = Address >> 8;
    upperSLAD |= 0x79;

    Wire.beginTransmission(byte(upperSLAD)); // Red
    Wire.write(byte(lowerSLAD));
    Wire.write(byte(Command));
    Wire.endTransmission(false); // false for Repeated Start

    Wire.beginTransmission(byte(upperSLAD));
    Wire.write(byte(lowerSLAD));
    Wire.requestFrom(upperSLAD, 2, true);
    unsigned int data = 0;

    while(Wire.available())    // slave may send less than requested. Print out received data byte
    {
      message = 1;
      c[i] = Wire.read(); // receive a byte as character
      i++;

    }
    Wire.endTransmission(true);

    data = c[1]; // write data to serial monitor. c[1] is higher byte
    data = (data << 8) | c[0];  // shift left and combine with lower byte
    Serial.print("0x");
    if (data < 0x1000)
        Serial.print("0");
    Serial.println(data, HEX);
    return data;
  }

   /*
  Parameters (IN): int Address - Address of RGB LED Shield, Default 0x15E
                   int Command - DIRECTACCESS_READ
  Parameters (OUT): None
  Return Value: Requested data from the Shield will be returned
  Description: This function will request 4 bytes of data from shield.
  */

unsigned long I2CREAD_DIRECTACCESS (unsigned int Address, unsigned int Command, unsigned long registerAddress)
  {
    int i = 0;
    unsigned int lowerSLAD = (unsigned int) (Address & 0x00FF); // sending command + address
    unsigned int upperSLAD = Address >> 8;
    upperSLAD |= 0x79; // First 5 bits 11110 and last bit '1' for a write

    Wire.beginTransmission(byte(upperSLAD));
    Wire.write(byte(lowerSLAD));
    Wire.write(byte(Command));

    unsigned int firstByte, secondByte, thirdByte, fourthByte;
    firstByte = registerAddress >> 24; // top byte
    secondByte = registerAddress >> 16;
    thirdByte = registerAddress >> 8;
    fourthByte = registerAddress; // bottom byte

    Wire.write(byte(firstByte));
    Wire.write(byte(secondByte));
    Wire.write(byte(thirdByte));
    Wire.write(byte(fourthByte));

    Wire.endTransmission(false); // false for Repeated Start

    Wire.beginTransmission(byte(upperSLAD)); // request for read
    Wire.write(byte(lowerSLAD));
    Wire.requestFrom(upperSLAD, 4, true);
    unsigned long data = 0;

    while(Wire.available())    // slave may send less than requested. Print out received data byte
    {
      d[i] = 0;
      d[i] = Wire.read(); // receive a byte as character
      i++;
    }


    Wire.endTransmission(true);

    data = d[3]; // combining into one variable. Highest byte received first
    data = (data << 8) | d[2];
    data = (data << 8) | d[1];
    data = (data << 8) | d[0];
    Serial.print("0x");
    if (data < 0x10000000)
        Serial.print("0");
    Serial.println(data, HEX);
    return data;
  }
   /*
  Parameters (IN): int Address - Address of RGB LED Shield, Default 0x15E
                   int Command - Defined I2C Commands i.e. DIRECTACCESS_OR, DIRECTACCESS_AND, DIRECTACCESS_MOVE
                   unsigned long registerAddress - address of target register
                   unsigned long Data - 32 bits data to be written to register
  Parameters (OUT): None
  Return Value: None
  Description: This function will write 4 bytes of data to specified register
  */
  void I2CWRITE_DIRECTACCESS (unsigned int Address, unsigned int Command, unsigned long registerAddress, unsigned long Data) // For accessing registers directly
  {
    int i = 0;
    unsigned int lowerSLAD = (unsigned int) (Address & 0x00FF); // sending command + address
    unsigned int upperSLAD = Address >> 8;
    upperSLAD |= 0x79; // First 5 bits 11110 and last bit '1' for a write

    Wire.beginTransmission(byte(upperSLAD));
    Wire.write(byte(lowerSLAD));
    Wire.write(byte(Command));

    unsigned int firstByte, secondByte, thirdByte, fourthByte; // Send address of register first
    firstByte = registerAddress >> 24; // top byte
    secondByte = registerAddress >> 16;
    thirdByte = registerAddress >> 8;
    fourthByte = registerAddress; // bottom byte

    Wire.write(byte(firstByte));
    Wire.write(byte(secondByte));
    Wire.write(byte(thirdByte));
    Wire.write(byte(fourthByte));

    firstByte = Data >> 24; // top byte
    secondByte = Data >> 16;
    thirdByte = Data >> 8;
    fourthByte = Data; // bottom byte


    Wire.write(byte(firstByte)); // send 4 bytes of data
    Wire.write(byte(secondByte));
    Wire.write(byte(thirdByte));
    Wire.write(byte(fourthByte));
    Wire.endTransmission(true);

  }
   /*
  Parameters (IN): int Address - Address of RGB LED Shield, Default 0x15E
                   unsigned int newAddress - Address the shield should change to
  Parameters (OUT): None
  Return Value: None
  Description: This function will change the I2C address of the slave
  */

  void CHANGEADDRESS (unsigned int Address, unsigned int newAddress)
  {
    unsigned int lowerSLAD = (unsigned int) (Address & 0x00FF);
    unsigned int upperSLAD = Address >> 8;
    upperSLAD |= 0x79; // First 5 bits 11110 and last bit '1' for a write

    Wire.beginTransmission(byte(upperSLAD)); // Red
    Wire.write(byte(lowerSLAD));
    Wire.write(byte(0x70)); // Command to change address
    lowerSLAD = (unsigned int) (newAddress & 0x00FF);
    upperSLAD = newAddress >> 7; // Split address into 2 bytes
    upperSLAD |= 0xF0; // 10 bit addressing: First 5 bits have to be 11110.
    upperSLAD &= 0xFE;
    Wire.write(byte(upperSLAD));
    Wire.write(byte(lowerSLAD));
    Wire.endTransmission(true);
  }

   /*
  Parameters (IN): int Address - Address of RGB LED Shield, Default 0x15E
                   unsigned int Command - DMXON, DMXOFF
  Parameters (OUT): None
  Return Value: None
  Description: This function will enable or disable DMX512 control on shield
  */

  void I2CDMX (unsigned int Address, unsigned int Command) // Switch off / on the DMX
  {
    unsigned int lowerSLAD = (unsigned int) (Address & 0x00FF); // Putting address into correct format
    unsigned int upperSLAD = Address >> 8;
    upperSLAD |= 0x79;

    Wire.beginTransmission(byte(upperSLAD)); // Start I2C transmission
    Wire.write(byte(lowerSLAD));
    Wire.write(byte(Command));
    Wire.endTransmission(true);

  }
   /*
  Parameters (IN): int Address - Address of RGB LED Shield, Default 0x15E
  Parameters (OUT): None
  Return Value: None
  Description: This function will request the shield to save configurations to flash memory
  */

  void I2CSAVEPARAM (unsigned int Address)
  {
    int i = 0;
    unsigned int lowerSLAD = (unsigned int) (Address & 0x00FF);
    unsigned int upperSLAD = Address >> 8;
    upperSLAD |= 0x79;

    Wire.beginTransmission(byte(upperSLAD));
    Wire.write(byte(lowerSLAD));
    Wire.write(byte(SAVEPARAMETERS)); // write SAVEPARAMETERS command
    Wire.endTransmission(false); // false for Repeated Start

    Wire.beginTransmission(byte(upperSLAD));
    Wire.write(byte(lowerSLAD)); // write to address lower 8 bits of slave address
    Wire.requestFrom(upperSLAD, 2, true);  // send READ request with upper slave address
    unsigned int data = 0;

    while(Wire.available())    // slave may send less than requested. Print out received data byte
    {
      message = 1;
      c[i] = Wire.read(); // receive a byte as character
      i++;
    }
    Wire.endTransmission(true); // STOP condition

    data = c[1]; // print the data on serial monitor
    data = (data << 8) | c[0];
    Serial.print("0x");
    if (data < 0x1000)
        Serial.print("0");
    Serial.println(data, HEX);

  }
I also made a HTML web app for this purpose, so that i can have a convenient interface and no need to type the address in the address bar, it ran perfectly on the PC and in the chrome browser on an android device. Here is a screenshot :
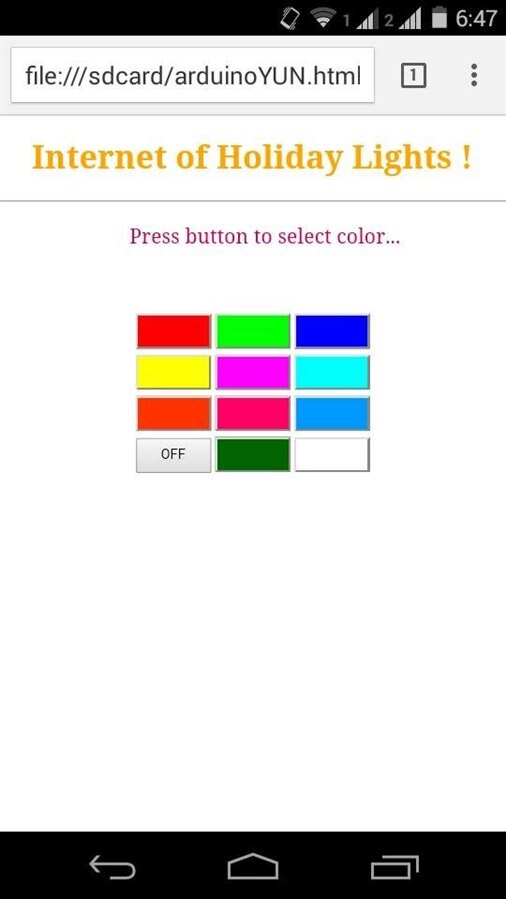
And here is the HTML code (Do change the address of my yun with your yun's address) :
<!doctype html>
<html>
<head>
<title>arduino LEDcolor</title>
<style type="text/css">
<--body{background-color:#abab00;}-->
h1{color:orange;text-align:center;text-decoration:none;}
h2{font-style:italic;}
p{color:#CC0052;text-indent:25px;font-size:20px;text-align:center}
table{text-align:center;}
#one{height:35px;width:75px;}
</style>
</head>
<body>
<h1> Internet of Holiday Lights !</h1>
<hr>
<p>Press button to select color... </p><br>
<table align="center">
<h3><h3>
<tr>
<td ><a href="http://192.168.1.17/mailbox/red" onclick="window.open('#','_blank');window.open(this.href,'_self');"><input type="button" value=""style="background-color:#FF0000" id="one"  /></a></td>
<td ><a href="http://192.168.1.17/mailbox/green" onclick="window.open('#','_blank');window.open(this.href,'_self');"><input type="button" style="background-color:#00FF00"value="" id="one"/></a></td>
<td><a href="http://192.168.1.17/mailbox/blue" onclick="window.open('#','_blank');window.open(this.href,'_self');"><input type="button" value="" style="background-color:#0000FF"id="one"/></a></td>
</tr>
<tr>
<td><a href="http://192.168.1.17/mailbox/yellow" onclick="window.open('#','_blank');window.open(this.href,'_self');"><input type="button" value="" style="background-color:#FFFF00"id="one"/></a></td>
<td><a href="http://192.168.1.17/mailbox/purple" onclick="window.open('#','_blank');window.open(this.href,'_self');"><input type="button" value="" style="background-color:#FF00FF"id="one"/></a></td>
<td><a href="http://192.168.1.17/mailbox/cyan" onclick="window.open('#','_blank');window.open(this.href,'_self');"><input type="button" value="" style="background-color:#00FFFF"id="one"/></a></td>
</tr>
<tr>
<td><a href="http://192.168.1.17/mailbox/orange" onclick="window.open('#','_blank');window.open(this.href,'_self');"><input type="button" value="" style="background-color:#FF3300"id="one"/></a></td>
<td><a href="http://192.168.1.17/mailbox/pink" onclick="window.open('#','_blank');window.open(this.href,'_self');"><input type="button" value="" style="background-color:#FF0066"id="one"/></a></td>
<td><a href="http://192.168.1.17/mailbox/aqua" onclick="window.open('#','_blank');window.open(this.href,'_self');"><input type="button" value="" style="background-color:#0099FF"id="one"/></a></td>
<tr>
<td><a href="http://192.168.1.17/mailbox/off" onclick="window.open('#','_blank');window.open(this.href,'_self');"><input type="button" value="OFF" id="one"/></a></td>
<td><a href="http://192.168.1.17/mailbox/teal" onclick="window.open('#','_blank');window.open(this.href,'_self');"><input type="button" value="" style="background-color:#006600"id="one"/></a></td>
<td><a href="http://192.168.1.17/mailbox/white" onclick="window.open('#','_blank');window.open(this.href,'_self');"><input type="button" value="" style="background-color:#FFFFFF"id="one"/></a></td>
</table>
</tr>
</body>
</html>
HERE is a demo video it explains more I can write :
So this is It, this is how I made the First IoT project of my life, it was a great learning experience for me, and I got to compete with some of the most talented People and work with awesome hardware i.e. Arduino YUN and Infineon RGB shield. I will not feel bad if I don't get 3D printer, because this learning opportunity was the biggest prize for me, Thanks Element14 and specially doctorcdf for selecting me..
Top Comments