

The LCD arrived so I got to work on writing an Arduino sketch, I decided to lay the LCD screen out similar to the Python test screen and this is what I ended up with:
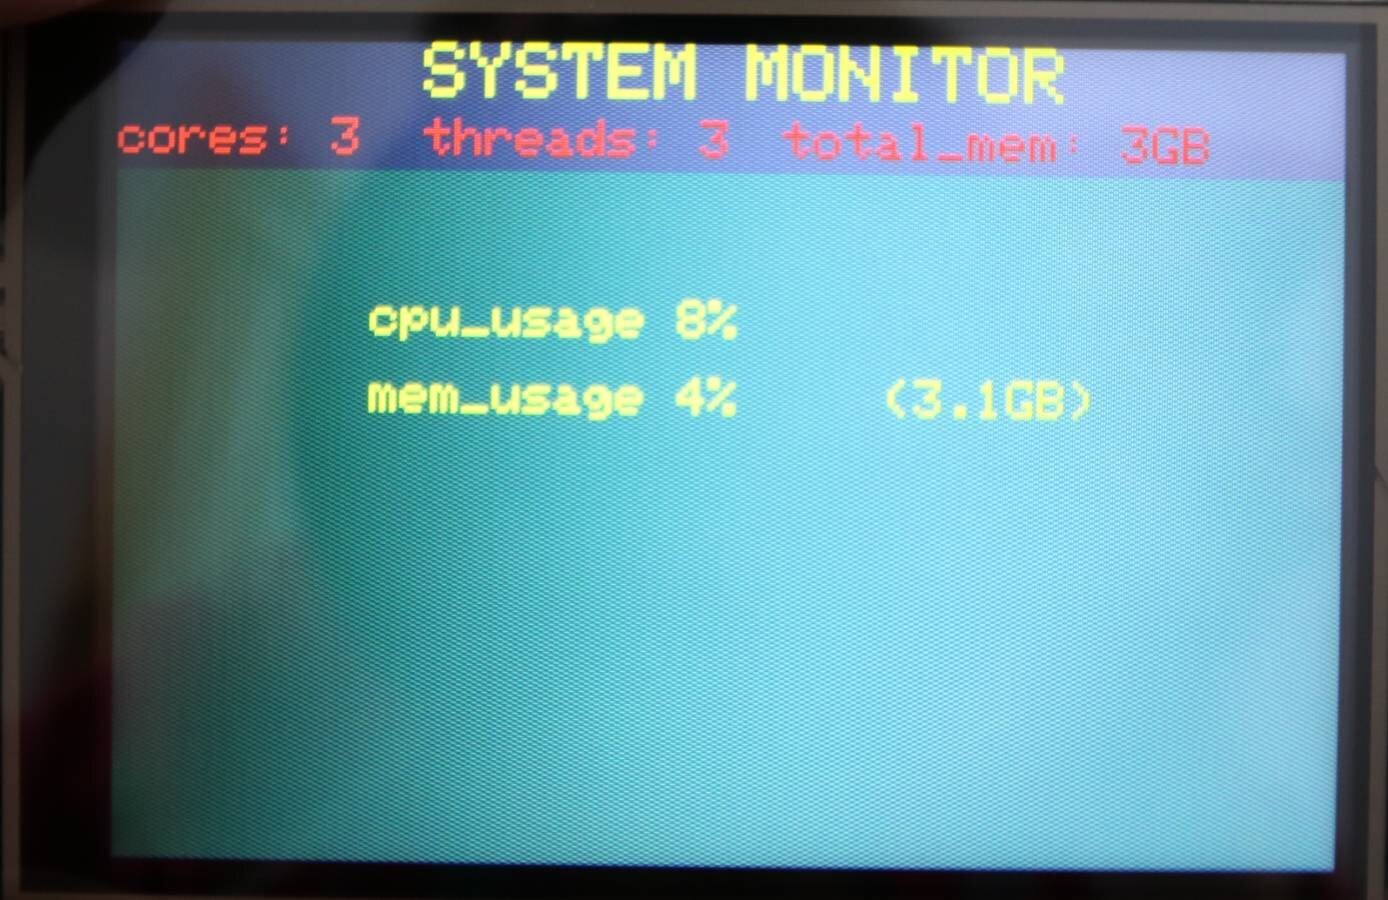
The Arduino side of things is complete, It sends out a command over the serial port and waits to receive some data which it then updates onto the screen:
In the first part of this blog, user Ralph Yamamoto suggested to make it USB compatible rather than serial compatible. For my needs the serial port is the best option but by default the Arduino side is compatible with both serial and USB without needing any changes since the serial side of its onboard USB-serial converter shares the hardware serial port connections. The only change that would be needed is to ask the Python script to use the USB port instead of the serial port on the computer. In my case that would be using /dev/ttyUSB0 rather than /dev/ttyS0 and can be set through the command line when starting the script.
For the Arduino sketch, I kept everything in Arduino-ese. It was my first time ever using an Arduino and it was very easy to do although there are undoubtedly some code optimizations that can be done by replacing some of the Arduino-ese with C code.
The downside of using the Arduino is that its not the fastest runner in the world and takes a while to refresh the screen, from what I understand if I connected the screen in 8-bit mode to the Arduino then it would improve but maybe a future improvement would be to switch the Arduino out for something more capable, I bought a second screen so I can play about maybe on a raspberry pi.
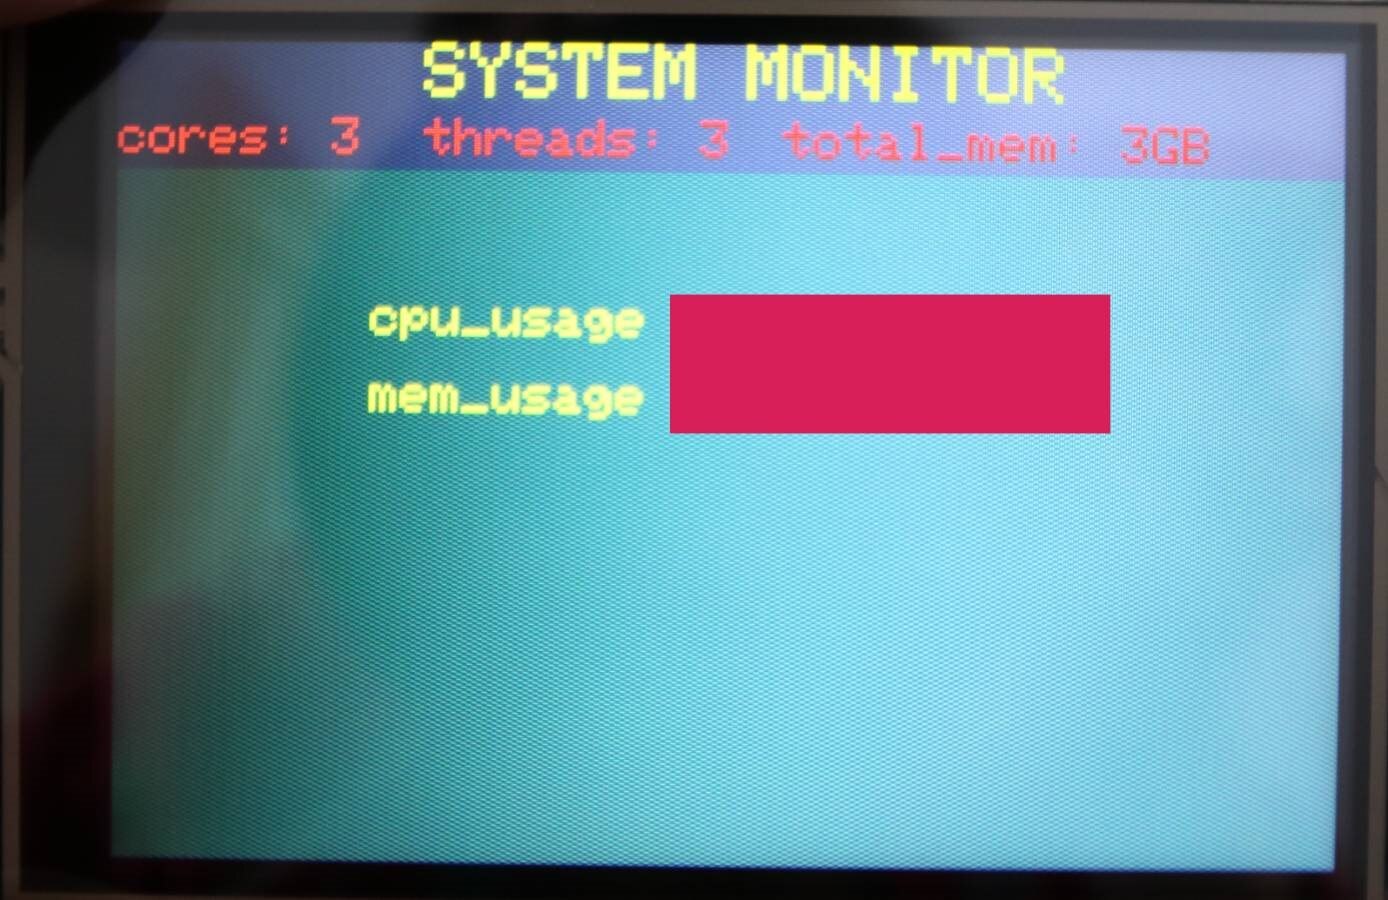
For the time being, rather ask the Arduino to update the full screen whenever a change is needed I just ask it to update the area's that are necessary. I did this by drawing a box the same colour as the background over the top of the text I was replacing and then redrawing the new text, the red box in the image below shows the area that gets redrawn with each update which gives it a much more realistic update speed.
Time to revisit the Python script and get it to talk to the Arduino!
Oh! the Arduino sketch:
#include <SPI.h>
#include "Adafruit_GFX.h"
#include "Adafruit_HX8357.h"


// These are 'flexible' lines that can be changed
#define TFT_CS 10
#define TFT_DC 9
#define TFT_RST 8 // RST can be set to -1 if you tie it to Arduino's reset

// Pass 8-bit (each) R,G,B, get back 16-bit packed color
uint16_t color565(uint8_t r, uint8_t g, uint8_t b) {
  return ((r & 0xF8) << 8) | ((g & 0xFC) << 3) | (b >> 3);
}

#define BGCOLOR color565(100,100,100)
#define TBGCOLOR color565(60,131,103)
#define TITLECOLOR color565(255,255,0)
#define LABELCOLOR color565(255,0,0)
#define LABELYELLOW color565(255,255,0)

// Use hardware SPI (on Uno, #13, #12, #11) and the above for CS/DC
Adafruit_HX8357 tft = Adafruit_HX8357(TFT_CS, TFT_DC, TFT_RST);

String cpuusage = "0.0";
String memusage1 = "0.0";
String memusage2 = "0.0";
String coresinfo = "0";
String threadsinfo = "0";
String totalmeminfo = "0";

String incomingString = "0.0";
String namepair;
String valuepair;
int ind1;
int ind2;
int ind3;

void setup() {
  // put your setup code here, to run once:

  //setup serial port
  Serial.begin(19200);

  //setup LCD screen
  tft.begin();
  tft.setRotation(3);

  //create LCD backgrounds
  tft.fillScreen(BGCOLOR);
  tft.fillRect(0,50,480,270,TBGCOLOR);

  //get static system info
  Serial.println("getCores");
  while(!Serial.available() ){
  }
  if (Serial.available() > 0) {
      // read the incoming byte:
      coresinfo = Serial.readString();

  }

  Serial.println("getThreads");
  while(!Serial.available() ){
  }
  if (Serial.available() > 0) {
      // read the incoming byte:
      threadsinfo = Serial.readString();

  }

  Serial.println("getTotalMem");
  while(!Serial.available() ){
  }
  if (Serial.available() > 0) {
      // read the incoming byte:
      totalmeminfo = Serial.readString();

  }

  //create and draw static labels
  tft.setCursor(120,0);
  tft.setTextColor(TITLECOLOR);  tft.setTextSize(3);
  tft.println("SYSTEM MONITOR");
  tft.setCursor(0,30);
  tft.setTextColor(LABELCOLOR); tft.setTextSize(2);
  tft.println("cores: " + coresinfo);
  tft.setCursor(120,30);
  tft.setTextColor(LABELCOLOR); tft.setTextSize(2);
  tft.println("threads: " + threadsinfo);
  tft.setCursor(260,30);
  tft.setTextColor(LABELCOLOR); tft.setTextSize(2);
  tft.println("total_mem: " +  totalmeminfo + "GB");
  tft.setCursor(100,100);
  tft.setTextColor(LABELYELLOW); tft.setTextSize(2);
  tft.println("cpu_usage");
  tft.setCursor(100,130);
  tft.setTextColor(LABELYELLOW); tft.setTextSize(2);
  tft.println("mem_usage");

}


void loop() {
  // put your main code here, to run repeatedly:
  Serial.println("dynamicInfo");
  while(!Serial.available() ){
  }
  if (Serial.available() > 0) {
      // read the incoming byte:
      incomingString = Serial.readString();
      ind1 = incomingString.indexOf(':'); // find location of first :
      cpuusage = incomingString.substring(0,ind1);
      ind2 = incomingString.indexOf(':', ind1+1 );   //finds location of second :
      memusage1 = incomingString.substring(ind1+1, ind2);
      memusage2 = incomingString.substring(ind2+1);
  }

  tft.fillRect(220,100,175,45,TBGCOLOR);
  tft.setTextColor(LABELYELLOW); tft.setCursor(220,100); tft.setTextSize(2);
  tft.println(cpuusage+"%");
  tft.setTextColor(LABELYELLOW); tft.setCursor(220,130); tft.setTextSize(2);
  tft.println(memusage1+"%");
  tft.setTextColor(LABELYELLOW); tft.setCursor(300,130); tft.setTextSize(2);
  tft.println("("+memusage2+"GB)");


}
