element14 Community
element14 Community
    Register Log In
  • Site
  • Search
  • Log In Register
  • Community Hub
    Community Hub
    • What's New on element14
    • Feedback and Support
    • Benefits of Membership
    • Personal Blogs
    • Members Area
    • Achievement Levels
  • Learn
    Learn
    • Ask an Expert
    • eBooks
    • element14 presents
    • Learning Center
    • Tech Spotlight
    • STEM Academy
    • Webinars, Training and Events
    • Learning Groups
  • Technologies
    Technologies
    • 3D Printing
    • FPGA
    • Industrial Automation
    • Internet of Things
    • Power & Energy
    • Sensors
    • Technology Groups
  • Challenges & Projects
    Challenges & Projects
    • Design Challenges
    • element14 presents Projects
    • Project14
    • Arduino Projects
    • Raspberry Pi Projects
    • Project Groups
  • Products
    Products
    • Arduino
    • Avnet Boards Community
    • Dev Tools
    • Manufacturers
    • Multicomp Pro
    • Product Groups
    • Raspberry Pi
    • RoadTests & Reviews
  • Store
    Store
    • Visit Your Store
    • Choose another store...
      • Europe
      •  Austria (German)
      •  Belgium (Dutch, French)
      •  Bulgaria (Bulgarian)
      •  Czech Republic (Czech)
      •  Denmark (Danish)
      •  Estonia (Estonian)
      •  Finland (Finnish)
      •  France (French)
      •  Germany (German)
      •  Hungary (Hungarian)
      •  Ireland
      •  Israel
      •  Italy (Italian)
      •  Latvia (Latvian)
      •  
      •  Lithuania (Lithuanian)
      •  Netherlands (Dutch)
      •  Norway (Norwegian)
      •  Poland (Polish)
      •  Portugal (Portuguese)
      •  Romania (Romanian)
      •  Russia (Russian)
      •  Slovakia (Slovak)
      •  Slovenia (Slovenian)
      •  Spain (Spanish)
      •  Sweden (Swedish)
      •  Switzerland(German, French)
      •  Turkey (Turkish)
      •  United Kingdom
      • Asia Pacific
      •  Australia
      •  China
      •  Hong Kong
      •  India
      •  Korea (Korean)
      •  Malaysia
      •  New Zealand
      •  Philippines
      •  Singapore
      •  Taiwan
      •  Thailand (Thai)
      • Americas
      •  Brazil (Portuguese)
      •  Canada
      •  Mexico (Spanish)
      •  United States
      Can't find the country/region you're looking for? Visit our export site or find a local distributor.
  • Translate
  • Profile
  • Settings
Arduino
  • Products
  • More
Arduino
Blog Fast Track to Arduino Programming - Lesson 4a, Ethernet input and response test console
  • Blog
  • Forum
  • Documents
  • Quiz
  • Events
  • Polls
  • Files
  • Members
  • Mentions
  • Sub-Groups
  • Tags
  • More
  • Cancel
  • New
Join Arduino to participate - click to join for free!
  • Share
  • More
  • Cancel
Group Actions
  • Group RSS
  • More
  • Cancel
Engagement
  • Author Author: Robert Peter Oakes
  • Date Created: 21 Jun 2014 2:41 AM Date Created
  • Views 1608 views
  • Likes 2 likes
  • Comments 5 comments
  • tutorial
  • web
  • ethernet
  • fast_track_to_arduino_programming
  • intermediate
  • pages
  • arduino
  • wiznet
Related
Recommended

Fast Track to Arduino Programming - Lesson 4a, Ethernet input and response test console

Robert Peter Oakes
Robert Peter Oakes
21 Jun 2014

Link back to main menu Fast Track to Arduino Programming


Sorry this one was so long in coming, it has taken a while to work through getting the web page up and running without being complicated and also to figure the best pins to use while not compromising the next few lessons as I want to build upon this lesson in future tutorials, the video should be up in the next couple of days (by 23rd June 2014)


So in preparation for the video I am going to preview this one with what the output is going to look like

image

You don't have permission to edit metadata of this video.
Edit media
x
image
Upload Preview
image


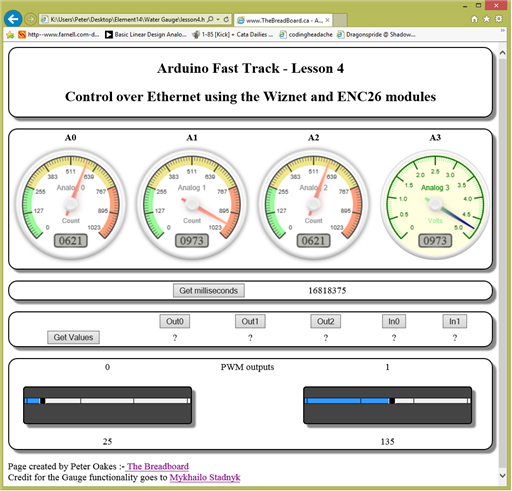
Yes this is the output of the this tutorial, it is a fully functional html page that actually talks to your Arduino over tcp/ip (Ethernet) and controls and retrieves data for the various I/O pins of the Arduino UNO


If you think about it, this tutorial is about adding an Ethernet shield to the UNO, so how are we going to test it, there are plenty of Android or IOS clients that can be configured to work but we need something we can all use and run on a basic PC, the best way to do this is provide the client... Please welcome my test client  or  control console, depending on how you look at it image. A simple web page that will drive the UNO from anywhere on your home network and you can modify it to suit your own projects later


You can turn on and off three digital pins (Pin 2, 3 and 5)

You can read two input pins (Actually all of them but only two with buttons) (Pins 7 and 8)

You can change the PWM output of two channels with a simple slide of the mouse (Pin 6 and 9)

and it automatically reads the Analog inputs of 4 channels every second and displays the results on those pretty Gauge's... sweet (Pins A0, 1, 2 and 3)

oh and lastly it will retrieve the current Mills() value and show you the up time of the board


Oh and while it is doing all of this it is writing debug info to the serial port and responding o commands from the serial port too


The video is over an hour long, it needs to be edited and should be up tomorrow (Later today, image its 2:39am so ill do it later), code for sketch it posted now so enjoy


If you think this looks scary and beyond your abilities, I don't blame you, but believe me it is not, this is tested on IE, it has issues with Chrome, it is not the Arduino's fault but I am not a pro WEB developer so I am not sure why, I have not yet tested on other browsers. I will post the HLML page now and if there is a web developer out there that can tell me why it fails in chrome, that would be nice, correct the file and return it to me would be appreciated too, I will give you the credit for the fix in this blog


The WEB page is pure browser side, it uses HTML 5, Canvas and CSS but everything is contained in the one file attached. The is room for improvement and optimization but this is an Arduino tutorial, not a WEB one. The java script uses ajax and json formatted data returned from the UNO.


The code on the UNO will not look much different from lesson 3B but of course with an Ethernet reader which you will see is almost identical to the serial reader we have already reviewed.


The process to doCommand() in lesson 3 is the same with the exception of adjustments for the change in pins and available I/O and adding even more commands (The process is the same) but you will learn about recursion


imageimage


A quick explanation as to why I have eliminated eight pins from the available I/O


5 Pins are used by SPI

MOSI - 11

MISO - 12

SCK - 13

Ethernet Chip Select - 10

SD Card Chip Select - 4


2 pins for I2C

SCL - A4

SDA - A5


2 Pins used by the serial port to talk to your PC via the USB

TX - 0

RX - 1


Future lessons are going to use these pins (Lesson 4 is already using the SPI pins and all previous ones are using TX and RX) so I figured it is better to eliminate them now to save confusion later and allow me to keep things consistent as possible


You may think this seriously inhibits the capability of the UNO, it does not, with the addition of a single chip I can extend digital IO by 8 pins, add 16 PWM channels or even an LCD display without loosing any more pins and by the time these lessons are over we will have done all of this.


in order for things to work you will need to edit the top of the htm page, you can use any text editor for this, set the ip address to suit your environment and match the IP address you use in the sketch


<!DOCTYPE html>

<html><head>

  <title>www.TheBreadBoard.ca - Arduino Fast Track - Lesson 4</title>

  <script>

   var myIPaddress = "http://192.168.1.247/";

   var analogAlljson = "analogAlljson";

   var digitalAlljson = "digitalAlljson";
  
   var analog0 = 0;

   var analog1 = 0;

   var analog2 = 0;

   var analog3 = 0;
  
   var Gauge = function (b) {

Attachments:
lesson4.htm.zip
Arduino_Lesson_4_processing_Commands_from_Ethernet.ino.zip
  • Sign in to reply

Top Comments

  • Robert Peter Oakes
    Robert Peter Oakes over 9 years ago in reply to Former Member +1
    You can add 16 channel PWM by using a chip like TLC58116 (Or Similar) http://www.ti.com.cn/cn/lit/ds/symlink/tlc59116.pdf , it would attach to the I2C bus and as long as there was not another device on…
  • Former Member
    Former Member over 9 years ago in reply to Robert Peter Oakes

    Thanks for your reply.

    I will work on these and see what I can do.

    Of course, I will look at 3B too and will get back to you.

    Thanks a lot.

    • Cancel
    • Vote Up 0 Vote Down
    • Sign in to reply
    • More
    • Cancel
  • Robert Peter Oakes
    Robert Peter Oakes over 9 years ago in reply to Former Member

    You can add 16 channel PWM by using a chip like TLC58116 (Or Similar) http://www.ti.com.cn/cn/lit/ds/symlink/tlc59116.pdf , it would attach to the I2C bus and as long as there was not another device on the bus with the same address it will work.

    image

    or one of these PCA9685|NXP PCA9685: 16-channel, 12-bit PWM Fm+ I²C-bus LED controller

    image


    You can add an 8 or 16 pin digital IO by using a device like MCP23017 (16 bits) again, it would attach to the I2C bus and as long as there was not another device on the bus with the same address it will work. You can have 8 of these on the same I2C bus.

    image


    I am starting to look at those older code samples and am updating them to work with the latest IDE. I just re-posted 3B to GitHub if your interested

    • Cancel
    • Vote Up +1 Vote Down
    • Sign in to reply
    • More
    • Cancel
  • Former Member
    Former Member over 9 years ago in reply to Robert Peter Oakes

    Dear Peter,

    You mentioned that you can extend digital IO by 8 pins, add 16 PWM channels or even an LCD display without loosing any more pins with the addition of a single chip.

    Would you please share how to do this?

    I also found some errors because of library update and still working on it but am very interested in how to extend pins with a single chip.

    If you could share the idea, it would be highly appreciated.

    I am using an UNO but thinking about to use Mega... but hope that I can stick with UNO/Nano.

    Thanks for your great tutorial.~

    Regards,

    IC

    • Cancel
    • Vote Up 0 Vote Down
    • Sign in to reply
    • More
    • Cancel
  • Robert Peter Oakes
    Robert Peter Oakes over 11 years ago in reply to pferreira

    I will look into it tonight and hopefully correct it for you


    you can also check in my GITHUB if you like, i just uploaded them to there last night, I will still check later though in case I added an error in the file


    this is the link https://github.com/thebreadboard/Arduino-Tutorials


    Regards

    Peter

    • Cancel
    • Vote Up 0 Vote Down
    • Sign in to reply
    • More
    • Cancel
  • pferreira
    pferreira over 11 years ago

    Dear Peter:

    First of all, congratulations for the beautiful and concise work you've been doing.

    But I would like to know what happened to the lesson4 sketch as,  when I've tried

    to compile it,  I got several message errors. Besides that the 5,6K size (as in the page)

    is not matching the downloaded  one ( ~17k).

    Excuse me if I I'm wrong.

    • Cancel
    • Vote Up 0 Vote Down
    • Sign in to reply
    • More
    • Cancel
element14 Community

element14 is the first online community specifically for engineers. Connect with your peers and get expert answers to your questions.

  • Members
  • Learn
  • Technologies
  • Challenges & Projects
  • Products
  • Store
  • About Us
  • Feedback & Support
  • FAQs
  • Terms of Use
  • Privacy Policy
  • Legal and Copyright Notices
  • Sitemap
  • Cookies

An Avnet Company © 2025 Premier Farnell Limited. All Rights Reserved.

Premier Farnell Ltd, registered in England and Wales (no 00876412), registered office: Farnell House, Forge Lane, Leeds LS12 2NE.

ICP 备案号 10220084.

Follow element14

  • X
  • Facebook
  • linkedin
  • YouTube