element14 Community
element14 Community
    Register Log In
  • Site
  • Search
  • Log In Register
  • Community Hub
    Community Hub
    • What's New on element14
    • Feedback and Support
    • Benefits of Membership
    • Personal Blogs
    • Members Area
    • Achievement Levels
  • Learn
    Learn
    • Ask an Expert
    • eBooks
    • element14 presents
    • Learning Center
    • Tech Spotlight
    • STEM Academy
    • Webinars, Training and Events
    • Learning Groups
  • Technologies
    Technologies
    • 3D Printing
    • FPGA
    • Industrial Automation
    • Internet of Things
    • Power & Energy
    • Sensors
    • Technology Groups
  • Challenges & Projects
    Challenges & Projects
    • Design Challenges
    • element14 presents Projects
    • Project14
    • Arduino Projects
    • Raspberry Pi Projects
    • Project Groups
  • Products
    Products
    • Arduino
    • Avnet Boards Community
    • Dev Tools
    • Manufacturers
    • Multicomp Pro
    • Product Groups
    • Raspberry Pi
    • RoadTests & Reviews
  • Store
    Store
    • Visit Your Store
    • Choose another store...
      • Europe
      •  Austria (German)
      •  Belgium (Dutch, French)
      •  Bulgaria (Bulgarian)
      •  Czech Republic (Czech)
      •  Denmark (Danish)
      •  Estonia (Estonian)
      •  Finland (Finnish)
      •  France (French)
      •  Germany (German)
      •  Hungary (Hungarian)
      •  Ireland
      •  Israel
      •  Italy (Italian)
      •  Latvia (Latvian)
      •  
      •  Lithuania (Lithuanian)
      •  Netherlands (Dutch)
      •  Norway (Norwegian)
      •  Poland (Polish)
      •  Portugal (Portuguese)
      •  Romania (Romanian)
      •  Russia (Russian)
      •  Slovakia (Slovak)
      •  Slovenia (Slovenian)
      •  Spain (Spanish)
      •  Sweden (Swedish)
      •  Switzerland(German, French)
      •  Turkey (Turkish)
      •  United Kingdom
      • Asia Pacific
      •  Australia
      •  China
      •  Hong Kong
      •  India
      •  Korea (Korean)
      •  Malaysia
      •  New Zealand
      •  Philippines
      •  Singapore
      •  Taiwan
      •  Thailand (Thai)
      • Americas
      •  Brazil (Portuguese)
      •  Canada
      •  Mexico (Spanish)
      •  United States
      Can't find the country/region you're looking for? Visit our export site or find a local distributor.
  • Translate
  • Profile
  • Settings
Arduino
  • Products
  • More
Arduino
Blog Interfacing a Soil Moisture Sensor with Arduino Nano
  • Blog
  • Forum
  • Documents
  • Quiz
  • Events
  • Polls
  • Files
  • Members
  • Mentions
  • Sub-Groups
  • Tags
  • More
  • Cancel
  • New
Join Arduino to participate - click to join for free!
  • Share
  • More
  • Cancel
Group Actions
  • Group RSS
  • More
  • Cancel
Engagement
  • Author Author: rachna34
  • Date Created: 13 Aug 2024 5:33 PM Date Created
  • Views 4048 views
  • Likes 7 likes
  • Comments 1 comment
  • arduino uno
  • arduino_tutorials
  • arduino tutorials
  • arduino_development
  • arduino uno R4
  • arduino
Related
Recommended

Interfacing a Soil Moisture Sensor with Arduino Nano

rachna34
rachna34
13 Aug 2024

In this article, we'll explore how to interface a soil moisture sensor with an Arduino Nano, enabling you to create a simple yet effective soil moisture monitoring system.

What is a Soil Moisture Sensor?

A soil moisture sensor is an electronic device that measures the volumetric water content in the soil. It typically consists of two components: the sensor probes and the sensor circuit. The probes are inserted into the soil, and they measure the resistance or capacitance of the soil to determine its moisture content. This data can then be used to trigger actions like turning on a water pump, sending alerts, or simply logging the data for analysis.

There are two main types of soil moisture sensors commonly used with Arduino:

  1. Resistive Soil Moisture Sensors: These measure the resistance of the soil, which varies with moisture content. The wetter the soil, the lower the resistance.
  2. Capacitive Soil Moisture Sensors: These measure the dielectric permittivity of the soil, which changes with moisture content. Capacitive sensors are generally more durable and less prone to corrosion than resistive sensors.

Components Required

To create a soil moisture monitoring system using an Arduino, you will need the following components:

  • Arduino Board: An Arduino Uno or Nano works well for this project.
  • Soil Moisture Sensor: A resistive or capacitive sensor.
  • Jumper Wires: To connect the components.
  • Breadboard: For making the connections.
  • 10K Ohm Resistor: To form a voltage divider if necessary.
  • LCD Display: To display the moisture level.

Understanding the Soil Moisture Sensor

Before interfacing the sensor with the Arduino, it's essential to understand how the sensor works.

  • Resistive Soil Moisture Sensor: This sensor has two conductive probes that are inserted into the soil. When the soil is dry, the resistance between the probes is high, and when the soil is wet, the resistance decreases. The sensor outputs an analog voltage corresponding to the moisture level in the soil.
  • Capacitive Soil Moisture Sensor: This sensor works on the principle of capacitance, where the sensor's dielectric constant changes based on the soil moisture. Unlike the resistive sensor, this type doesn't involve direct electrical contact with the soil, making it more resistant to corrosion.

Circuit Diagram

Soil sensor with Arduino Nano

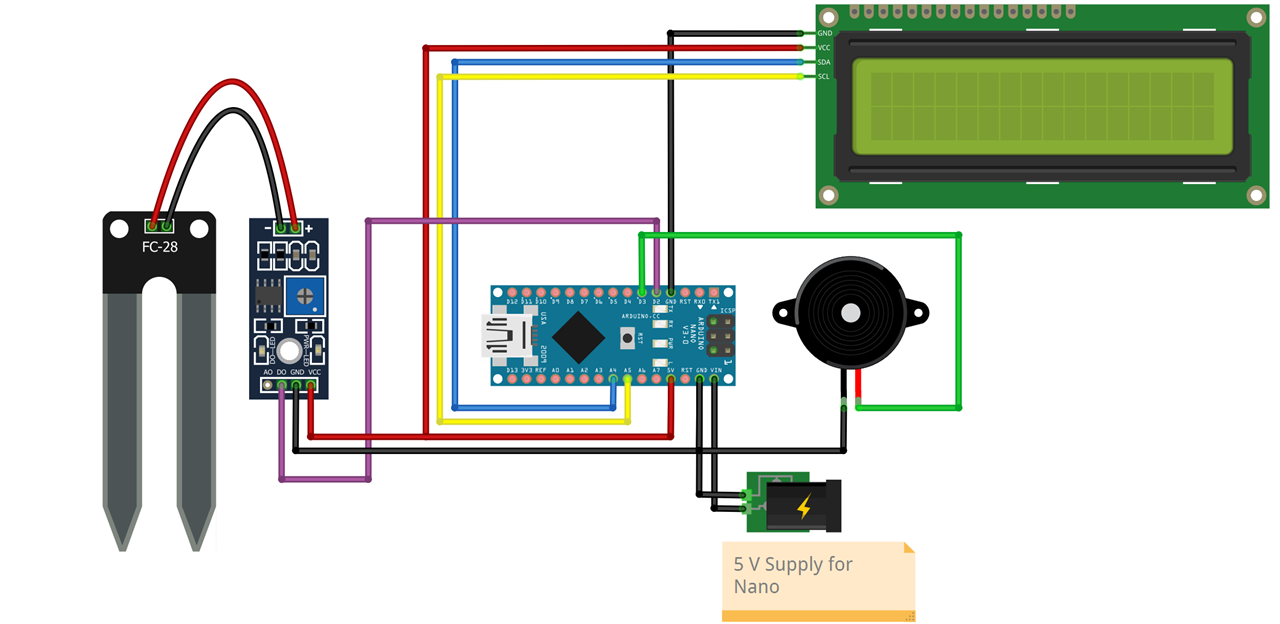
This wiring diagram illustrates a system where an Arduino Nano is connected to a soil moisture sensor (FC-28), an I2C LCD display, a buzzer, and a relay module, all powered by a 5V supply. The soil moisture sensor detects the moisture level in the soil and sends a digital signal to the Arduino. Depending on the moisture level, the Arduino can activate the relay, which could control a device like a water pump, and trigger the buzzer to alert when the soil is dry. The I2C LCD display is used to show the moisture readings or other relevant information. This setup is designed for an automated irrigation system, where the Arduino monitors soil conditions and automatically controls watering to maintain optimal soil moisture level.

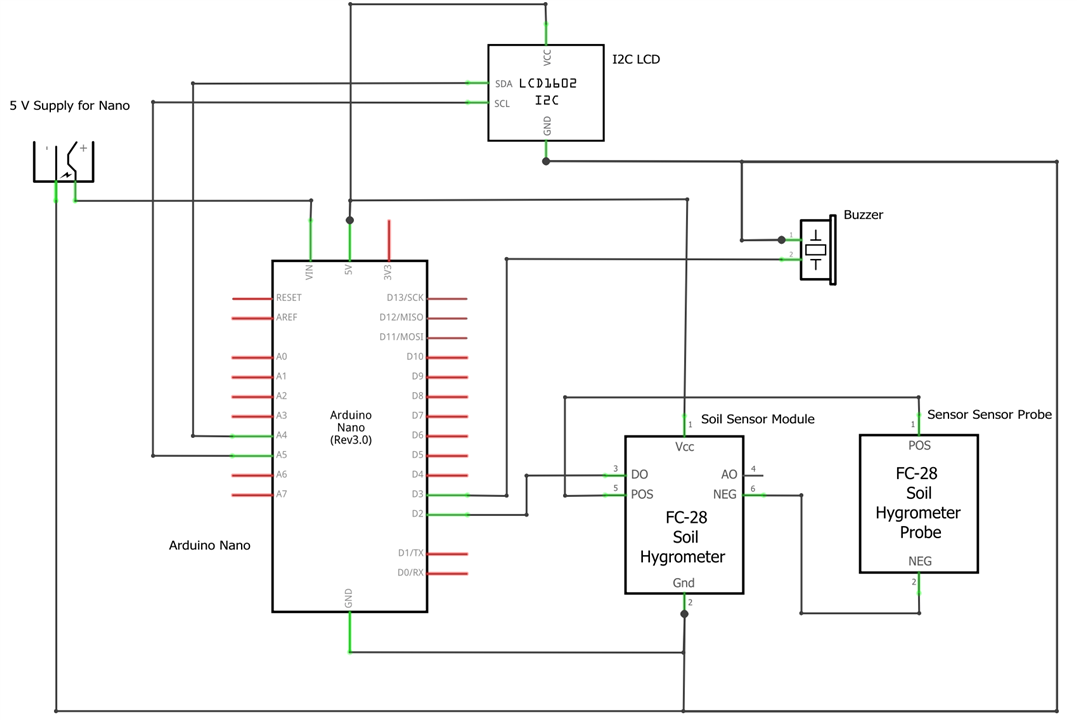
Here is the Schematic Diagram:

image

Arduino Code

#include <LiquidCrystal_I2C.h>                    // Library to Run I2C LCD

// Set the LCD address to 0x27 for a 16 chars and 2 line display
LiquidCrystal_I2C lcd(0x27, 16, 2);

#define BUZZER_PIN 3                              // The buzzer will start when the soil is Dry and it stops when its moisture is OK

// Define the digital pin for the soil moisture sensor
const int soilMoisturePin = 2;

// Variable to store Output
int sensorOutput = 0;

// index for loop
int i;

void setup() {
  // initialize the lcd
  lcd.init();
  // Turn on the Backlight
  lcd.backlight();
  // Clear the display buffer
  lcd.clear();

  // Initialize the digital pin as an input
  pinMode(soilMoisturePin, INPUT);
  // Innitialize buzzer pin as output
  pinMode(BUZZER_PIN, OUTPUT);

  // Print a message to the LCD
  lcd.setCursor(0, 0);
  lcd.print("Soil Moisture:");
}

void loop() {
  // Read the value from the soil moisture sensor
  sensorOutput = digitalRead(soilMoisturePin);

  // Display the moisture status on the LCD
  lcd.setCursor(0, 1);
  if (sensorOutput == HIGH) {
    lcd.print("Dry");
    for(i=0;i<3;i++)
    {
      digitalWrite(BUZZER_PIN,HIGH);
      delay(200);
      digitalWrite(BUZZER_PIN,LOW);
      delay(200);
    }
  } else {
    lcd.print("Wet");
  }

  // Wait for 1 seconds before the next loop iteration
  delay(1000);
}

Related Article: Interfacing Soil Moisture Sensor with Arduino

  • Sign in to reply
  • DAB
    DAB 10 months ago

    If you use the resistive sensor, make sure that the voltage across the probe is around 1 v, otherwise you will get pitting as the probe begins to react to the moisture and electrolysis begins. 

    • Cancel
    • Vote Up 0 Vote Down
    • Sign in to reply
    • More
    • Cancel
element14 Community

element14 is the first online community specifically for engineers. Connect with your peers and get expert answers to your questions.

  • Members
  • Learn
  • Technologies
  • Challenges & Projects
  • Products
  • Store
  • About Us
  • Feedback & Support
  • FAQs
  • Terms of Use
  • Privacy Policy
  • Legal and Copyright Notices
  • Sitemap
  • Cookies

An Avnet Company © 2025 Premier Farnell Limited. All Rights Reserved.

Premier Farnell Ltd, registered in England and Wales (no 00876412), registered office: Farnell House, Forge Lane, Leeds LS12 2NE.

ICP 备案号 10220084.

Follow element14

  • X
  • Facebook
  • linkedin
  • YouTube