element14 Community
element14 Community
    Register Log In
  • Site
  • Search
  • Log In Register
  • Community Hub
    Community Hub
    • What's New on element14
    • Feedback and Support
    • Benefits of Membership
    • Personal Blogs
    • Members Area
    • Achievement Levels
  • Learn
    Learn
    • Ask an Expert
    • eBooks
    • element14 presents
    • Learning Center
    • Tech Spotlight
    • STEM Academy
    • Webinars, Training and Events
    • Learning Groups
  • Technologies
    Technologies
    • 3D Printing
    • FPGA
    • Industrial Automation
    • Internet of Things
    • Power & Energy
    • Sensors
    • Technology Groups
  • Challenges & Projects
    Challenges & Projects
    • Design Challenges
    • element14 presents Projects
    • Project14
    • Arduino Projects
    • Raspberry Pi Projects
    • Project Groups
  • Products
    Products
    • Arduino
    • Avnet & Tria Boards Community
    • Dev Tools
    • Manufacturers
    • Multicomp Pro
    • Product Groups
    • Raspberry Pi
    • RoadTests & Reviews
  • About Us
  • Store
    Store
    • Visit Your Store
    • Choose another store...
      • Europe
      •  Austria (German)
      •  Belgium (Dutch, French)
      •  Bulgaria (Bulgarian)
      •  Czech Republic (Czech)
      •  Denmark (Danish)
      •  Estonia (Estonian)
      •  Finland (Finnish)
      •  France (French)
      •  Germany (German)
      •  Hungary (Hungarian)
      •  Ireland
      •  Israel
      •  Italy (Italian)
      •  Latvia (Latvian)
      •  
      •  Lithuania (Lithuanian)
      •  Netherlands (Dutch)
      •  Norway (Norwegian)
      •  Poland (Polish)
      •  Portugal (Portuguese)
      •  Romania (Romanian)
      •  Russia (Russian)
      •  Slovakia (Slovak)
      •  Slovenia (Slovenian)
      •  Spain (Spanish)
      •  Sweden (Swedish)
      •  Switzerland(German, French)
      •  Turkey (Turkish)
      •  United Kingdom
      • Asia Pacific
      •  Australia
      •  China
      •  Hong Kong
      •  India
      • Japan
      •  Korea (Korean)
      •  Malaysia
      •  New Zealand
      •  Philippines
      •  Singapore
      •  Taiwan
      •  Thailand (Thai)
      • Vietnam
      • Americas
      •  Brazil (Portuguese)
      •  Canada
      •  Mexico (Spanish)
      •  United States
      Can't find the country/region you're looking for? Visit our export site or find a local distributor.
  • Translate
  • Profile
  • Settings
Arduino
  • Products
  • More
Arduino
Blog Three ways to reflash an Arduino Yun
  • Blog
  • Forum
  • Documents
  • Quiz
  • Events
  • Polls
  • Files
  • Members
  • Mentions
  • Sub-Groups
  • Tags
  • More
  • Cancel
  • New
Join Arduino to participate - click to join for free!
  • Share
  • More
  • Cancel
Group Actions
  • Group RSS
  • More
  • Cancel
Engagement
  • Author Author: Workshopshed
  • Date Created: 18 Apr 2015 11:39 AM Date Created
  • Views 2059 views
  • Likes 3 likes
  • Comments 4 comments
  • flash
  • arduino_yun
Related
Recommended

Three ways to reflash an Arduino Yun

Workshopshed
Workshopshed
18 Apr 2015

The Arduino Yun is a 2 part device, half a conventional Arduino micro controller and half an embedded Linux using OpenWRT/Linino with Ethernet and Wifi connectivity.


Because there is an operating system as well as application code on the Linux side there is a need to keep that code up-to date. This guide compares the different techniques and discusses when best to use each one.

image

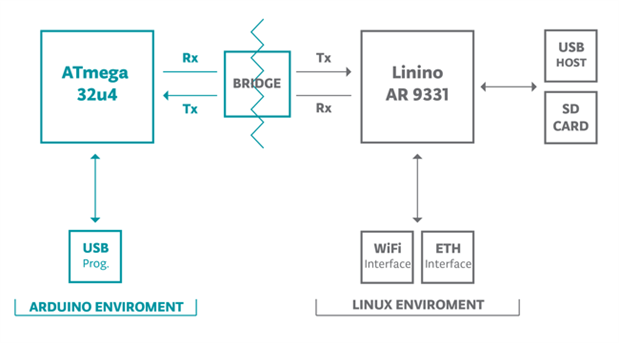
The Linux portion is made up of the software components, the boot loader (U-Boot), the Kernel and the Applications/Configuration. Reflashing the Yun will update all of these so you will loose your configuration and applications. For the applications it is possible to upgrade those independently using the package manager OPKM.


Ensure that you've copied your applications and configuration or have a way of recovering those before continuing with these processes. Note that you may need to update packages using OPKM following a reflashing.


There are various versions of the instructions for updating the flash, many of these are specific to particular companies or projects. However there are generic instructions on the Arduino site. Arduino - YunSysupgrade


IMPORTANT!

Do not power off the Yun whilst doing a reflashing process!


It will take about 3 to 5 minutes so ensure that you have time and power to complete the process.

Powering off the Yun in a middle of a reflashing process may result in a device that won't boot.


Getting images


The Yun will support several different images including OpenWRT, you can even build your own images. For starting up or recovering a Yun you are probably best with the official Arduino image, an alternative that I've found to work is the Linino image.


http://www.arduino.cc/en/Main/Software

http://wiki.linino.org/doku.php


SD Card and Web UI


This is the standard approach, you copy the image file to the SD card and use the UI to load it. It's a fairly straight forward process with the only "gotcha" being that the Wifi is reset hence you need to connect to the Arduino's access point as if you'd just started from scratch.


SSH and sysupgrade


Using the console and sysupgrade is a good approach if you are comfortable with using the shell. It would also be a good approach if you had many devices to upgrade as it could be automated. You can also use the WGET command to download the image directly onto the Yun which is a good approach if you don't have another technique for getting images onto the SD Card. The Linino site suggests that you can preserve your configuration files with this approach but I've not tried that.


Arduino - YunSysupgrade

Linino Wiki - Upgrade using SysUpgrade


U-Boot and TFTP


WARNING!
Following this guide will VOID the WARRANTY of your Yún


The instructions at the top of the Arduino page tell you not to do this step unless you are really certain. I've not actually managed to find out what that warranty consists of so I'm not sure what you are giving away.


However I'd recommend trying the other approaches first as this technique is a little fiddly. The key thing about this process is that it will work even if your Yun does not boot up properly. I had to try this approach as I'd unthinkingly pulled the power in the middle of a reflashing step.


This approach requires 3 different images. It's worth doing these as a set because there may be incompatibilities between the different components. I ended up at one point with a board that would boot partially and then report lots of errors.


You must use the WIRED Ethernet connector for this approach.


You also need to setup a TFTP server, I found a simple one for windows that I could use. It's worth downloading a client too so you can test your server. Note that you might need to adjust your firewall settings to be able to use the server.


http://www.arduino.cc/en/Tutorial/YunUBootReflash

  • Sign in to reply

Top Comments

  • clem57
    clem57 over 10 years ago in reply to Workshopshed +1
    I was thinking of using COM port into linux and not Ethernet which is more natural. Clem
  • Workshopshed
    Workshopshed over 10 years ago in reply to clem57

    That makes sense image

    • Cancel
    • Vote Up 0 Vote Down
    • Sign in to reply
    • More
    • Cancel
  • clem57
    clem57 over 10 years ago in reply to Workshopshed

    I was thinking of using COM port into linux and not Ethernet which is more natural.

    Clem

    • Cancel
    • Vote Up +1 Vote Down
    • Sign in to reply
    • More
    • Cancel
  • Workshopshed
    Workshopshed over 10 years ago in reply to clem57

    I'm not sure I quite get you. You can SSH in on either the Ethernet or WiFi IP addresses, assuming they are connected.

    It's also possible to see the boot process and directly interact using serial over the micro USB socket if you've installed http://www.arduino.cc/en/Tutorial/YunSerialTerminal you need that for the U-Boot approach.

    I've not used the USB type A socket, is that attached to the Linux side of the Yun? I'm guessing you could use it for thumb drives, keyboards , mice etc...

    • Cancel
    • Vote Up 0 Vote Down
    • Sign in to reply
    • More
    • Cancel
  • clem57
    clem57 over 10 years ago

    Nice. One thing to note on the SSH approach Is the Linaro is connected to the host USB (wield shaped) and not the programmable USB most people expect. Therefore If you use the latter, a serial sketch needs to be running using bridge code to talk to Linaro system. IMHO this is a very nice tool to play.

    Clem

    • Cancel
    • Vote Up 0 Vote Down
    • Sign in to reply
    • More
    • Cancel
element14 Community

element14 is the first online community specifically for engineers. Connect with your peers and get expert answers to your questions.

  • Members
  • Learn
  • Technologies
  • Challenges & Projects
  • Products
  • Store
  • About Us
  • Feedback & Support
  • FAQs
  • Terms of Use
  • Privacy Policy
  • Legal and Copyright Notices
  • Sitemap
  • Cookies

An Avnet Company © 2025 Premier Farnell Limited. All Rights Reserved.

Premier Farnell Ltd, registered in England and Wales (no 00876412), registered office: Farnell House, Forge Lane, Leeds LS12 2NE.

ICP 备案号 10220084.

Follow element14

  • X
  • Facebook
  • linkedin
  • YouTube