element14 Community
element14 Community
    Register Log In
  • Site
  • Search
  • Log In Register
  • About Us
  • Community Hub
    Community Hub
    • What's New on element14
    • Feedback and Support
    • Benefits of Membership
    • Personal Blogs
    • Members Area
    • Achievement Levels
  • Learn
    Learn
    • Ask an Expert
    • eBooks
    • element14 presents
    • Learning Center
    • Tech Spotlight
    • STEM Academy
    • Webinars, Training and Events
    • Learning Groups
  • Technologies
    Technologies
    • 3D Printing
    • FPGA
    • Industrial Automation
    • Internet of Things
    • Power & Energy
    • Sensors
    • Technology Groups
  • Challenges & Projects
    Challenges & Projects
    • Design Challenges
    • element14 presents Projects
    • Project14
    • Arduino Projects
    • Raspberry Pi Projects
    • Project Groups
  • Products
    Products
    • Arduino
    • Avnet Boards Community
    • Dev Tools
    • Manufacturers
    • Multicomp Pro
    • Product Groups
    • Raspberry Pi
    • RoadTests & Reviews
  • Store
    Store
    • Visit Your Store
    • Choose another store...
      • Europe
      •  Austria (German)
      •  Belgium (Dutch, French)
      •  Bulgaria (Bulgarian)
      •  Czech Republic (Czech)
      •  Denmark (Danish)
      •  Estonia (Estonian)
      •  Finland (Finnish)
      •  France (French)
      •  Germany (German)
      •  Hungary (Hungarian)
      •  Ireland
      •  Israel
      •  Italy (Italian)
      •  Latvia (Latvian)
      •  
      •  Lithuania (Lithuanian)
      •  Netherlands (Dutch)
      •  Norway (Norwegian)
      •  Poland (Polish)
      •  Portugal (Portuguese)
      •  Romania (Romanian)
      •  Russia (Russian)
      •  Slovakia (Slovak)
      •  Slovenia (Slovenian)
      •  Spain (Spanish)
      •  Sweden (Swedish)
      •  Switzerland(German, French)
      •  Turkey (Turkish)
      •  United Kingdom
      • Asia Pacific
      •  Australia
      •  China
      •  Hong Kong
      •  India
      •  Korea (Korean)
      •  Malaysia
      •  New Zealand
      •  Philippines
      •  Singapore
      •  Taiwan
      •  Thailand (Thai)
      • Americas
      •  Brazil (Portuguese)
      •  Canada
      •  Mexico (Spanish)
      •  United States
      Can't find the country/region you're looking for? Visit our export site or find a local distributor.
  • Translate
  • Profile
  • Settings
Arduino
  • Products
  • More
Arduino
Blog TinkerCad Tutorial #1 Simple Arduino LED Blink
  • Blog
  • Forum
  • Documents
  • Quiz
  • Events
  • Polls
  • Files
  • Members
  • Mentions
  • Sub-Groups
  • Tags
  • More
  • Cancel
  • New
Join Arduino to participate - click to join for free!
  • Share
  • More
  • Cancel
Group Actions
  • Group RSS
  • More
  • Cancel
Engagement
  • Author Author: meera_hussien
  • Date Created: 13 May 2019 9:57 AM Date Created
  • Views 10526 views
  • Likes 2 likes
  • Comments 1 comment
  • tutorial
  • maker
  • electrosoft
  • arduino
  • tinkercad
Related
Recommended

TinkerCad Tutorial #1 Simple Arduino LED Blink

meera_hussien
meera_hussien
13 May 2019

TinkerCad Tutorial #1

Simple Arduino LED Blink


          Hi. Today, we shall another simulation tool which we can use to simulate our Arduino project. The best thing about this software is that it is free and no installation is required. All is done through online. The software which we will look in to is TinkerCad Circuits.


image


               This software is very easy to use and user-friendly too. The introduction video which I have made has covered all the necessary knowledge one will need to start using the tinkercad. Below is the video.


Basically, in the first lesson, we shall see how to make a simple Arduino led blink using the tinkercad. Constructing the circuit is pretty much straight forward. For the coding, there are three different options available
  1. The first option is to write the coding using the block
  2. The second option is to write the code using the block and text
  3. And the last option is to write the code using the normal text
For our case, we have decided to write the code using the block. In the video, if you observe the block is constructed just by drag and drop. Each function of the block is differentiated by their colour and shape. Below is the list of the blocks available in the tinkercad.
image

By referring to the image above, we can know that the "Blue" colour represents for the output. the "PURPLE" colour represents the input, the "GREY" colour represent for notation/comment, the "ORANGE" colour represents the control function, the "GREEN" for mathematical operation and finally the "PINK" colour represent for the variables. That are the 6 different types of block available in the tinkercad.


Now let's look at the circuit which we have constructed in the tinkercad


image


The connection between the Arduino and the breadboard are done as per the image above. The loop connection for the GND and 5V are made for easy access. The LED is controlled through the pin 13.

image

Once we are fine with the hardware, we can move on to the coding part.


image


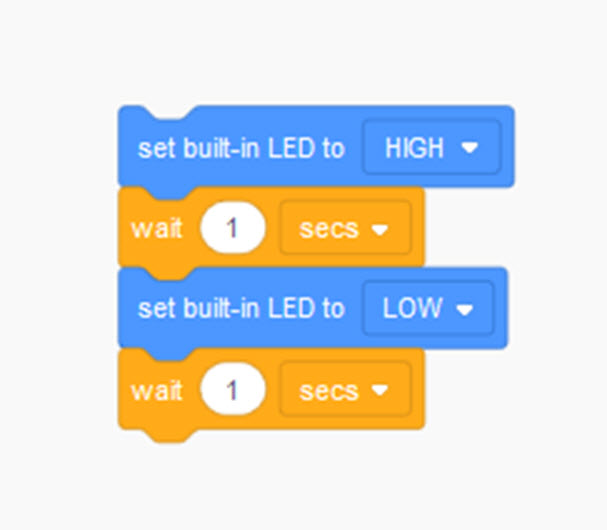
As we can see from the above image, we can see that the coding is quite easy to follow. The first block which we choose is the output block and set it to HIGH to turn on the LED. Since it is connected to the PIN 13, we choose the "set built-in LED to". The HIGH and LOW in the block means HIGH = 5V and LOW = 0V. The we choose the control block to gives the delay. In our case, we choose 1 sec. Next followed by the output block again. This time we set the block to LOW, to turn off the LED and lastly we choose the wait control block again with 1 sec. And this block runs in the continous loop.


Below is the result of this tutorial.


image


Thank you.


  • Sign in to reply
  • Way2_code
    Way2_code over 3 years ago

    you can watch the interfacing of led and coding to make a led blink

    www.youtube.com/watch

    • Cancel
    • Vote Up 0 Vote Down
    • Sign in to reply
    • More
    • Cancel
element14 Community

element14 is the first online community specifically for engineers. Connect with your peers and get expert answers to your questions.

  • Members
  • Learn
  • Technologies
  • Challenges & Projects
  • Products
  • Store
  • About Us
  • Feedback & Support
  • FAQs
  • Terms of Use
  • Privacy Policy
  • Legal and Copyright Notices
  • Sitemap
  • Cookies

An Avnet Company © 2025 Premier Farnell Limited. All Rights Reserved.

Premier Farnell Ltd, registered in England and Wales (no 00876412), registered office: Farnell House, Forge Lane, Leeds LS12 2NE.

ICP 备案号 10220084.

Follow element14

  • X
  • Facebook
  • linkedin
  • YouTube