element14 Community
element14 Community
    Register Log In
  • Site
  • Search
  • Log In Register
  • About Us
  • Community Hub
    Community Hub
    • What's New on element14
    • Feedback and Support
    • Benefits of Membership
    • Personal Blogs
    • Members Area
    • Achievement Levels
  • Learn
    Learn
    • Ask an Expert
    • eBooks
    • element14 presents
    • Learning Center
    • Tech Spotlight
    • STEM Academy
    • Webinars, Training and Events
    • Learning Groups
  • Technologies
    Technologies
    • 3D Printing
    • FPGA
    • Industrial Automation
    • Internet of Things
    • Power & Energy
    • Sensors
    • Technology Groups
  • Challenges & Projects
    Challenges & Projects
    • Design Challenges
    • element14 presents Projects
    • Project14
    • Arduino Projects
    • Raspberry Pi Projects
    • Project Groups
  • Products
    Products
    • Arduino
    • Avnet Boards Community
    • Dev Tools
    • Manufacturers
    • Multicomp Pro
    • Product Groups
    • Raspberry Pi
    • RoadTests & Reviews
  • Store
    Store
    • Visit Your Store
    • Choose another store...
      • Europe
      •  Austria (German)
      •  Belgium (Dutch, French)
      •  Bulgaria (Bulgarian)
      •  Czech Republic (Czech)
      •  Denmark (Danish)
      •  Estonia (Estonian)
      •  Finland (Finnish)
      •  France (French)
      •  Germany (German)
      •  Hungary (Hungarian)
      •  Ireland
      •  Israel
      •  Italy (Italian)
      •  Latvia (Latvian)
      •  
      •  Lithuania (Lithuanian)
      •  Netherlands (Dutch)
      •  Norway (Norwegian)
      •  Poland (Polish)
      •  Portugal (Portuguese)
      •  Romania (Romanian)
      •  Russia (Russian)
      •  Slovakia (Slovak)
      •  Slovenia (Slovenian)
      •  Spain (Spanish)
      •  Sweden (Swedish)
      •  Switzerland(German, French)
      •  Turkey (Turkish)
      •  United Kingdom
      • Asia Pacific
      •  Australia
      •  China
      •  Hong Kong
      •  India
      •  Korea (Korean)
      •  Malaysia
      •  New Zealand
      •  Philippines
      •  Singapore
      •  Taiwan
      •  Thailand (Thai)
      • Americas
      •  Brazil (Portuguese)
      •  Canada
      •  Mexico (Spanish)
      •  United States
      Can't find the country/region you're looking for? Visit our export site or find a local distributor.
  • Translate
  • Profile
  • Settings
Arduino
  • Products
  • More
Arduino
Arduino Forum Need someone to fabricate this for me
  • Blog
  • Forum
  • Documents
  • Quiz
  • Events
  • Polls
  • Files
  • Members
  • Mentions
  • Sub-Groups
  • Tags
  • More
  • Cancel
  • New
Join Arduino to participate - click to join for free!
Actions
  • Share
  • More
  • Cancel
Forum Thread Details
  • Replies 29 replies
  • Subscribers 391 subscribers
  • Views 2544 views
  • Users 0 members are here
  • atmega
  • pcb desinging
  • pcb fabrication
  • arduino
Related

Need someone to fabricate this for me

alexbee13
alexbee13 over 5 years ago

Hi,


Forgive me if this is the wrong place but i am struggling and out of options at this point.


I designed a PCB for an ATMega8 and its basically a low profile Arduino that solders to PCB's similar to how ESP8266 modules attach using castellated holes


The issue is i am a complete novice when it comes to using a hot air rework station so i am struggling to solder them and if i do, i can never seem to program them via Arduino as ISP


I was wondering if there is anyone in the UK that could fabricate and send me these completed PCB's for a project for the original xbox.


I think my design works but again i have no way of testing them.


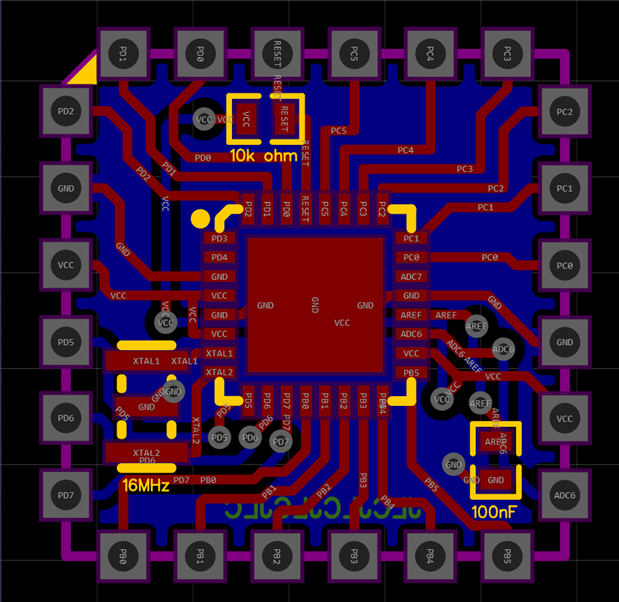
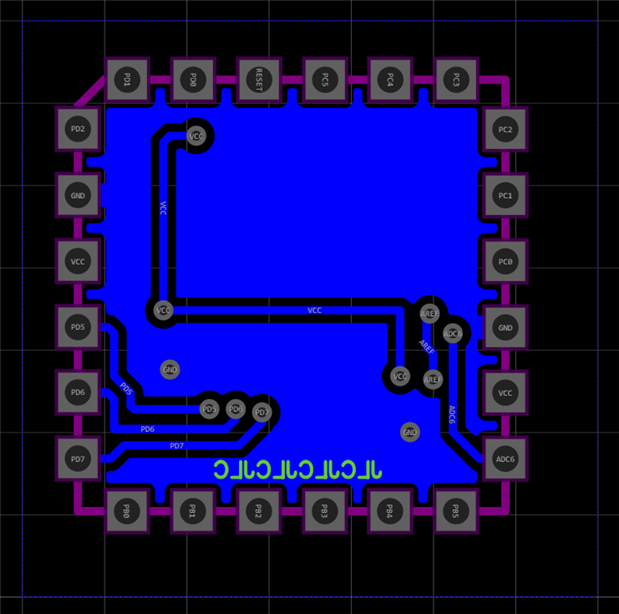
The image on the left is the final thing with it attached and the PCB on the right is what it looks like assembled (i think i have all the components i need on that board for it to be sufficient but again (complete novice at this)


If anyone would be able to help, i can happily supply the Gerber/schematic for what i have named (ATMegaX)


Thanks


What the final result would look likeThe chip in question i am trying to make

  • Sign in to reply
  • Cancel

Top Replies

  • michaelkellett
    michaelkellett over 5 years ago in reply to alexbee13 +9
    How many of these do you need to solder ? You will get the best results if you use leaded solder paste, a stencil to apply it and reflow the boards in a decent oven. If you don't have all these things…
  • shabaz
    shabaz over 5 years ago +5
    Hi, I cannot volunteer to do this, but I can suggest an alternative; if you don't have the tools or experience for this, you're better off ditching the castellated board which makes no sense if it is carrying…
  • fmilburn
    fmilburn over 5 years ago in reply to michaelkellett +4
    Thanks for the tip of using a large hole under the center pad Michael. I hadn’t tried that and getting too much paste without a stencil is easy to do. Also agree that hot air rework is difficult with these…
Parents
  • shabaz
    shabaz over 5 years ago

    Hi,


    I cannot volunteer to do this, but I can suggest an alternative; if you don't have the tools or experience for this, you're better off ditching the castellated board which makes no sense if it is carrying just the microcontroller, crystal and a couple of passive components, and just redesigning the board on the left to carry the TQFP version of the chip, which has fairly large 0.8mm pin spacing, and is hand-solderable with a normal iron, no need for hot air tool skills. The TQFP part will take up less space than the castellated board, so it will fit. It would be a cleaner, lower-profile and more reliable solution.

    Castellated boards kind-of make sense for (say) ESP boards because they contain more circuitry as a module, and also radio circuitry to simplify the end product. Here it's not simplifying, it's making it more complicated.

    Also, the left side board is large, you could also go for a larger crystal and passives, if you feel you have the space for that. I can't tell if you're using 0603 or 0402.. 0402 is more unreliable for manufacture, I don't think it's worth the effort (unless there's a technical reason for using 0402).

    • Cancel
    • Vote Up +5 Vote Down
    • Sign in to reply
    • Cancel
Reply
  • shabaz
    shabaz over 5 years ago

    Hi,


    I cannot volunteer to do this, but I can suggest an alternative; if you don't have the tools or experience for this, you're better off ditching the castellated board which makes no sense if it is carrying just the microcontroller, crystal and a couple of passive components, and just redesigning the board on the left to carry the TQFP version of the chip, which has fairly large 0.8mm pin spacing, and is hand-solderable with a normal iron, no need for hot air tool skills. The TQFP part will take up less space than the castellated board, so it will fit. It would be a cleaner, lower-profile and more reliable solution.

    Castellated boards kind-of make sense for (say) ESP boards because they contain more circuitry as a module, and also radio circuitry to simplify the end product. Here it's not simplifying, it's making it more complicated.

    Also, the left side board is large, you could also go for a larger crystal and passives, if you feel you have the space for that. I can't tell if you're using 0603 or 0402.. 0402 is more unreliable for manufacture, I don't think it's worth the effort (unless there's a technical reason for using 0402).

    • Cancel
    • Vote Up +5 Vote Down
    • Sign in to reply
    • Cancel
Children
  • alexbee13
    alexbee13 over 5 years ago in reply to shabaz

    Hi, The reason for the Castellated holes version is so that i can use the same module for other projects in the future, Instead of having a full arduino with pin headers taking up valuable room, i could instead go for a module that keeps a low profile while providing everythhing i need, Also i regrettably went with 0402 and it was a terrible mistake, I only have space where it is on the PCB due to how the xbox from panel connects to the front. I guess i could go with the TQFP version as well but preferrably would want to keep with this module idea for future projects.


    Thank you for your feedback though and i guess i could make a prototype using the TQFP version. Also do you suggest any other crystals to use because they are really small and again, hot air rework/soldering those sized modules is really difficult

    • Cancel
    • Vote Up +3 Vote Down
    • Sign in to reply
    • Cancel
  • michaelkellett
    michaelkellett over 5 years ago in reply to alexbee13

    How many of these do you need to solder ?


    You will get the best results if you use leaded solder paste, a stencil to apply it and reflow the boards in a decent oven.


    If you don't have all these things, you can hand solder the parts on using a soldering iron and plenty of flux, but only if you have a decent sized hole under the chip centre pad.


    If you have only the tiny holes shown in the data sheet or on hole you will have to use solder paste for the centre pad.


    In my experience hand held hot air guns are worse than useless for soldering parts on.


    You can use a hot plate.


    The really cheap way:


    Get some leaded solder past and some really runny flux ( https://www.rapidonline.com/warton-metals-future-315-low-residue-no-clean-flux-500ml-bottle-87-0728  )

    This is the flux for hand work - I've tried lots. Rapid's cheapo solder wick is OK too.


    Apply paste to the board using a pin, cocktail stick or whatever. You will end up with it smeared across the processor pads but this doesn't matter. Only put a tiny bit on the centre pad, especially if you have no holes through the pad.

    Reflow the boards on a hotplate, (if you don't have one use a clean non stick frying pan (at a pinch a dirty sticky one image)). Calibrate the hotplate if you have the means. You want it to be at 215C for lead free solder paste.

    Place the solder pasted and componented board in the pan and wait untill the solder melts where you can see it on the processor and other component pins. Wait a further 30 seconds because the solder under the processor needs more time. remove the board.


    Some of the pins on the processor will be shorted, clean it up with a fine tip soldering iron, solderwick and lots of flux.


    Clean the board. Washing up liquid in water will do. Rinse lots in tap water. Rinse twice in de-ionised water. Dry thoroughly before you apply power (this is important !!!!).


    This process works, using a Chinese £150 hotplate just permanently set to 215C I've soldered hundreds of boards like this. It's not ideal and I have better gear now. Leaded solder makes it all much, much easier. If you are going to use lead free solder just pay someone to do the job for you. (Perfectly legal to use leaded solder for prototoypes.)


    With packages like the one you are using for the ATMEGA it is a really good idea to have a decent sized hole (1 - 1.5 mm diameter) in the middle of the centre pad. It will let excess solder paste escape, allow you to check if the pad is soldered or solder the pad if required. Ignore the manufacturers notes about lots of tiny holes - that's fine with a proper production process but not for home brew.


    By the way - you don't need the castellation for prototypes unless you are really pushed for space - you can solder through holes to pads quite easily.


    image


    The picture shows a tiny board which replaces a chip on the main board that didn't quite work as planned. I used holes rather than castellations because it is massively more expensive to get single tiny boards with features on the edges. I bought all my tiny boards in a 16 board lump and cut them out with a very non-precision guillotine - that way they cost about £4 each rather than £40 each on a 2 day turnaround.


    Hope this helps - happy soldering.


    MK

    • Cancel
    • Vote Up +9 Vote Down
    • Sign in to reply
    • Cancel
  • alexbee13
    alexbee13 over 5 years ago in reply to michaelkellett

    Ideally i only need maybe 5 of these, The castellations don't actually cost any more when ordering via JLCPCB so its just $2 for the 5 plus the shipping cost from china.


    The problem i have is i dont know whether the PCB's designed are actually good in that i havent made a mistake or that i am not soldering the QFN chips properly. As when i try to use arduino via ISP it always reports device signature 00000.


    Ideally i am looking for some assistance into whether my PCB is correct or if not is anyone able to assist in designing a PCB of the same size (give or take) that fits this project perfectly and others in the future that i decide to make.


    The hot air gun that is apart of my soldering station seems to do the job. After preheating the board at 150C on medium air for 5-10 minutes then when ready to solder using paste, pushing the temperature to 400c for the 10-15 seconds it takes to reflow

    (i use 400 because i doubt its actually pushing out 400C air).


    I will look into that flux you reccommended and while i cannot get the hotplate currently, it will be something i will look into for future uses.

    • Cancel
    • Vote Up +3 Vote Down
    • Sign in to reply
    • Cancel
  • shabaz
    shabaz over 5 years ago in reply to alexbee13

    Hi Alex,


    I don't know if you're using an 8 MHz crystal or a different value, but this 5 x 3.2 mm 8 MHz crystal5 x 3.2 mm 8 MHz crystal might be an option. That is a popular size, and easy to solder.

    Next popular size up is 7 x 5 mm. There are also larger curved metal can ones (available in through-hole or surface-mount) if you have the space for them.

    • Cancel
    • Vote Up +2 Vote Down
    • Sign in to reply
    • Cancel
  • michaelkellett
    michaelkellett over 5 years ago in reply to alexbee13

    If you post the schematic of your pcb here I'll look at it (as will many others who may be more Arduino expert than me).

    The track layout would help as well.


    Please post it as a .pdf or .jpb so that everyone can read it.


    MK

    • Cancel
    • Vote Up +2 Vote Down
    • Sign in to reply
    • Cancel
  • fmilburn
    fmilburn over 5 years ago in reply to michaelkellett

    Thanks for the tip of using a large hole under the center pad Michael. I hadn’t tried that and getting too much paste without a stencil is easy to do.  Also agree that hot air rework is difficult with these parts.  I use a cheap $30 toaster oven and watch a thermocouple for temperature control which works OK.

    • Cancel
    • Vote Up +4 Vote Down
    • Sign in to reply
    • Cancel
  • alexbee13
    alexbee13 over 5 years ago in reply to michaelkellett

    imageimage

    Here are closeup images of the PCB layout, i believe i have all the bare minimum components needed for this to function, the 100nF cap on the AREF so i can use analog inputs and the 10k resistor on the reset and VCC to stop random resets and allow the resetting of the ATMega.


    The 16Mhz crystal not sure if actually needed to get it working as i can use 8Mhz i believe.


    Thanks

    • Cancel
    • Vote Up +1 Vote Down
    • Sign in to reply
    • Cancel
  • michaelkellett
    michaelkellett over 5 years ago in reply to alexbee13

    From an EMC point of view it's not ideal - the ground plane is nearly cut in two.


    I don't see any load capacitors for the crystal (if it's actually a ceramic resonator it may not need them).


    The system should start up on it's internal clock so the crystal shouldn't matter if you don't use it.


    How are you trying to programme it - does this programming process work with other parts ?


    MK

    • Cancel
    • Vote Up +2 Vote Down
    • Sign in to reply
    • Cancel
  • alexbee13
    alexbee13 over 5 years ago in reply to michaelkellett

    They are ceramic Resonators yeah, And as for programming i'm using Arduino as ISP as you should be able to do that with these. i have done it successfully before using a DIP package ATTiny and a QFN version of the ATTiny but this doesnt want to play nicely.

    • Cancel
    • Vote Up +1 Vote Down
    • Sign in to reply
    • Cancel
  • michaelkellett
    michaelkellett over 5 years ago in reply to alexbee13

    Can you post a picture of your programming set up and explain exactly what happens when you try.


    MK

    • Cancel
    • Vote Up 0 Vote Down
    • Sign in to reply
    • Cancel
element14 Community

element14 is the first online community specifically for engineers. Connect with your peers and get expert answers to your questions.

  • Members
  • Learn
  • Technologies
  • Challenges & Projects
  • Products
  • Store
  • About Us
  • Feedback & Support
  • FAQs
  • Terms of Use
  • Privacy Policy
  • Legal and Copyright Notices
  • Sitemap
  • Cookies

An Avnet Company © 2025 Premier Farnell Limited. All Rights Reserved.

Premier Farnell Ltd, registered in England and Wales (no 00876412), registered office: Farnell House, Forge Lane, Leeds LS12 2NE.

ICP 备案号 10220084.

Follow element14

  • X
  • Facebook
  • linkedin
  • YouTube