element14 Community
element14 Community
    Register Log In
  • Site
  • Search
  • Log In Register
  • About Us
  • Community Hub
    Community Hub
    • What's New on element14
    • Feedback and Support
    • Benefits of Membership
    • Personal Blogs
    • Members Area
    • Achievement Levels
  • Learn
    Learn
    • Ask an Expert
    • eBooks
    • element14 presents
    • Learning Center
    • Tech Spotlight
    • STEM Academy
    • Webinars, Training and Events
    • Learning Groups
  • Technologies
    Technologies
    • 3D Printing
    • FPGA
    • Industrial Automation
    • Internet of Things
    • Power & Energy
    • Sensors
    • Technology Groups
  • Challenges & Projects
    Challenges & Projects
    • Design Challenges
    • element14 presents Projects
    • Project14
    • Arduino Projects
    • Raspberry Pi Projects
    • Project Groups
  • Products
    Products
    • Arduino
    • Avnet Boards Community
    • Dev Tools
    • Manufacturers
    • Multicomp Pro
    • Product Groups
    • Raspberry Pi
    • RoadTests & Reviews
  • Store
    Store
    • Visit Your Store
    • Choose another store...
      • Europe
      •  Austria (German)
      •  Belgium (Dutch, French)
      •  Bulgaria (Bulgarian)
      •  Czech Republic (Czech)
      •  Denmark (Danish)
      •  Estonia (Estonian)
      •  Finland (Finnish)
      •  France (French)
      •  Germany (German)
      •  Hungary (Hungarian)
      •  Ireland
      •  Israel
      •  Italy (Italian)
      •  Latvia (Latvian)
      •  
      •  Lithuania (Lithuanian)
      •  Netherlands (Dutch)
      •  Norway (Norwegian)
      •  Poland (Polish)
      •  Portugal (Portuguese)
      •  Romania (Romanian)
      •  Russia (Russian)
      •  Slovakia (Slovak)
      •  Slovenia (Slovenian)
      •  Spain (Spanish)
      •  Sweden (Swedish)
      •  Switzerland(German, French)
      •  Turkey (Turkish)
      •  United Kingdom
      • Asia Pacific
      •  Australia
      •  China
      •  Hong Kong
      •  India
      •  Korea (Korean)
      •  Malaysia
      •  New Zealand
      •  Philippines
      •  Singapore
      •  Taiwan
      •  Thailand (Thai)
      • Americas
      •  Brazil (Portuguese)
      •  Canada
      •  Mexico (Spanish)
      •  United States
      Can't find the country/region you're looking for? Visit our export site or find a local distributor.
  • Translate
  • Profile
  • Settings
Arduino
  • Products
  • More
Arduino
Arduino Forum Reading state of a powered button.
  • Blog
  • Forum
  • Documents
  • Quiz
  • Events
  • Polls
  • Files
  • Members
  • Mentions
  • Sub-Groups
  • Tags
  • More
  • Cancel
  • New
Join Arduino to participate - click to join for free!
Actions
  • Share
  • More
  • Cancel
Forum Thread Details
  • Replies 3 replies
  • Subscribers 392 subscribers
  • Views 330 views
  • Users 0 members are here
Related

Reading state of a powered button.

Former Member
Former Member over 10 years ago

Hey guys, Having a bit of trouble figuring out the best way to read the state of my brake lever on my Electric Bike. The bike is 48V, and the high side of the button embedded in the lever has the full 48V running through it. It needs to remain connected to the main controller of the bike so that it can activate the electric assisted braking.  i would like to be able to read the state of this button with a 5V arduino, without disconnecting it from 48V (basically monitor it for changes at the same time as the original controller, neither it or the arduino being affected by the other (no load on the 48V as that would trigger the button state as far as the main controller (and my brake assist haha) ) ) . I have one idea, but i would like to hear what the community can come up with, as i feel my idea is highly inefficient.


edit: my original idea is to just cut the switch away from the main controller, read the state with arduino, and if high (or low can't remember which way the switch is at the moment), trigger a MOSFET on the LED and either another MOSFET or a relay across where the controller expects the switch


excuse my horrible explanations haha i'm really tired, it's been really busy around here


Edit: i actually just figured it out, i explained this horribly, sorry guys i'm tired and it's 5AM here. keep an eye on my other post, i'll explain in a few days with a video, as i just realized i'll have to go back to the start on this bike.

Other post: My new Electronics Blog

  • Sign in to reply
  • Cancel

Top Replies

  • lokkytron
    lokkytron over 10 years ago +1
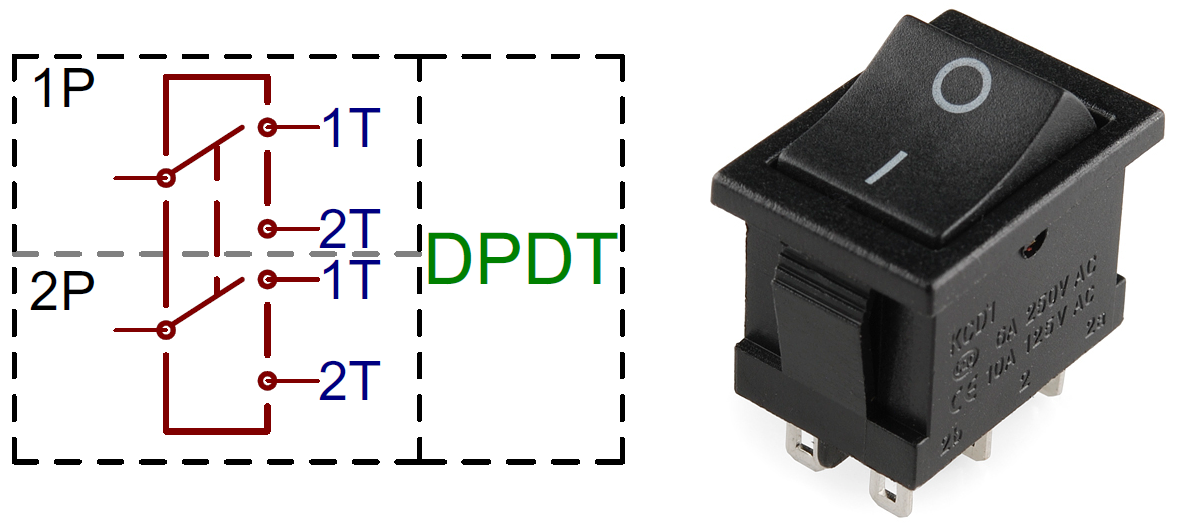
    Hello Zakk If you only need to check the state of the button and no more... You only need to connect one circuit (48v) at 1P and other circuit (5V) to 2P I hope to have understood what you are asking.
  • Former Member
    Former Member over 10 years ago +1
    bobcroft lokkytron edited. Thanks, though, always appreciate quick responses
  • lokkytron
    lokkytron over 10 years ago

    Hello Zakk

    If you only need to check the state of the button and no more...


    517edbabce395fd51d000000.png


    You only need to connect one circuit (48v) at 1P and other circuit (5V) to 2P

    I hope to have understood what you are asking.

    • Cancel
    • Vote Up +1 Vote Down
    • Sign in to reply
    • Cancel
  • bobcroft
    bobcroft over 10 years ago

    Zakk,  The safest way to monitor your braking control so as not to compromise the braking or risk the Arduino getting fried is to use ab opto isolated input to the Arduino.  Presumably the voltage on the brake changes from 0 to 48 volts so if you monitor the voltage via a suitable resistor to drive the internal LED in the opto  isolator then you will achieve your goal.  Choose a suitable opto isolator that you either have or can get locally, check its specs and then use ohms law to calculate the required resistor.  For example if the internal led needs say 10 mA and has a forward volt drop of 1.8 v then you need to use a voltage of (48 - 1.8 volts) and a current of 10 mA.

    On the Arduino input you can use the internal pull up resistor to pull the input hi, then use the output of the opto isolator to pull the input low via a suitable current limiting resistor, something like 2.2 K should work.  You could use the input to trigger an interrupt if you so desired.


    A simple way to test if you are monitoring the brake voltage is just to rig up an ordinary LED to the brake and see if you can get it to turn on / off without the Arduino.  Method to work out current limiting resistor is the same.


    I hope that helps.  I haven't done all the work for you as I believe doing a little research helps the learing process immensely.

    • Cancel
    • Vote Up 0 Vote Down
    • Sign in to reply
    • Cancel
  • Former Member
    Former Member over 10 years ago

    bobcroft lokkytron edited. Thanks, though, always appreciate quick responses image

    • Cancel
    • Vote Up +1 Vote Down
    • Sign in to reply
    • Cancel
element14 Community

element14 is the first online community specifically for engineers. Connect with your peers and get expert answers to your questions.

  • Members
  • Learn
  • Technologies
  • Challenges & Projects
  • Products
  • Store
  • About Us
  • Feedback & Support
  • FAQs
  • Terms of Use
  • Privacy Policy
  • Legal and Copyright Notices
  • Sitemap
  • Cookies

An Avnet Company © 2025 Premier Farnell Limited. All Rights Reserved.

Premier Farnell Ltd, registered in England and Wales (no 00876412), registered office: Farnell House, Forge Lane, Leeds LS12 2NE.

ICP 备案号 10220084.

Follow element14

  • X
  • Facebook
  • linkedin
  • YouTube