element14 Community
element14 Community
    Register Log In
  • Site
  • Search
  • Log In Register
  • Community Hub
    Community Hub
    • What's New on element14
    • Feedback and Support
    • Benefits of Membership
    • Personal Blogs
    • Members Area
    • Achievement Levels
  • Learn
    Learn
    • Ask an Expert
    • eBooks
    • element14 presents
    • Learning Center
    • Tech Spotlight
    • STEM Academy
    • Webinars, Training and Events
    • Learning Groups
  • Technologies
    Technologies
    • 3D Printing
    • FPGA
    • Industrial Automation
    • Internet of Things
    • Power & Energy
    • Sensors
    • Technology Groups
  • Challenges & Projects
    Challenges & Projects
    • Design Challenges
    • element14 presents Projects
    • Project14
    • Arduino Projects
    • Raspberry Pi Projects
    • Project Groups
  • Products
    Products
    • Arduino
    • Avnet & Tria Boards Community
    • Dev Tools
    • Manufacturers
    • Multicomp Pro
    • Product Groups
    • Raspberry Pi
    • RoadTests & Reviews
  • About Us
  • Store
    Store
    • Visit Your Store
    • Choose another store...
      • Europe
      •  Austria (German)
      •  Belgium (Dutch, French)
      •  Bulgaria (Bulgarian)
      •  Czech Republic (Czech)
      •  Denmark (Danish)
      •  Estonia (Estonian)
      •  Finland (Finnish)
      •  France (French)
      •  Germany (German)
      •  Hungary (Hungarian)
      •  Ireland
      •  Israel
      •  Italy (Italian)
      •  Latvia (Latvian)
      •  
      •  Lithuania (Lithuanian)
      •  Netherlands (Dutch)
      •  Norway (Norwegian)
      •  Poland (Polish)
      •  Portugal (Portuguese)
      •  Romania (Romanian)
      •  Russia (Russian)
      •  Slovakia (Slovak)
      •  Slovenia (Slovenian)
      •  Spain (Spanish)
      •  Sweden (Swedish)
      •  Switzerland(German, French)
      •  Turkey (Turkish)
      •  United Kingdom
      • Asia Pacific
      •  Australia
      •  China
      •  Hong Kong
      •  India
      • Japan
      •  Korea (Korean)
      •  Malaysia
      •  New Zealand
      •  Philippines
      •  Singapore
      •  Taiwan
      •  Thailand (Thai)
      • Vietnam
      • Americas
      •  Brazil (Portuguese)
      •  Canada
      •  Mexico (Spanish)
      •  United States
      Can't find the country/region you're looking for? Visit our export site or find a local distributor.
  • Translate
  • Profile
  • Settings
Arduino
  • Products
  • More
Arduino
Arduino Forum Arduino Uno Stopwatch
  • Blog
  • Forum
  • Documents
  • Quiz
  • Events
  • Polls
  • Files
  • Members
  • Mentions
  • Sub-Groups
  • Tags
  • More
  • Cancel
  • New
Join Arduino to participate - click to join for free!
Actions
  • Share
  • More
  • Cancel
Forum Thread Details
  • State Suggested Answer
  • Replies 4 replies
  • Answers 1 answer
  • Subscribers 402 subscribers
  • Views 961 views
  • Users 0 members are here
  • address
  • lcd
  • stopwatch
  • uno
  • arduino
Related

Arduino Uno Stopwatch

Former Member
Former Member over 11 years ago

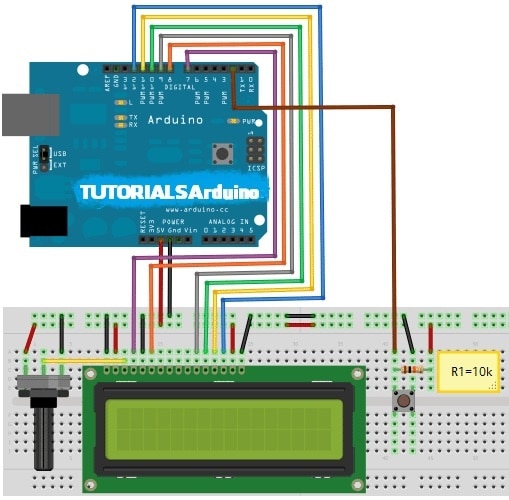
I am making an Arduino Stopwatch, I have researched about this and found a circuit diagram that i could use on youtube. i have connected my Arduino up to how that diagram looks and I have programmed it witht the code the video gave me. The problem is that it doesnt work so I got in touch with someone that knows a lot of technical information. This is what i got back from him "Quiet A bit of info via our morning net.. (1) The voltage from the 10k pot to the screen in very critical and needs careful setting. (2) It’s possible an I2C bus is used between the arduino and the lcd in which case you need to get the correct lcd address to make it receive the arduino output. (3) It is possible to fit a link that gives 3 addresses to chose from.(4) if the back light LED switches on and off during the switch on boot up it’s an indication that the software is working. Note some backlight LEDs are wired from the 5v supple so won’t flash. Hope this helps." I have checked this email with my product. There is nothing wrong with (1) because when the potentionometer is turned or the button is pressed there is a change in display. (4) also works. I am not sure about (2) and (3). I am using the arduino starter kit to make this. Would anyone be able to give me any information on an LCD address?

  • Sign in to reply
  • Cancel

Top Replies

  • neilk
    neilk over 11 years ago in reply to Former Member +1
    Hi Sarah The LCD pin assignment statement in your code - LiquidCrystal lcd(12, 11, 5, 4, 3, 2); is the same as in this basic tuorial Arduino - LiquidCrystal However, looking at your circuit diagram, it…
  • gihu
    0 gihu over 11 years ago

    Can you share the info? code, sch...

    Is this link, the video you say?

    Arduino Tutorial | Stopwatch with LCD | with CODE & SCHEMATIC!!! - YouTube

    If yes, the LCD seems the typical HD44780 compatible, connected in 4-bit mode,so, not over I2C.

    Can you share an image of what you see on LCD?

    I suppose you are using a 2lines x 16characters display. If you see the first row dark, and the second clear, you are having a problem with the initialitation, so check the wiring. If you see al the LCD clear, maybe you have a problem with the contrast, so disconnect the potentiometer and try connecting a resistor about 100 ohm between Vo and GND.


    But, it is wery important that you give us more detailed information just to help you.


    Regards,

    Miguel

    • Cancel
    • Vote Up 0 Vote Down
    • Sign in to reply
    • Verify Answer
    • Reject Answer
    • Cancel
  • Former Member
    0 Former Member over 11 years ago in reply to gihu

    You don't have permission to edit metadata of this video.
    Edit media
    x
    image
    Upload Preview
    image
    i have enclose a video of  my Arduino Stopwatch, it shows that the first row is black and the second row is clear. this is the code i have used:

    #include <LiquidCrystal.h>

    LiquidCrystal lcd(12, 11, 5, 4, 3, 2);


    int ledPin = 13;                    // LED connected to digital pin 13

    int buttonPin = 8;                  // button on pin 2


    int value = LOW;                    // previous value of the LED

    int buttonState;                    // variable to store button state

    int lastButtonState;                // variable to store last button state

    int blinking;                       // condition for blinking - timer is timing

    int frameRate = 100;                // the frame rate (frames per second) at which the stopwatch runs - Change to suit

    long interval = (1000/frameRate);   // blink interval

    long previousMillis = 0;            // variable to store last time LED was updated

    long startTime ;                    // start time for stop watch

    long elapsedTime ;                  // elapsed time for stop watch

    int fractional;                     // variable used to store fractional part of Frames

    int fractionalSecs;                 // variable used to store fractional part of Seconds

    int fractionalMins;                 // variable used to store fractional part of Minutes

    int elapsedFrames;                  // elapsed frames for stop watch

    int elapsedSeconds;                 // elapsed seconds for stop watch

    int elapsedMinutes;                 // elapsed Minutes for stop watch

    char buf[10];                       // string buffer for itoa function


    void setup()

    {

      lcd.begin(16, 2);                // intialise the LCD.

      pinMode(ledPin, OUTPUT);         // sets the digital pin as output

      pinMode(buttonPin, INPUT);       // not really necessary, pins default to INPUT anyway

      digitalWrite(buttonPin, HIGH);   // turn on pullup resistors. Wire button so that press shorts pin to ground.

    lcd.setCursor(0,0);

      lcd.print("Subscribe at");

      lcd.setCursor(0,1);

      lcd.print("TutorialsArduino");

    }


    void loop(){


      digitalWrite(ledPin, LOW);            // Initiate LED and Step Pin States


      buttonState = digitalRead(buttonPin); // Check for button press, read the button state and store


    // check for a high to low transition if true then found a new button press while clock is not running - start the clock   

       if (buttonState == LOW && lastButtonState == HIGH  &&  blinking == false){

        startTime = millis();                               // store the start time

          blinking = true;                                  // turn on blinking while timing

          delay(10);                                         // short delay to debounce switch

          lastButtonState = buttonState;                    // store buttonState in lastButtonState, to compare next time

       }


    // check for a high to low transition if true then found a new button press while clock is running - stop the clock and report

       else if (buttonState == LOW && lastButtonState == HIGH && blinking == true){

       blinking = false;                                    // turn off blinking, all done timing

       lastButtonState = buttonState;                       // store buttonState in lastButtonState, to compare next time


    // Routine to report elapsed time           

       elapsedTime =   millis() - startTime;                // store elapsed time

       elapsedMinutes = (elapsedTime / 60000L);

       elapsedSeconds = (elapsedTime / 1000L);              // divide by 1000 to convert to seconds - then cast to an int to print

       elapsedFrames = (elapsedTime / interval);            // divide by 100 to convert to 1/100 of a second - then cast to an int to print

       fractional = (int)(elapsedFrames % frameRate);       // use modulo operator to get fractional part of 100 Seconds

       fractionalSecs = (int)(elapsedSeconds % 60L);        // use modulo operator to get fractional part of 60 Seconds

       fractionalMins = (int)(elapsedMinutes % 60L);        // use modulo operator to get fractional part of 60 Minutes

       lcd.clear();                                         // clear the LDC


    if (fractionalMins < 10){                            // pad in leading zeros

          lcd.print("0");                                 // add a zero

          }


        lcd.print(itoa(fractionalMins, buf, 10));       // convert the int to a string and print a fractional part of 60 Minutes to the LCD

          lcd.print(":");                                 //print a colan.


    if (fractionalSecs < 10){                            // pad in leading zeros

          lcd.print("0");                                 // add a zero

          }


    lcd.print(itoa(fractionalSecs, buf, 10));          // convert the int to a string and print a fractional part of 60 Seconds to the LCD

       lcd.print(":");                                    //print a colan.


    if (fractional < 10){                                // pad in leading zeros

          lcd.print("0");                                 // add a zero

          }    


    lcd.print(itoa(fractional, buf, 10));              // convert the int to a string and print a fractional part of 25 Frames to the LCD

       }


    else{

          lastButtonState = buttonState;                  // store buttonState in lastButtonState, to compare next time

       }


    // run commands at the specified time interval

    // blink routine - blink the LED while timing

    // check to see if it's time to blink the LED; that is, the difference

    // between the current time and last time we blinked the LED is larger than

    // the interval at which we want to blink the LED.


    if ( (millis() - previousMillis > interval) ) {


        if (blinking == true){

           previousMillis = millis();                    // remember the last time we blinked the LED


           digitalWrite(ledPin, HIGH);                   // Pulse the LED for Visual Feedback


           elapsedTime =   millis() - startTime;         // store elapsed time

             elapsedMinutes = (elapsedTime / 60000L);      // divide by 60000 to convert to minutes - then cast to an int to print

             elapsedSeconds = (elapsedTime / 1000L);       // divide by 1000 to convert to seconds - then cast to an int to print

             elapsedFrames = (elapsedTime / interval);     // divide by 40 to convert to 1/25 of a second - then cast to an int to print

             fractional = (int)(elapsedFrames % frameRate);// use modulo operator to get fractional part of 25 Frames

             fractionalSecs = (int)(elapsedSeconds % 60L); // use modulo operator to get fractional part of 60 Seconds

             fractionalMins = (int)(elapsedMinutes % 60L); // use modulo operator to get fractional part of 60 Minutes

             lcd.clear();                                  // clear the LDC


           if (fractionalMins < 10){                     // pad in leading zeros

             lcd.print("0");                             // add a zero

             }


           lcd.print(itoa(fractionalMins, buf, 10));   // convert the int to a string and print a fractional part of 60 Minutes to the LCD

             lcd.print(":");                             //print a colan.


           if (fractionalSecs < 10){                     // pad in leading zeros

             lcd.print("0");                             // add a zero

             }


           lcd.print(itoa(fractionalSecs, buf, 10));   // convert the int to a string and print a fractional part of 60 Seconds to the LCD

             lcd.print(":");                             //print a colan.


           if (fractional < 10){                         // pad in leading zeros

             lcd.print("0");                             // add a zero

             }

              lcd.print(itoa((fractional), buf, 10));  // convert the int to a string and print a fractional part of 25 Frames to the LCD

             }


        else{

              digitalWrite(ledPin, LOW);                 // turn off LED when not blinking

              }

    }


    }

    image

    Many thanks

    Sarah

    • Cancel
    • Vote Up 0 Vote Down
    • Sign in to reply
    • Verify Answer
    • Cancel
  • neilk
    0 neilk over 11 years ago in reply to Former Member

    Hi Sarah


    The LCD pin assignment statement in your code - LiquidCrystal lcd(12, 11, 5, 4, 3, 2);


    is the same as in this basic tuorial  Arduino - LiquidCrystal


    However, looking at your circuit diagram, it appears that you haven't connected the appropriate Arduino pins to the LCD.


    The tutorial includes a circuit diagram which shows how to connect the LCD correctly.


    Hope this helps


    Good Luck


    Neil

    • Cancel
    • Vote Up +1 Vote Down
    • Sign in to reply
    • Verify Answer
    • Cancel
  • gihu
    0 gihu over 11 years ago

    Hi Sarah,


    Neil is rigth.

    If your hardware is cabled as shown the LCD pin assigmentshuold be like this:

    LiquidCrystal lcd(7,8,9,10,11,12);


    The most important thing, is that you understand that you are initialitating the LCD in 4-bit mode, and the sentence in your code is LiquidCrystal lcd(rs,e,db4,db5,db6,db7), so you have to do well the pin assigment, in order to make it work properly.


    Hope it helps,

    Miguel

    • Cancel
    • Vote Up 0 Vote Down
    • Sign in to reply
    • Verify Answer
    • Cancel
element14 Community

element14 is the first online community specifically for engineers. Connect with your peers and get expert answers to your questions.

  • Members
  • Learn
  • Technologies
  • Challenges & Projects
  • Products
  • Store
  • About Us
  • Feedback & Support
  • FAQs
  • Terms of Use
  • Privacy Policy
  • Legal and Copyright Notices
  • Sitemap
  • Cookies

An Avnet Company © 2025 Premier Farnell Limited. All Rights Reserved.

Premier Farnell Ltd, registered in England and Wales (no 00876412), registered office: Farnell House, Forge Lane, Leeds LS12 2NE.

ICP 备案号 10220084.

Follow element14

  • X
  • Facebook
  • linkedin
  • YouTube