element14 Community
element14 Community
    Register Log In
  • Site
  • Search
  • Log In Register
  • About Us
  • Community Hub
    Community Hub
    • What's New on element14
    • Feedback and Support
    • Benefits of Membership
    • Personal Blogs
    • Members Area
    • Achievement Levels
  • Learn
    Learn
    • Ask an Expert
    • eBooks
    • element14 presents
    • Learning Center
    • Tech Spotlight
    • STEM Academy
    • Webinars, Training and Events
    • Learning Groups
  • Technologies
    Technologies
    • 3D Printing
    • FPGA
    • Industrial Automation
    • Internet of Things
    • Power & Energy
    • Sensors
    • Technology Groups
  • Challenges & Projects
    Challenges & Projects
    • Design Challenges
    • element14 presents Projects
    • Project14
    • Arduino Projects
    • Raspberry Pi Projects
    • Project Groups
  • Products
    Products
    • Arduino
    • Avnet Boards Community
    • Dev Tools
    • Manufacturers
    • Multicomp Pro
    • Product Groups
    • Raspberry Pi
    • RoadTests & Reviews
  • Store
    Store
    • Visit Your Store
    • Choose another store...
      • Europe
      •  Austria (German)
      •  Belgium (Dutch, French)
      •  Bulgaria (Bulgarian)
      •  Czech Republic (Czech)
      •  Denmark (Danish)
      •  Estonia (Estonian)
      •  Finland (Finnish)
      •  France (French)
      •  Germany (German)
      •  Hungary (Hungarian)
      •  Ireland
      •  Israel
      •  Italy (Italian)
      •  Latvia (Latvian)
      •  
      •  Lithuania (Lithuanian)
      •  Netherlands (Dutch)
      •  Norway (Norwegian)
      •  Poland (Polish)
      •  Portugal (Portuguese)
      •  Romania (Romanian)
      •  Russia (Russian)
      •  Slovakia (Slovak)
      •  Slovenia (Slovenian)
      •  Spain (Spanish)
      •  Sweden (Swedish)
      •  Switzerland(German, French)
      •  Turkey (Turkish)
      •  United Kingdom
      • Asia Pacific
      •  Australia
      •  China
      •  Hong Kong
      •  India
      •  Korea (Korean)
      •  Malaysia
      •  New Zealand
      •  Philippines
      •  Singapore
      •  Taiwan
      •  Thailand (Thai)
      • Americas
      •  Brazil (Portuguese)
      •  Canada
      •  Mexico (Spanish)
      •  United States
      Can't find the country/region you're looking for? Visit our export site or find a local distributor.
  • Translate
  • Profile
  • Settings
Arduino
  • Products
  • More
Arduino
Arduino Forum Model Rocket Flight Computer Altitude / Speed update
  • Blog
  • Forum
  • Documents
  • Quiz
  • Events
  • Polls
  • Files
  • Members
  • Mentions
  • Sub-Groups
  • Tags
  • More
  • Cancel
  • New
Join Arduino to participate - click to join for free!
Actions
  • Share
  • More
  • Cancel
Forum Thread Details
  • Replies 25 replies
  • Subscribers 387 subscribers
  • Views 5385 views
  • Users 0 members are here
  • altitude
  • mpu6050
  • bmp280
  • speed-measuring
  • I2C OLED Display
Related

Model Rocket Flight Computer Altitude / Speed update

Frausing
Frausing over 2 years ago

Hi all, I am new to Arduino

I am trying to make an Model Rocket Flight Computer

I Use an Arduino Nano, an BMP280 and MPU6050 to measure Altitude and Speed
It show it on an small I2C OLED Display

It should show the live data on the display for the first 10 minutes
And after 10 minutes it then should show the Max Altitude and the Max Speed.

I can't get the Altitude and Speed to update on the display, it just keep saying 0.00
and of course after the 10 min. it still say 0.00

BMP280, MPU6050, OLED Display
Is conected to:
VCC to 5V on Arduino Nano
GND to GND
SDA to A4
SCL to A5

The LED is on Pin 13

I hope that someone can help me 

#include <Wire.h>
#include <Adafruit_GFX.h>
#include <Adafruit_SSD1306.h>
#include <Adafruit_BMP280.h>
#include <Wire.h>
#include <MPU6050.h>

#define OLED_RESET 4
Adafruit_SSD1306 display(OLED_RESET);

Adafruit_BMP280 bmp;
MPU6050 mpu;

const int ledPin = 13;
float altitude;
float speed;
int maxAltitude = 0;
int maxSpeed = 0;
unsigned long startTime = 0;

void setup() {
  Serial.begin(9600);
  Wire.begin();
  mpu.initialize();
  bmp.begin();
  display.begin(SSD1306_SWITCHCAPVCC, 0x3C);
  display.clearDisplay();
  pinMode(ledPin, OUTPUT);
  digitalWrite(ledPin, HIGH);
  delay(1000);
  digitalWrite(ledPin, HIGH);
  startTime = millis();
}

void loop() {
  unsigned long elapsedTime = millis() - startTime;
  int secondsElapsed = elapsedTime / 1000;

  if (secondsElapsed < 10) { // Display startup message for 10 seconds
    display.clearDisplay();
    display.setCursor(0, 0);
    display.println("0RocketFlightComputer");
    display.display();
  }
  else if (secondsElapsed < 600) { // Display current altitude and speed for first 10 minutes
    int16_t accelY = mpu.getAccelerationY();
    float accel = accelY / 16384.0 * 9.81; // convert to m/s^2
    altitude = bmp.readAltitude(1013.25);
    speed = accel * altitude;

    if (isnan(altitude) || isinf(altitude)) {
      altitude = 0;
    }

    if (isnan(speed) || isinf(speed)) {
      speed = 0;
    }

    display.clearDisplay();
    display.setTextSize(1);
    display.setTextColor(WHITE);
    display.setCursor(0, 0);
    display.println("RocketFlightComputer1");
    display.setCursor(0,10);
    display.print("Altitude: " + String(altitude, 2));
    // display.println(altitude, 2);
    display.setCursor(0,20);
    display.print("Speed: " + String(speed, 2));
    // display.println(speed, 2);
    display.display();
  }
  else { // Display maximum altitude and speed after 10 minutes
    if (altitude > maxAltitude) {
      maxAltitude = altitude;
    }
    if (speed > maxSpeed) {
      maxSpeed = speed;
    }
    display.clearDisplay();
    display.setTextSize(1);
    display.setTextColor(WHITE);
    display.setCursor(0, 0);
    display.println("RocketFlightComputer2");
    display.setCursor(0,10);
    display.println("Max Altitude: " + String(maxAltitude) + " m");
    display.setCursor(0,20);
    display.println("Max Speed: " + String(maxSpeed) + " m/s");
    display.display();
  }
  delay(100);
}


Test setup

image
image

  • Sign in to reply
  • Cancel

Top Replies

  • Gough Lui
    Gough Lui over 2 years ago +4
    Your code never checks if the sensors were initialised correctly anyway - check return values for mpu.initialize() and bmp.begin(). I suspect you have issues with your I2C connectivity - run a I2C scanner…
  • Jan Cumps
    Jan Cumps over 2 years ago in reply to phoenixcomm +3
    Vars don't belong in a header file. I advise arduino users to stick to the setup() and loop() mechanisms. It works well and it 'll be easier to get assistance when you use a common approach.
  • Gough Lui
    Gough Lui over 2 years ago in reply to shabaz +2
    I wonder if it's because people who have not configured a name (rather than having just username) get blanked? shabaz - I'll test it with your name and see what happens. Or perhaps there's some more…
  • Jan Cumps
    Jan Cumps over 2 years ago in reply to phoenixcomm

    We seem to have different views on the language Slight smile. When the language or libs have a functionality, I prefer to use it instead of rolling my own.

    The arduino already handles the main + setup +  loop. I prefer using that, instead of overriding their main() and bypassing their setup() and loop().

    c++ has a solution for boolean, I prefer using that instead of a PASS and FAIL. I think the c++ boolean is a better solution than the custom one you wrote, and  easier to use in expressions than your +1 / -1 pair. 

    > In real life, there is no difference between a .c file and a .h file.

    That is true, but a .h is intended to be included in other files. To define interfaces, APIs, constants - likely to be reused at other places. Declaring a variable in a .h will surprise anyone that wants to use your code. 

    • Cancel
    • Vote Up +1 Vote Down
    • Sign in to reply
    • Cancel
  • shabaz
    shabaz over 2 years ago in reply to phoenixcomm

    Hi Cris,

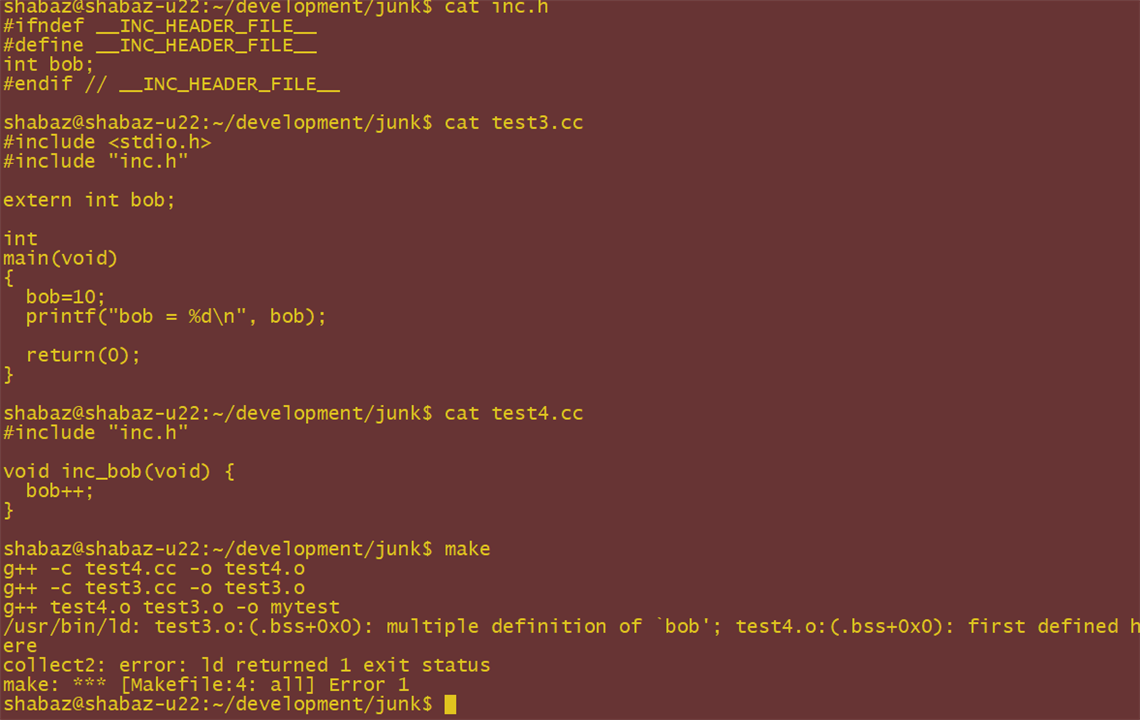
    Putting variables in header files limits including the header file to just one source file (.c). The linker will throw this error (this is with GCC):

    image

    If the variable was in a .c file, there's no problem. Every file that needs to use the global variable can simply have the extern declaration of the variable.

    I'm not saying code should use variables in this way, but there's definitely a lot more flexibility if the variables are in a .c file. With a .h file containing variables, it is not possible to include that header file anywhere, except in just one .c file. I might be missing something though, this is just at first thought.

    • Cancel
    • Vote Up +2 Vote Down
    • Sign in to reply
    • Cancel
  • phoenixcomm
    phoenixcomm over 2 years ago in reply to shabaz

    nope! sorry but you are wrong.... lets's say I have a file fsmath.h it can be #included in as many files as you wish. But you have to be careful as not to redefine it again in fs.c  or you will have this problem. One of my libs that I wrote was for fixpoint math. but it was included in every file.c that needed to use fixpoint math. 

    • Cancel
    • Vote Up +1 Vote Down
    • Sign in to reply
    • Cancel
  • phoenixcomm
    phoenixcomm over 2 years ago in reply to Jan Cumps

    The problem with booleans is you are forced to use ON -OFF ie two states but then how do you return error message codes if it fails?? In my NAV computer, I have about 20-30 error message codes. So 1 = Pass and ANY negative number is a failure with the code. Just think about it. Return FAIL  (Bool) then you are going to have to get the error message from someplace else.. OUCH...

    • Cancel
    • Vote Up +1 Vote Down
    • Sign in to reply
    • Cancel
  • shabaz
    shabaz over 2 years ago in reply to phoenixcomm

    I can't figure out how to do that. I'm not saying it's not possible, but I can't see a straightforward way of #including one .h file from multiple .c files.

    Is there any example files you (or anyone) can share, showing this, i.e. one header file containing a variable, and two source files that both #include that header file?

    In the screenshot above,  it shows my attempt at one header file and two source files, and the results of the build. What line should I modify in the code in the screenshot, and what should the modification be?

    • Cancel
    • Vote Up 0 Vote Down
    • Sign in to reply
    • Cancel
<
element14 Community

element14 is the first online community specifically for engineers. Connect with your peers and get expert answers to your questions.

  • Members
  • Learn
  • Technologies
  • Challenges & Projects
  • Products
  • Store
  • About Us
  • Feedback & Support
  • FAQs
  • Terms of Use
  • Privacy Policy
  • Legal and Copyright Notices
  • Sitemap
  • Cookies

An Avnet Company © 2025 Premier Farnell Limited. All Rights Reserved.

Premier Farnell Ltd, registered in England and Wales (no 00876412), registered office: Farnell House, Forge Lane, Leeds LS12 2NE.

ICP 备案号 10220084.

Follow element14

  • X
  • Facebook
  • linkedin
  • YouTube