element14 Community
element14 Community
    Register Log In
  • Site
  • Search
  • Log In Register
  • About Us
  • Community Hub
    Community Hub
    • What's New on element14
    • Feedback and Support
    • Benefits of Membership
    • Personal Blogs
    • Members Area
    • Achievement Levels
  • Learn
    Learn
    • Ask an Expert
    • eBooks
    • element14 presents
    • Learning Center
    • Tech Spotlight
    • STEM Academy
    • Webinars, Training and Events
    • Learning Groups
  • Technologies
    Technologies
    • 3D Printing
    • FPGA
    • Industrial Automation
    • Internet of Things
    • Power & Energy
    • Sensors
    • Technology Groups
  • Challenges & Projects
    Challenges & Projects
    • Design Challenges
    • element14 presents Projects
    • Project14
    • Arduino Projects
    • Raspberry Pi Projects
    • Project Groups
  • Products
    Products
    • Arduino
    • Avnet Boards Community
    • Dev Tools
    • Manufacturers
    • Multicomp Pro
    • Product Groups
    • Raspberry Pi
    • RoadTests & Reviews
  • Store
    Store
    • Visit Your Store
    • Choose another store...
      • Europe
      •  Austria (German)
      •  Belgium (Dutch, French)
      •  Bulgaria (Bulgarian)
      •  Czech Republic (Czech)
      •  Denmark (Danish)
      •  Estonia (Estonian)
      •  Finland (Finnish)
      •  France (French)
      •  Germany (German)
      •  Hungary (Hungarian)
      •  Ireland
      •  Israel
      •  Italy (Italian)
      •  Latvia (Latvian)
      •  
      •  Lithuania (Lithuanian)
      •  Netherlands (Dutch)
      •  Norway (Norwegian)
      •  Poland (Polish)
      •  Portugal (Portuguese)
      •  Romania (Romanian)
      •  Russia (Russian)
      •  Slovakia (Slovak)
      •  Slovenia (Slovenian)
      •  Spain (Spanish)
      •  Sweden (Swedish)
      •  Switzerland(German, French)
      •  Turkey (Turkish)
      •  United Kingdom
      • Asia Pacific
      •  Australia
      •  China
      •  Hong Kong
      •  India
      •  Korea (Korean)
      •  Malaysia
      •  New Zealand
      •  Philippines
      •  Singapore
      •  Taiwan
      •  Thailand (Thai)
      • Americas
      •  Brazil (Portuguese)
      •  Canada
      •  Mexico (Spanish)
      •  United States
      Can't find the country/region you're looking for? Visit our export site or find a local distributor.
  • Translate
  • Profile
  • Settings
Arduino
  • Products
  • More
Arduino
Arduino Forum Model Rocket Flight Computer Altitude / Speed update
  • Blog
  • Forum
  • Documents
  • Quiz
  • Events
  • Polls
  • Files
  • Members
  • Mentions
  • Sub-Groups
  • Tags
  • More
  • Cancel
  • New
Join Arduino to participate - click to join for free!
Actions
  • Share
  • More
  • Cancel
Forum Thread Details
  • Replies 25 replies
  • Subscribers 387 subscribers
  • Views 5368 views
  • Users 0 members are here
  • altitude
  • mpu6050
  • bmp280
  • speed-measuring
  • I2C OLED Display
Related

Model Rocket Flight Computer Altitude / Speed update

Frausing
Frausing over 2 years ago

Hi all, I am new to Arduino

I am trying to make an Model Rocket Flight Computer

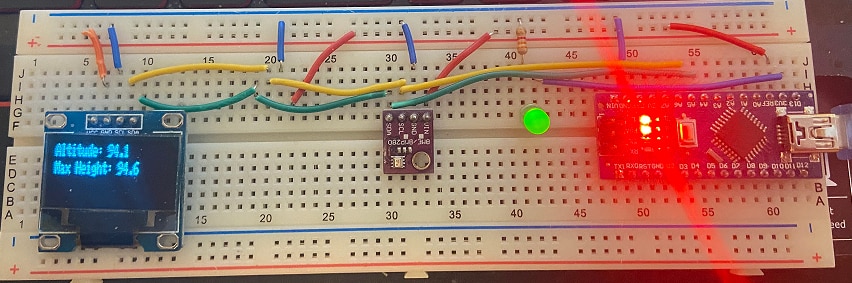
I Use an Arduino Nano, an BMP280 and MPU6050 to measure Altitude and Speed
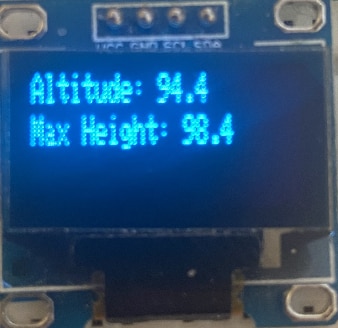
It show it on an small I2C OLED Display

It should show the live data on the display for the first 10 minutes
And after 10 minutes it then should show the Max Altitude and the Max Speed.

I can't get the Altitude and Speed to update on the display, it just keep saying 0.00
and of course after the 10 min. it still say 0.00

BMP280, MPU6050, OLED Display
Is conected to:
VCC to 5V on Arduino Nano
GND to GND
SDA to A4
SCL to A5

The LED is on Pin 13

I hope that someone can help me 

#include <Wire.h>
#include <Adafruit_GFX.h>
#include <Adafruit_SSD1306.h>
#include <Adafruit_BMP280.h>
#include <Wire.h>
#include <MPU6050.h>

#define OLED_RESET 4
Adafruit_SSD1306 display(OLED_RESET);

Adafruit_BMP280 bmp;
MPU6050 mpu;

const int ledPin = 13;
float altitude;
float speed;
int maxAltitude = 0;
int maxSpeed = 0;
unsigned long startTime = 0;

void setup() {
  Serial.begin(9600);
  Wire.begin();
  mpu.initialize();
  bmp.begin();
  display.begin(SSD1306_SWITCHCAPVCC, 0x3C);
  display.clearDisplay();
  pinMode(ledPin, OUTPUT);
  digitalWrite(ledPin, HIGH);
  delay(1000);
  digitalWrite(ledPin, HIGH);
  startTime = millis();
}

void loop() {
  unsigned long elapsedTime = millis() - startTime;
  int secondsElapsed = elapsedTime / 1000;

  if (secondsElapsed < 10) { // Display startup message for 10 seconds
    display.clearDisplay();
    display.setCursor(0, 0);
    display.println("0RocketFlightComputer");
    display.display();
  }
  else if (secondsElapsed < 600) { // Display current altitude and speed for first 10 minutes
    int16_t accelY = mpu.getAccelerationY();
    float accel = accelY / 16384.0 * 9.81; // convert to m/s^2
    altitude = bmp.readAltitude(1013.25);
    speed = accel * altitude;

    if (isnan(altitude) || isinf(altitude)) {
      altitude = 0;
    }

    if (isnan(speed) || isinf(speed)) {
      speed = 0;
    }

    display.clearDisplay();
    display.setTextSize(1);
    display.setTextColor(WHITE);
    display.setCursor(0, 0);
    display.println("RocketFlightComputer1");
    display.setCursor(0,10);
    display.print("Altitude: " + String(altitude, 2));
    // display.println(altitude, 2);
    display.setCursor(0,20);
    display.print("Speed: " + String(speed, 2));
    // display.println(speed, 2);
    display.display();
  }
  else { // Display maximum altitude and speed after 10 minutes
    if (altitude > maxAltitude) {
      maxAltitude = altitude;
    }
    if (speed > maxSpeed) {
      maxSpeed = speed;
    }
    display.clearDisplay();
    display.setTextSize(1);
    display.setTextColor(WHITE);
    display.setCursor(0, 0);
    display.println("RocketFlightComputer2");
    display.setCursor(0,10);
    display.println("Max Altitude: " + String(maxAltitude) + " m");
    display.setCursor(0,20);
    display.println("Max Speed: " + String(maxSpeed) + " m/s");
    display.display();
  }
  delay(100);
}


Test setup

image
image

  • Sign in to reply
  • Cancel

Top Replies

  • Gough Lui
    Gough Lui over 2 years ago +4
    Your code never checks if the sensors were initialised correctly anyway - check return values for mpu.initialize() and bmp.begin(). I suspect you have issues with your I2C connectivity - run a I2C scanner…
  • Jan Cumps
    Jan Cumps over 2 years ago in reply to phoenixcomm +3
    Vars don't belong in a header file. I advise arduino users to stick to the setup() and loop() mechanisms. It works well and it 'll be easier to get assistance when you use a common approach.
  • Gough Lui
    Gough Lui over 2 years ago in reply to shabaz +2
    I wonder if it's because people who have not configured a name (rather than having just username) get blanked? shabaz - I'll test it with your name and see what happens. Or perhaps there's some more…
  • shabaz
    shabaz over 2 years ago

    Hi,

    The code isn't readable. It is possible to use the Insert->Code menu option in the blog post to correct the formatting.

    To save a bit of time for anyone wishing to read the code:

    #include <Wire.h>
    #include <Adafruit_GFX.h>
    #include <Adafruit_SSD1306.h>
    #include <Adafruit_BMP280.h>
    #include <Wire.h>
    #include <MPU6050.h>
    
    #define OLED_RESET 4
    Adafruit_SSD1306 display(OLED_RESET);
    
    Adafruit_BMP280 bmp;
    MPU6050 mpu;
    
    const int ledPin = 13;
    float altitude;
    float speed;
    int maxAltitude = 0;
    int maxSpeed = 0;
    unsigned long startTime = 0;
    
    void setup()
    {
        Serial.begin(9600);
        Wire.begin();
        mpu.initialize();
        bmp.begin();
        display.begin(SSD1306_SWITCHCAPVCC, 0x3C);
        display.clearDisplay();
        pinMode(ledPin, OUTPUT);
        digitalWrite(ledPin, HIGH);
        delay(1000);
        digitalWrite(ledPin, HIGH);
        startTime = millis();
    }
    
    void loop()
    {
        unsigned long elapsedTime = millis() - startTime;
        int secondsElapsed = elapsedTime / 1000;
    
        if (secondsElapsed < 10)
        { // Display startup message for 10 seconds
            display.clearDisplay();
            display.setCursor(0, 0);
            display.println("0RocketFlightComputer");
            display.display();
        }
        else if (secondsElapsed < 600)
        { // Display current altitude and speed for first 10 minutes
            int16_t accelY = mpu.getAccelerationY();
            float accel = accelY / 16384.0 * 9.81; // convert to m/s^2
            altitude = bmp.readAltitude(1013.25);
            speed = accel * altitude;
    
            if (isnan(altitude) || isinf(altitude))
            {
                altitude = 0;
            }
    
            if (isnan(speed) || isinf(speed))
            {
                speed = 0;
            }
    
            display.clearDisplay();
            display.setTextSize(1);
            display.setTextColor(WHITE);
            display.setCursor(0, 0);
            display.println("RocketFlightComputer1");
            display.setCursor(0, 10);
            display.print("Altitude: " + String(altitude, 2));
            // display.println(altitude, 2);
            display.setCursor(0, 20);
            display.print("Speed: " + String(speed, 2));
            // display.println(speed, 2);
            display.display();
        }
        else
        { // Display maximum altitude and speed after 10 minutes
            if (altitude > maxAltitude)
            {
                maxAltitude = altitude;
            }
            if (speed > maxSpeed)
            {
                maxSpeed = speed;
            }
            display.clearDisplay();
            display.setTextSize(1);
            display.setTextColor(WHITE);
            display.setCursor(0, 0);
            display.println("RocketFlightComputer2");
            display.setCursor(0, 10);
            display.println("Max Altitude: " + String(maxAltitude) + " m");
            display.setCursor(0, 20);
            display.println("Max Speed: " + String(maxSpeed) + " m/s");
            display.display();
        }
        delay(100);
    }

    • Cancel
    • Vote Up 0 Vote Down
    • Sign in to reply
    • Cancel
  • Frausing
    Frausing over 2 years ago in reply to shabaz

    Thank you so much :-)
    I have corrected my post

    • Cancel
    • Vote Up +1 Vote Down
    • Sign in to reply
    • Cancel
  • charlieo21
    charlieo21 over 2 years ago

    First be sure that all your connections are well done, check if you can communicate with the BMP280 & MPU6050

    • Cancel
    • Vote Up 0 Vote Down
    • Sign in to reply
    • Cancel
  • Frausing
    Frausing over 2 years ago in reply to charlieo21

    Thanks 

    Yes, I did re-wire it as the first thing, I was also sure that it was the wiring, but no it still don't work :-(

    • Cancel
    • Vote Up 0 Vote Down
    • Sign in to reply
    • Cancel
  • shabaz
    shabaz over 2 years ago

    I can't see clearly from the photos, are you running the modules all from 5V? If so, can you check if the MPU6050 module supports 5V operation? I think it might only support 3.3V operation. 

    Anyway, that needs checking via module datasheet etc.

    (Incidentally, most sensors have moved to 3.3V operation these days, and using a 5V Nano makes life more difficult, compared to just moving to 3.3V microcontrollers and 3.3V supported attached devices).

    Also, you should just try to get one sensor working first (physically disconnect the other sensor). 

    Finally, how will this be used? If it is on a model rocket, then who will be able to read the altitude and speed in-flight? Maybe a logging system would be more usable (perhaps even without a display etc, to make it lighter).

    • Cancel
    • Vote Up 0 Vote Down
    • Sign in to reply
    • Cancel
  • Frausing
    Frausing over 2 years ago in reply to shabaz

    Hi, Good eye you got :-)

    yes now it is on 5V did first run it on 3.3 V
    and the MPU6050 can run on 3 to 5V

    I have just changed it to 3.3V again, no change

    I did not look at the datasheet, I just found it here: https://components101.com/sensors/mpu6050-module
    Will find the datasheet :-)

    I have just run an example code on each modul, and they say they work.

    This will be on an small 1 meter rocket, I did first try with an SD card reader and it shake sometime too much. So the data is corrupted
    I did read that the copper connections from the SD card reader can do that. thats why I will try this.

    Thats why I have set it up, so the first 10 minutes, it should show the live data, and after 10 min. it then show the MAX.
    Then I can see that it work, before I send. and I can see the Altitude before I send the rocket. 

    • Cancel
    • Vote Up 0 Vote Down
    • Sign in to reply
    • Cancel
  • shabaz
    shabaz over 2 years ago in reply to Frausing

    The circuit at that site shows that even if the MPU module is powered with 5V, the I2C lines are pulled up to 3.3V. The BME280 module I think expects 3.3V.

    You really need to check carefully what voltage levels each board expects on the I2C lines, and what power supply each board can be powered from, and then connect it accordingly. If the Nano only has 5V GPIO, then you have an incompatibility there too.

    Best advice: redesign the solution, using a more modern microcontroller, and any modern sensors and display that have 3.3V compatible GPIO.

    Pi Pico springs to mind, it is a similar size to the Arduino Nano, but has more normal (nowadays) 3.3V level GPIO.

    I'm confused about this comment:

    This will be on an small 1 meter rocket... Thats why I have set it up, so the first 10 minutes, it should show the live data

    Who can read the display during the time the rocket is in flight, if that flight time occurs for a period within those ten minutes? If you wish to reduce the size and weight further, then another idea is to remove the display (another benefit is that it is one less device to power up if you don't include it, and one less thing that needs compatible I2C voltage levels). Incidentally the microcontroller in the Nano contains EEPROM, which could be used for storage perhaps. If that's not enough, an external memory chip should be soldered.

    • Cancel
    • Vote Up 0 Vote Down
    • Sign in to reply
    • Cancel
  • Gough Lui
    Gough Lui over 2 years ago

    Your code never checks if the sensors were initialised correctly anyway - check return values for mpu.initialize() and bmp.begin().

    I suspect you have issues with your I2C connectivity - run a I2C scanner to check for the presence of devices first, before troubleshooting further.

    Your code is also broken - it only updates the maxAltitude and maxSpeed parameters AFTER 600 seconds has passed (all previous readings are not stored) and then it NEVER reads the altitude or speed again. This means if it started descending before 600s, you won't have the maxAltitude nor maxSpeed, and if it lands before 600s, you'll only ever get zero.

    - Gough

    • Cancel
    • Vote Up +4 Vote Down
    • Sign in to reply
    • Cancel
  • Frausing
    Frausing over 2 years ago in reply to Gough Lui

    Hi and thanks

    I have changed the voltage to 3.3V

    I have also removed the part with 10 min as Gough did point out, it did never work

    The MPU6050 I also removed and the speed part of the code, so I only have the Altitude

    Then I run a I2C scanner to check for the presence of devices first, and it find the 2 devices (BMP280 and the screen)
    Scanning for I2C devices...
    Found device at address 0x3C !
    Found device at address 0x76 !
    Found 2 I2C device(s).

    So it now show the current Altitude and the max 

    I use the current Altitude, to see how high I am over the sea level, I am right now 94 meter over sea level.
    If I don't do that, I will just think my rocket is flying higher LOL


    The electronic is going to be inside the rocket, and then there will be a hole in the side of the bodytube, where the screen is mounted flush with the tube. So I can see it before the launch, and then again after to see the max altitude.

    Now I just have to find a way to do the same to the Max speed, but that is giving me problems.
    If I reinstall the MPU6050 the I2C scanner see it fine. but the code is to hard for me, as  I am new to Arduino and coding.
    Maybe I will be good enough some day

    imageimage

    The code now:

    #include <Wire.h>
    #include <Adafruit_SSD1306.h>
    #include <Adafruit_BMP280.h>
    
    #define OLED_RESET 4
    #define SCREEN_WIDTH 128
    #define SCREEN_HEIGHT 32
    
    Adafruit_SSD1306 display(SCREEN_WIDTH, SCREEN_HEIGHT, &Wire, OLED_RESET);
    Adafruit_BMP280 bmp;
    const int ledPin = 13;
    float current_height = 0;
    float max_height = 0;
    
    
    unsigned long previous_time = 0;
    
    // Function to scan for I2C devices
    void scanI2C() {
      Wire.begin();
      Serial.println("Scanning for I2C devices...");
      byte count = 0;
      
      for (byte i = 1; i < 120; i++) {
        Wire.beginTransmission(i);
        if (Wire.endTransmission() == 0) {
          Serial.print("Found device at address 0x");
          if (i < 16) {
            Serial.print("0");
          }
          Serial.print(i, HEX);
          Serial.println(" !");
          count++;
          delay(1);  // Small delay for readability
        }
      }
      
      if (count == 0) {
        Serial.println("No I2C devices found.");
      } else {
        Serial.print("Found ");
        Serial.print(count);
        Serial.println(" I2C device(s).");
      }
    }
    
    void setup() {
      Serial.begin(9600);
      scanI2C();
      
      pinMode(ledPin, OUTPUT);
      
      // Initialize BMP280 sensor
      if (!bmp.begin(0x76)) {
        Serial.println("Could not find a valid BMP280 sensor, check wiring!");
        while (1);
      }
    
      // Initialize OLED display
      display.begin(SSD1306_SWITCHCAPVCC, 0x3C);
      display.clearDisplay();
      display.setTextColor(WHITE);
      display.setTextSize(1);
    }
    
    void loop() {
      // Read altitude from BMP280 sensor
      current_height = bmp.readAltitude(1013.25);
    
      // Store maximum altitude achieved
      if (current_height > max_height) {
        max_height = current_height;
      }
    
      // Display altitude and max height on OLED display
      display.clearDisplay();
      display.setCursor(0, 0);
      display.print("Altitude: ");
      display.println(current_height, 1);
      display.setCursor(0, 10);
      display.print("Max Height: ");
      display.println(max_height, 1);
      display.display();
    
      // Toggle LED on and off
      digitalWrite(ledPin, HIGH);
      delay(500);
      digitalWrite(ledPin, LOW);
      delay(500);
    }
    

    • Cancel
    • Vote Up +1 Vote Down
    • Sign in to reply
    • Cancel
  • shabaz
    shabaz over 2 years ago in reply to Frausing

    Hi, 

    Now that the BMP.. portion is working, you should try to add the code to setup the MPU.. device, and print out a value from it. 

    Your initial code had (in the setup function):

    mpu.initialize();

    however, by googling it seems people use this:

    mpu.begin();

    I don't know the difference, but it could be worth a try. Also you should check the return values and display it as a test to the screen as Gough mentions, e.g. something like:

    ret = mpu.begin();

    display.print("Ret val: ");

    display.println(ret, 1);

    The next step up would be to run such built-in tests at power-up and display them to the screen for several seconds, e.g. "Gyro Test.. OK" but that could be a future thing to add.

    I'm still unconvinced about the usability/value of a display on the rocket versus download later (or say Bluetooth), and cutting out a window isn't aerodynamic, because the screen won't be completely flush and curved, but I guess it needs experimenting to see the effect, I could be wrong because I don't know much about this topic.

    • Cancel
    • Vote Up +1 Vote Down
    • Sign in to reply
    • Cancel
>
element14 Community

element14 is the first online community specifically for engineers. Connect with your peers and get expert answers to your questions.

  • Members
  • Learn
  • Technologies
  • Challenges & Projects
  • Products
  • Store
  • About Us
  • Feedback & Support
  • FAQs
  • Terms of Use
  • Privacy Policy
  • Legal and Copyright Notices
  • Sitemap
  • Cookies

An Avnet Company © 2025 Premier Farnell Limited. All Rights Reserved.

Premier Farnell Ltd, registered in England and Wales (no 00876412), registered office: Farnell House, Forge Lane, Leeds LS12 2NE.

ICP 备案号 10220084.

Follow element14

  • X
  • Facebook
  • linkedin
  • YouTube