element14 Community
element14 Community
    Register Log In
  • Site
  • Search
  • Log In Register
  • About Us
  • Community Hub
    Community Hub
    • What's New on element14
    • Feedback and Support
    • Benefits of Membership
    • Personal Blogs
    • Members Area
    • Achievement Levels
  • Learn
    Learn
    • Ask an Expert
    • eBooks
    • element14 presents
    • Learning Center
    • Tech Spotlight
    • STEM Academy
    • Webinars, Training and Events
    • Learning Groups
  • Technologies
    Technologies
    • 3D Printing
    • FPGA
    • Industrial Automation
    • Internet of Things
    • Power & Energy
    • Sensors
    • Technology Groups
  • Challenges & Projects
    Challenges & Projects
    • Design Challenges
    • element14 presents Projects
    • Project14
    • Arduino Projects
    • Raspberry Pi Projects
    • Project Groups
  • Products
    Products
    • Arduino
    • Avnet Boards Community
    • Dev Tools
    • Manufacturers
    • Multicomp Pro
    • Product Groups
    • Raspberry Pi
    • RoadTests & Reviews
  • Store
    Store
    • Visit Your Store
    • Choose another store...
      • Europe
      •  Austria (German)
      •  Belgium (Dutch, French)
      •  Bulgaria (Bulgarian)
      •  Czech Republic (Czech)
      •  Denmark (Danish)
      •  Estonia (Estonian)
      •  Finland (Finnish)
      •  France (French)
      •  Germany (German)
      •  Hungary (Hungarian)
      •  Ireland
      •  Israel
      •  Italy (Italian)
      •  Latvia (Latvian)
      •  
      •  Lithuania (Lithuanian)
      •  Netherlands (Dutch)
      •  Norway (Norwegian)
      •  Poland (Polish)
      •  Portugal (Portuguese)
      •  Romania (Romanian)
      •  Russia (Russian)
      •  Slovakia (Slovak)
      •  Slovenia (Slovenian)
      •  Spain (Spanish)
      •  Sweden (Swedish)
      •  Switzerland(German, French)
      •  Turkey (Turkish)
      •  United Kingdom
      • Asia Pacific
      •  Australia
      •  China
      •  Hong Kong
      •  India
      •  Korea (Korean)
      •  Malaysia
      •  New Zealand
      •  Philippines
      •  Singapore
      •  Taiwan
      •  Thailand (Thai)
      • Americas
      •  Brazil (Portuguese)
      •  Canada
      •  Mexico (Spanish)
      •  United States
      Can't find the country/region you're looking for? Visit our export site or find a local distributor.
  • Translate
  • Profile
  • Settings
Arduino
  • Products
  • More
Arduino
Arduino Forum Why does my Arduino switch Debounce routine bounce?
  • Blog
  • Forum
  • Documents
  • Quiz
  • Events
  • Polls
  • Files
  • Members
  • Mentions
  • Sub-Groups
  • Tags
  • More
  • Cancel
  • New
Join Arduino to participate - click to join for free!
Actions
  • Share
  • More
  • Cancel
Forum Thread Details
  • Replies 31 replies
  • Subscribers 385 subscribers
  • Views 4207 views
  • Users 0 members are here
  • arduino_code
  • arduino coding
  • arduino
Related

Why does my Arduino switch Debounce routine bounce?

colporteur
colporteur over 2 years ago

Why does the LED flash twice with one push and release of the button?

#include <Servo.h>

Servo Stop_servo;  // create servo object to control a servo

// Buttons with Pull-Ups are "backwards"
// Some DEFINEs to make reading code easier
#define PUSHED false
#define NOT_PUSHED true
#define WATCH_BUTTON true
#define IGNORE_BUTTON false

// Time to wait for bounce, in MICROsconds
const int buttonWaitInterval = 6000;
// Pins for LED and Button
const int LEDpin = 5;
const int BUTTONpin = 2;
float Minpos = 0;    // variable to store the servo position
float Maxpos = 255;  //greatest travel of servo

// Used to track how long between "bounces"
unsigned long previousMicros = 0;

// Used to track state of button (high or low)
boolean previousButtonState = NOT_PUSHED;

// Variable reporting de-bounced state.
boolean debouncedButtonState = NOT_PUSHED;

// Tracks if we are waiting for a "bounce" event
boolean bounceState = false;

// Nothing surprising here
void setup() {
  pinMode(LEDpin, OUTPUT);
  pinMode(BUTTONpin, INPUT_PULLUP);
  digitalWrite(LEDpin, LOW);
  Stop_servo.attach(3);  // attaches the servo on pin 3 to the servo object
  Stop_servo.write(0);

  Serial.begin(9600);
  Serial.println(F("Serial Initialized"));
}

void loop() {

  // This needs to be called periodically to
  // update the timers and button status
  updateButton();
  // This replaces: digitalRead(BUTTONpin);
  //digitalWrite(LEDpin, debouncedButtonState);
  if (debouncedButtonState == LOW) {
    digitalWrite(LEDpin, HIGH);
    delay(500);
    digitalWrite(LEDpin, LOW);
    delay(500);
    Stop_servo.write(255);
    delay(5000);
    Stop_servo.write(0);
    Serial.println(F("servo cycled"));
  }
}

// All of the magic happens here
void updateButton() {
  // We are waiting for any activity on the button
  if (bounceState == WATCH_BUTTON) {
    // Get and store current button state
    boolean currentButtonState = digitalRead(BUTTONpin);
    // Check to see if a transition has occured (and only one)
    if (previousButtonState != currentButtonState) {
      // A transition was detected, ignore the others for a while
      bounceState = IGNORE_BUTTON;
      // Store current time (start the clock)
      previousMicros = micros();
    }
    // Keep storing existing button state, if we're watching
    previousButtonState = currentButtonState;
  }
  // We are waiting for the buttonWaitInterval to elapse
  if (bounceState == IGNORE_BUTTON) {
    // Compare current value of micros to previously stored, enough time yet?
    unsigned long currentMicros = micros();
    if ((unsigned long)(currentMicros - previousMicros) >= buttonWaitInterval) {
      // Store the state of the button/pin to debouncedButtonState, which "reports"
      // the correct value. This allows for the code to handle active high or low inputs
      debouncedButtonState = digitalRead(BUTTONpin);
      // Go back to watching the button again.
      bounceState = WATCH_BUTTON;
    }
  }
}

I'm trying to use Baldengineer debounce code to read a button and take an action. Each press of the button causes the LED to flash twice. The serial output reflects the routine running twice. 

I have failed in my code changes to get the result I hope. I have looked at Internet and have found no hints to help.

  • Sign in to reply
  • Cancel

Top Replies

  • scottiebabe
    scottiebabe over 2 years ago in reply to scottiebabe +4
    Technical forums are great, so many great tidbits of knowledge shared in this thread! One more demonstration showing why a schmitt trigger is an important part of the solution. I wrote a simple PIO…
  • dougw
    dougw over 2 years ago +3
    Debouncing may be good practice, but it would seem you don't need it here. If you start your LED and servo cycle as soon as a button push is first detected, all button bouncing will be long over before…
  • shabaz
    shabaz over 2 years ago +3
    Hi Sean, I've not looked in detail, but it seems that you wish to move a servo just once, if a button is pressed. Your delay() functions are actually already performing a button-pushed-down debounce…
Parents
  • mayermakes
    mayermakes over 2 years ago

    in some cases a simple RC-network on the button does sufficient debounce, would be cheap and quick to try out.
    i usually use a 0,1uF cap and 10k resistor.

    • Cancel
    • Vote Up +3 Vote Down
    • Sign in to reply
    • Cancel
  • phoenixcomm
    phoenixcomm over 2 years ago in reply to mayermakes

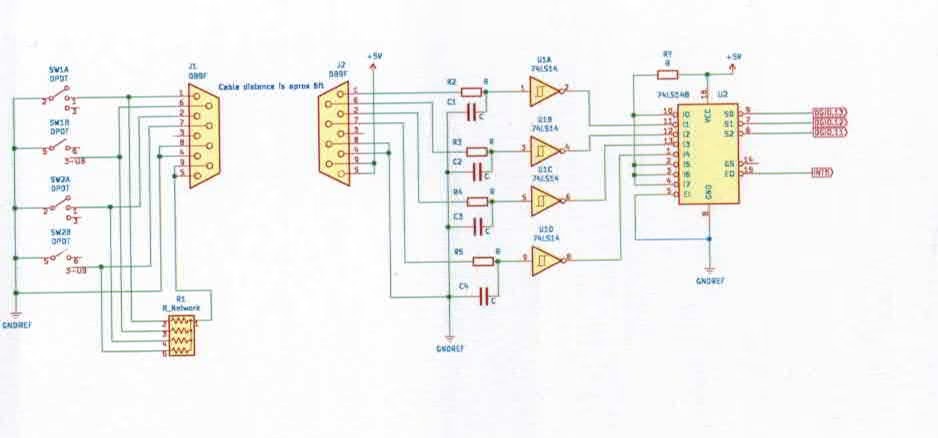
     mayermakes hi,  Mike I tend to disagree in my sim, the Arduino has normally 6 feet of cable between itself, and an avionics head. I don't want to troubleshoot a problem (like why is it a two or three when it should be one.) so be a big spender and waste about 50 cents. the part is a SN74x14N and it gives you 4 Shmitt Triggers in the package. This guarantees a square signal with no bounce NADA - ZIP, GONE, POOF.  I personally don't like good enough as it is bound to FAIL... LTRGTR by the way shabaz here is what I normally do: and this is from the Fuel Load Meter blogs:

    image

    BTW I later removed the SN74LS148 priority encoder you could have two positions on at the same time. 

    • Cancel
    • Vote Up +1 Vote Down
    • Sign in to reply
    • Cancel
  • colporteur
    colporteur over 2 years ago in reply to phoenixcomm

    You don't have a KiCAD schmidt trigger PCB layout you can share?

    Schmidt triggers have been mentioned in the past. I avoided using them, thinking I wouldn't have a problem. Start a locomotive with dirty wheels on a dirty track and you be surprised at how many false triggers you get.

    Maybe it is time to revisit the requirement:(

    • Cancel
    • Vote Up 0 Vote Down
    • Sign in to reply
    • Cancel
  • scottiebabe
    scottiebabe over 2 years ago in reply to phoenixcomm

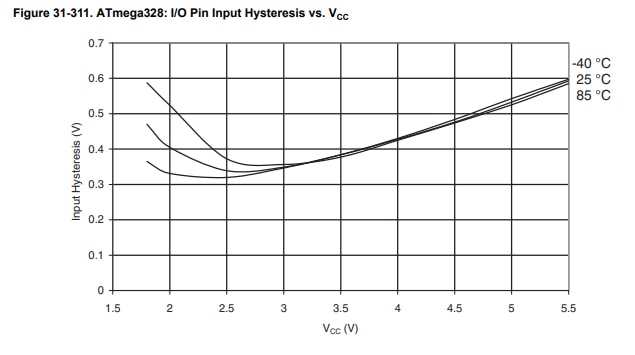
    Very fancy phoenixcomm! Many microcontrollers have Schmitt triggered inputs built-in  (at least the Microchip pic's do). I have never used an Arduino in my life but it looks like the atmega328 does too...

    image

    • Cancel
    • Vote Up 0 Vote Down
    • Sign in to reply
    • Cancel
  • phoenixcomm
    phoenixcomm over 2 years ago in reply to scottiebabe

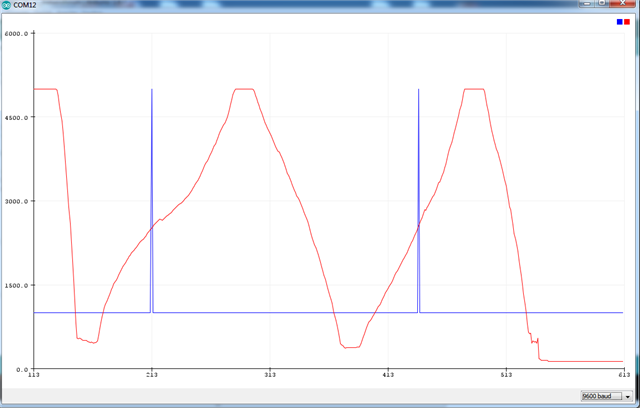
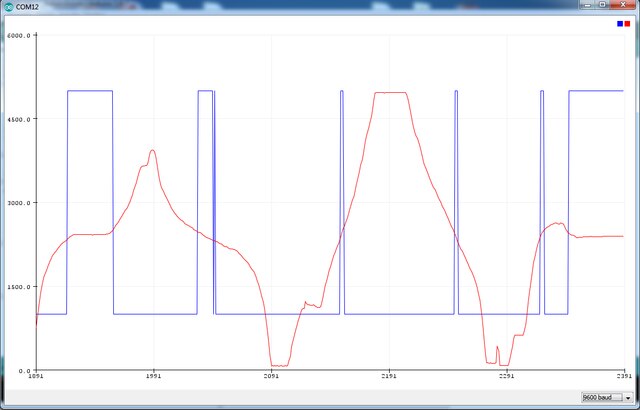
     scottiebabe I don't believe it does.  btw 2.5v is not a logic level I have two photos for you

    imageimage

    these came from https://forum.arduino.cc/t/rising-interrupts-behaves-as-chance-on-mega2560/570267/13 (new window)

    • Cancel
    • Vote Up +1 Vote Down
    • Sign in to reply
    • Cancel
  • scottiebabe
    scottiebabe over 2 years ago in reply to phoenixcomm

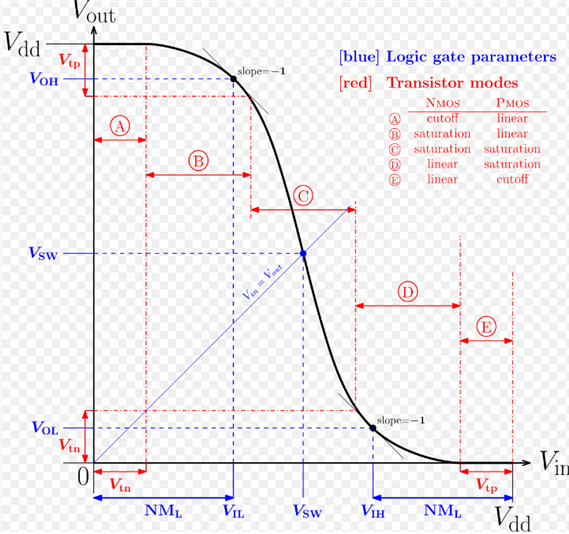
    Very interesting! *shrug* I don't know arduinos... The VTC curve of an inverter tends to have the input high/low threshold near Vdd/2 

    image 

    Yay another rabbit hole! The Rp2040 (pi pico) is supposed to have Schmitt triggered inputs I will try and measure the input thresholds.

    • Cancel
    • Vote Up +1 Vote Down
    • Sign in to reply
    • Cancel
  • phoenixcomm
    phoenixcomm over 2 years ago in reply to colporteur

    I'm so sorry, but I use I use a lot of Wire-Wrap®, on PCB as I have the tooling and lots of wire. I normally never get to the  PCB stage, unless the parts count gets ludicrous.  Below is a demo of Wire-Wrap®,

    You don't have permission to edit metadata of this video.
    Edit media
    x
    image
    Upload Preview
    image

    • Cancel
    • Vote Up +1 Vote Down
    • Sign in to reply
    • Cancel
Reply
  • phoenixcomm
    phoenixcomm over 2 years ago in reply to colporteur

    I'm so sorry, but I use I use a lot of Wire-Wrap®, on PCB as I have the tooling and lots of wire. I normally never get to the  PCB stage, unless the parts count gets ludicrous.  Below is a demo of Wire-Wrap®,

    You don't have permission to edit metadata of this video.
    Edit media
    x
    image
    Upload Preview
    image

    • Cancel
    • Vote Up +1 Vote Down
    • Sign in to reply
    • Cancel
Children
No Data
element14 Community

element14 is the first online community specifically for engineers. Connect with your peers and get expert answers to your questions.

  • Members
  • Learn
  • Technologies
  • Challenges & Projects
  • Products
  • Store
  • About Us
  • Feedback & Support
  • FAQs
  • Terms of Use
  • Privacy Policy
  • Legal and Copyright Notices
  • Sitemap
  • Cookies

An Avnet Company © 2025 Premier Farnell Limited. All Rights Reserved.

Premier Farnell Ltd, registered in England and Wales (no 00876412), registered office: Farnell House, Forge Lane, Leeds LS12 2NE.

ICP 备案号 10220084.

Follow element14

  • X
  • Facebook
  • linkedin
  • YouTube