


I bought a few weeks ago some quite cheap 5 meters RGB LED strips (60 LEDs per meter) on kynix. My intent is to drive them with a custom Arduino receiving commands over some XBees.
I was in need of MOSFETs in order to drive the 3 RGB channels, and again found some cheap ones on eBay I received a few days ago.
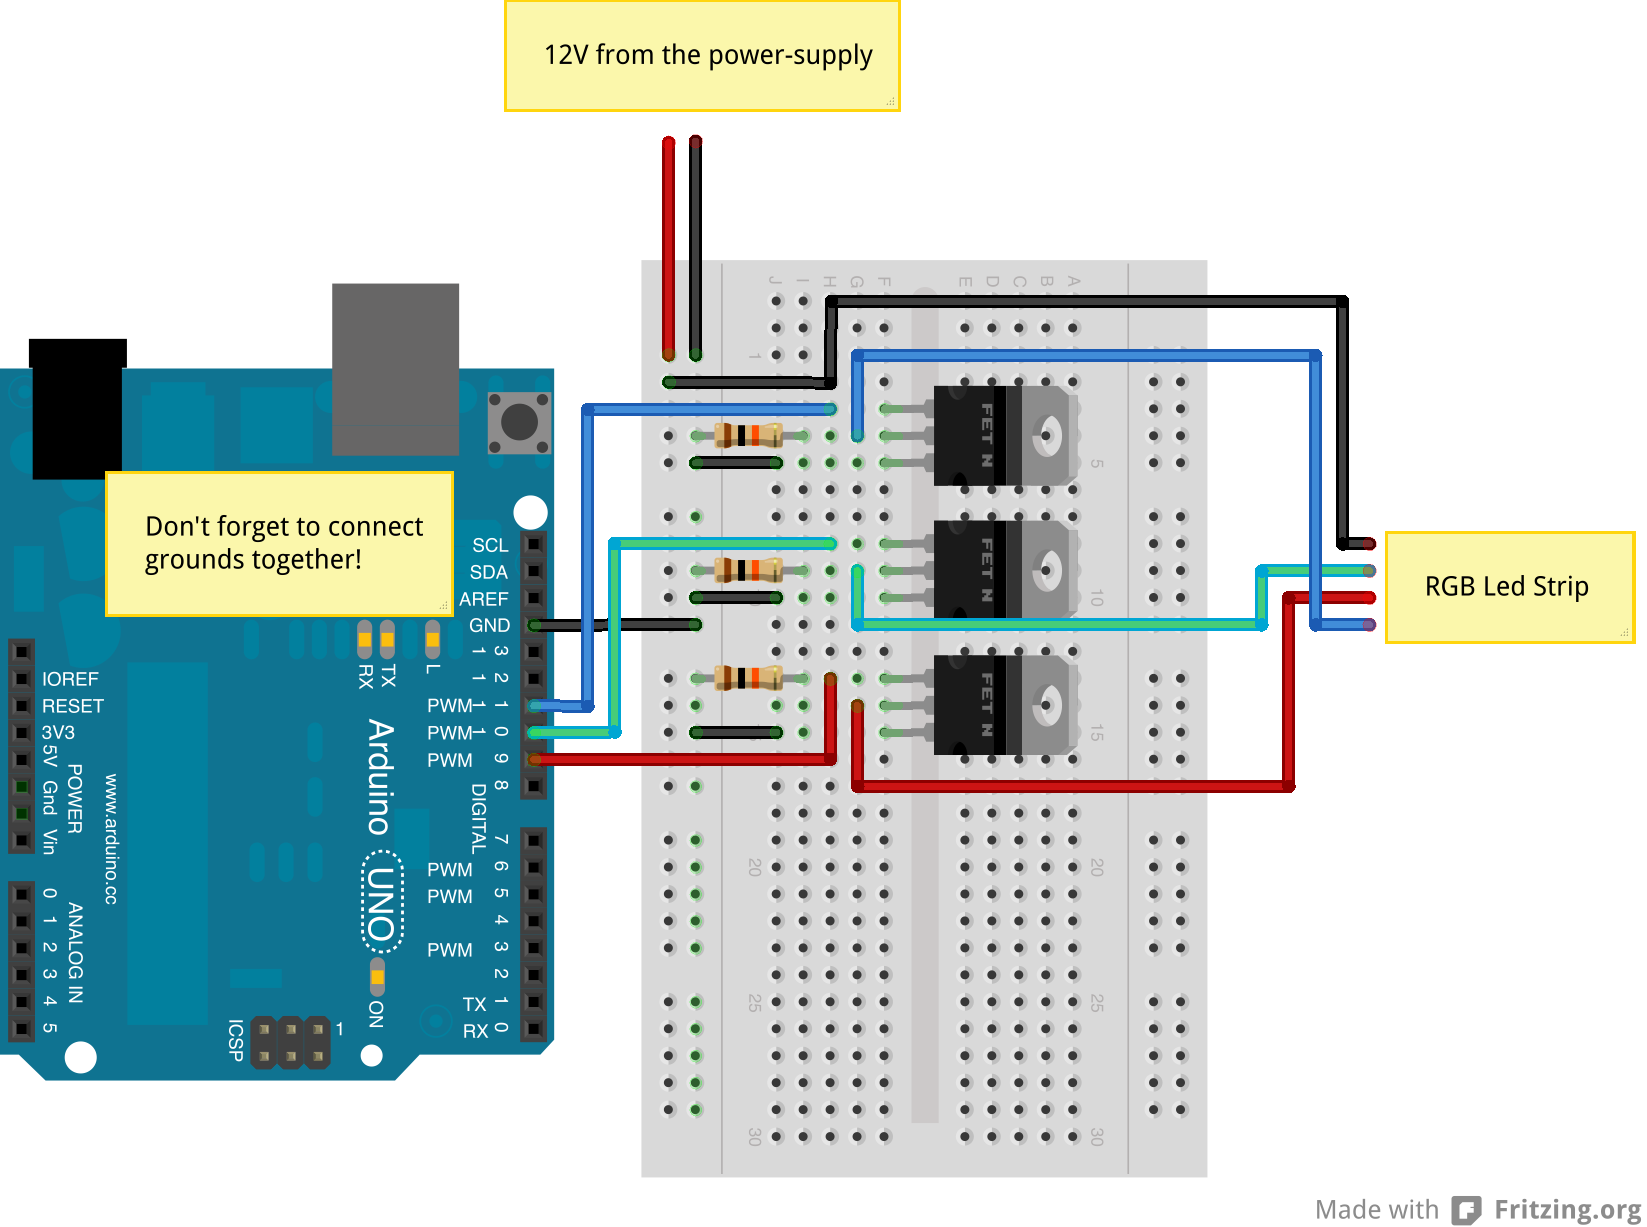
Today was a good opportunity for doing some basic tests. My first step was to control the color of the RGB LED Strip with the help of the MOSFETs and an Arduino.
Before your read the rest of this blog post, you should read Adafruit tutorial on RGB LED Strips and Bildr tutorial on MOSFETs.
I mostly did what Adafruit tutorial explains, except I added 10kΩ resistors, between each control/gate pins and ground (so 3 resistors for a RGB strip), in order to force the signal to LOW until the Arduino kicks in!
Controlling the LEDs via RGB colors, like the Adafruit example, is nice, but when you want smoother color transitions HSV or HSL (hue, saturation and lightness) is a better way to do it. Usually you keep the same saturation and lightness and only change hue.
Here is an interesting example illustrating this:
| // HSV fade/bounce for Arduino - scruss.com - 2010/09/12 | |
| // Note that there's some legacy code left in here which seems to do nothing | |
| // but should do no harm ... | |
| // don't futz with these, illicit sums later | |
| #define RED 9// pin for red LED | |
| #define GREEN 10 // pin for green - never explicitly referenced | |
| #define BLUE 11 // pin for blue - never explicitly referenced | |
| #define SIZE 255 | |
| #define DELAY 20 | |
| #define HUE_MAX 6.0 | |
| #define HUE_DELTA 0.01 | |
| //long deltas[3] = { 5, 6, 7 }; | |
| long rgb[3]; | |
| long rgbval; | |
| // for reasons unknown, if value !=0, the LED doesn't light. Hmm ... | |
| // and saturation seems to be inverted | |
| float hue=0.0, saturation=1, value=1; | |
| /* | |
| chosen LED SparkFun sku: COM-09264 | |
| has Max Luminosity (RGB): (2800, 6500, 1200)mcd | |
| so we normalize them all to 1200 mcd - | |
| R 250/600 = 107/256 | |
| G 250/950 = 67/256 | |
| B 250/250 = 256/256 | |
| */ | |
| long bright[3] = { 107, 67, 256}; | |
| //long bright[3] = { 256, 256, 256}; | |
| long k, temp_value; | |
| void setup () { | |
| randomSeed(analogRead(4)); | |
| for (k=0; k<3; k++) { | |
| pinMode(RED + k, OUTPUT); | |
| rgb[k]=0; | |
| analogWrite(RED + k, rgb[k] * bright[k]/256); | |
| } | |
| } | |
| void loop() { | |
| hue += HUE_DELTA; | |
| if (hue > HUE_MAX) { | |
| hue=0.0; | |
| } | |
| rgbval=HSV_to_RGB(hue, saturation, value); | |
| rgb[0] = (rgbval & 0x00FF0000) >> 16; // there must be better ways | |
| rgb[1] = (rgbval & 0x0000FF00) >> 8; | |
| rgb[2] = rgbval & 0x000000FF; | |
| for (k=0; k<3; k++) { // for all three colours | |
| analogWrite(RED + k, rgb[k] * bright[k]/256); | |
| } | |
| delay(DELAY); | |
| } | |
| long HSV_to_RGB( float h, float s, float v ) { | |
| /* modified from Alvy Ray Smith's site: http://www.alvyray.com/Papers/hsv2rgb.htm */ | |
| // H is given on [0, 6]. S and V are given on [0, 1]. | |
| // RGB is returned as a 24-bit long #rrggbb | |
| int i; | |
| float m, n, f; | |
| // not very elegant way of dealing with out of range: return black | |
| if ((s<0.0) || (s>1.0) || (v<1.0) || (v>1.0)) { | |
| return 0L; | |
| } | |
| if ((h < 0.0) || (h > 6.0)) { | |
| return long( v * 255 ) + long( v * 255 ) * 256 + long( v * 255 ) * 65536; | |
| } | |
| i = floor(h); | |
| f = h - i; | |
| if ( !(i&1) ) { | |
| f = 1 - f; // if i is even | |
| } | |
| m = v * (1 - s); | |
| n = v * (1 - s * f); | |
switch  { { | |
| case 6: | |
| case 0: | |
| return long(v * 255 ) * 65536 + long( n * 255 ) * 256 + long( m * 255); | |
| case 1: | |
| return long(n * 255 ) * 65536 + long( v * 255 ) * 256 + long( m * 255); | |
| case 2: | |
| return long(m * 255 ) * 65536 + long( v * 255 ) * 256 + long( n * 255); | |
| case 3: | |
| return long(m * 255 ) * 65536 + long( n * 255 ) * 256 + long( v * 255); | |
| case 4: | |
| return long(n * 255 ) * 65536 + long( m * 255 ) * 256 + long( v * 255); | |
| case 5: | |
| return long(v * 255 ) * 65536 + long( m * 255 ) * 256 + long( n * 255); | |
| } | |
| } |
Controlling the light based on temperature
In my project, I actually want an Arduino to control the color based on the temperature of the room. In order to do so, I’m simply using 1-Wire DS18B20 sensors.
Here is the updated breadboard view:
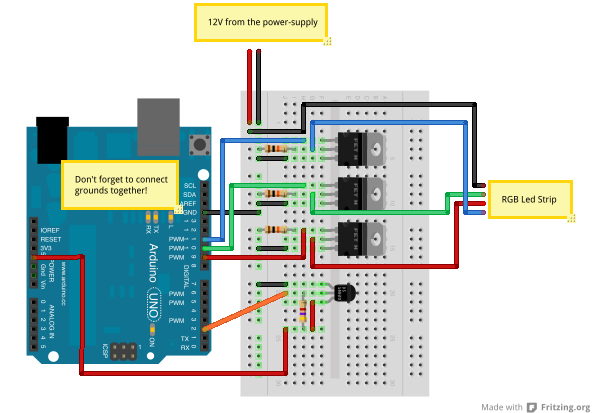
The idea is that cold temperature will tend to be blue, while a hot temperature will get a red color. If you have a look at the HSV wheel, the color will be between 240° when cold and 0° when hot, moving clock-wise (going through cyan, green and yellow).
Cold is in this case set to 18°C while hot is set to 30°C. Temperature under cold threshold will be considered as cold. Temperature above hot threshold will be considered as hot.
The final code is actually rather simple when you’ve got the HSV code already running:
// HSV fade/bounce for Arduino - scruss.com - 2010/09/12
// Note that there's some legacy code left in here which seems to do nothing
// but should do no harm ...
#include "OneWire.h"
//#include "Streaming.h"
const int DS18S20_Pin = 2; //DS18S20 Signal pin on digital 2
#define MIN_TEMP 18
#define MAX_TEMP 30
//Temperature chip i/o
OneWire ds(DS18S20_Pin); // on digital pin 2
// don't futz with these, illicit sums later
#define RED 9// pin for red LED
#define GREEN 10 // pin for green - never explicitly referenced
#define BLUE 11 // pin for blue - never explicitly referenced
#define SIZE 255
#define DELAY 0
#define HUE_MAX 6.0
#define HUE_DELTA 0.01
//long deltas[3] = { 5, 6, 7 };
long rgb[3];
long rgbval;
// for reasons unknown, if value !=0, the LED doesn't light. Hmm ...
// and saturation seems to be inverted
float hue=0.0, saturation=1, value=1;
/*
chosen LED SparkFun sku: COM-09264
has Max Luminosity (RGB): (2800, 6500, 1200)mcd
so we normalize them all to 1200 mcd -
R 250/600 = 107/256
G 250/950 = 67/256
B 250/250 = 256/256
*/
long bright[3] = { 107, 67, 256};
//long bright[3] = { 256, 256, 256};
long k, temp_value;
void setup () {
randomSeed(analogRead(4));
Serial.begin(57600);
for (k=0; k<3; k++) {
pinMode(RED + k, OUTPUT);
rgb[k]=0;
analogWrite(RED + k, rgb[k] * bright[k]/256);
}
}
void loop() {
float temperature = constrain(getTemp(), MIN_TEMP, MAX_TEMP);
float deltaTemp = (MAX_TEMP - MIN_TEMP);
float deltaHue = 4 - 0;
hue = map((temperature - MIN_TEMP) * 100, 0, deltaTemp * 100, deltaHue * 100, 0) / 100.0;
//Serial << "Temperature: " << temperature << endl;
//Serial << "HUE: " << hue << endl;
rgbval=HSV_to_RGB(hue, saturation, value);
rgb[0] = (rgbval & 0x00FF0000) >> 16; // there must be better ways
rgb[1] = (rgbval & 0x0000FF00) >> 8;
rgb[2] = rgbval & 0x000000FF;
for (k=0; k<3; k++) { // for all three colours
analogWrite(RED + k, rgb[k] * bright[k]/256);
}
//delay(DELAY);
}
float getTemp(){
//returns the temperature from one DS18S20 in DEG Celsius
byte data[12];
byte addr[8];
if ( !ds.search(addr)) {
//no more sensors on chain, reset search
ds.reset_search();
return -1000;
}
if ( OneWire::crc8( addr, 7) != addr[7]) {
Serial.println("CRC is not valid!");
return -1000;
}
if ( addr[0] != 0x10 && addr[0] != 0x28) {
Serial.print("Device is not recognized");
return -1000;
}
ds.reset();
ds.select(addr);
ds.write(0x44,1); // start conversion, with parasite power on at the end
byte present = ds.reset();
ds.select(addr);
ds.write(0xBE); // Read Scratchpad
for (int i = 0; i < 9; i++) { // we need 9 bytes
data[i] = ds.read();
}
ds.reset_search();
byte MSB = data[1];
byte LSB = data[0];
float tempRead = ((MSB << 8) | LSB); //using two's compliment
float TemperatureSum = tempRead / 16;
return TemperatureSum;
}
long HSV_to_RGB( float h, float s, float v ) {
/* modified from Alvy Ray Smith's site: http://www.alvyray.com/Papers/hsv2rgb.htm */
// H is given on [0, 6]. S and V are given on [0, 1].
// RGB is returned as a 24-bit long #rrggbb
int i;
float m, n, f;
// not very elegant way of dealing with out of range: return black
if ((s<0.0) || (s>1.0) || (v<1.0) || (v>1.0)) {
return 0L;
}
if ((h < 0.0) || (h > 6.0)) {
return long( v * 255 ) + long( v * 255 ) * 256 + long( v * 255 ) * 65536;
}
i = floor(h);
f = h - i;
if ( !(i&1) ) {
f = 1 - f; // if i is even
}
m = v * (1 - s);
n = v * (1 - s * f);
switch  {
{
case 6:
case 0:
return long(v * 255 ) * 65536 + long( n * 255 ) * 256 + long( m * 255);
case 1:
return long(n * 255 ) * 65536 + long( v * 255 ) * 256 + long( m * 255);
case 2:
return long(m * 255 ) * 65536 + long( v * 255 ) * 256 + long( n * 255);
case 3:
return long(m * 255 ) * 65536 + long( n * 255 ) * 256 + long( v * 255);
case 4:
return long(n * 255 ) * 65536 + long( m * 255 ) * 256 + long( v * 255);
case 5:
return long(v * 255 ) * 65536 + long( m * 255 ) * 256 + long( n * 255);
}
}