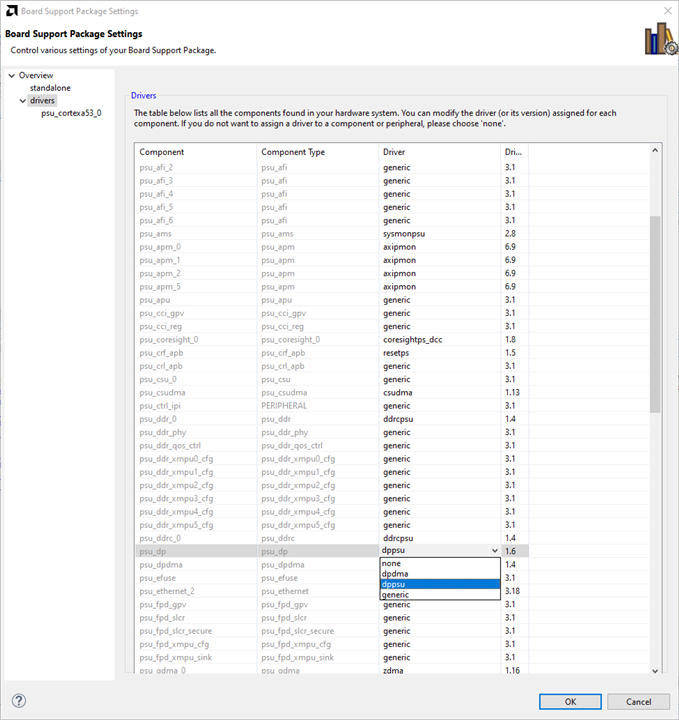
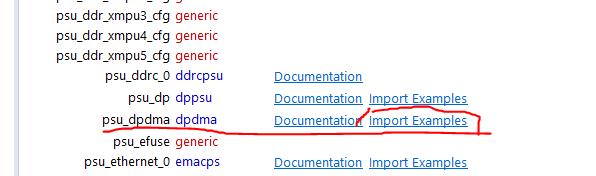
element14 Community
element14 Community
    Register Log In
  • Site
  • Search
  • Log In Register
  • About Us
  • Community Hub
    Community Hub
    • What's New on element14
    • Feedback and Support
    • Benefits of Membership
    • Personal Blogs
    • Members Area
    • Achievement Levels
  • Learn
    Learn
    • Ask an Expert
    • eBooks
    • element14 presents
    • Learning Center
    • Tech Spotlight
    • STEM Academy
    • Webinars, Training and Events
    • Learning Groups
  • Technologies
    Technologies
    • 3D Printing
    • FPGA
    • Industrial Automation
    • Internet of Things
    • Power & Energy
    • Sensors
    • Technology Groups
  • Challenges & Projects
    Challenges & Projects
    • Design Challenges
    • element14 presents Projects
    • Project14
    • Arduino Projects
    • Raspberry Pi Projects
    • Project Groups
  • Products
    Products
    • Arduino
    • Avnet Boards Community
    • Dev Tools
    • Manufacturers
    • Multicomp Pro
    • Product Groups
    • Raspberry Pi
    • RoadTests & Reviews
  • Store
    Store
    • Visit Your Store
    • Choose another store...
      • Europe
      •  Austria (German)
      •  Belgium (Dutch, French)
      •  Bulgaria (Bulgarian)
      •  Czech Republic (Czech)
      •  Denmark (Danish)
      •  Estonia (Estonian)
      •  Finland (Finnish)
      •  France (French)
      •  Germany (German)
      •  Hungary (Hungarian)
      •  Ireland
      •  Israel
      •  Italy (Italian)
      •  Latvia (Latvian)
      •  
      •  Lithuania (Lithuanian)
      •  Netherlands (Dutch)
      •  Norway (Norwegian)
      •  Poland (Polish)
      •  Portugal (Portuguese)
      •  Romania (Romanian)
      •  Russia (Russian)
      •  Slovakia (Slovak)
      •  Slovenia (Slovenian)
      •  Spain (Spanish)
      •  Sweden (Swedish)
      •  Switzerland(German, French)
      •  Turkey (Turkish)
      •  United Kingdom
      • Asia Pacific
      •  Australia
      •  China
      •  Hong Kong
      •  India
      •  Korea (Korean)
      •  Malaysia
      •  New Zealand
      •  Philippines
      •  Singapore
      •  Taiwan
      •  Thailand (Thai)
      • Americas
      •  Brazil (Portuguese)
      •  Canada
      •  Mexico (Spanish)
      •  United States
      Can't find the country/region you're looking for? Visit our export site or find a local distributor.
  • Translate
  • Profile
  • Settings
Avnet Boards Forums
  • Products
  • Dev Tools
  • Avnet Boards Community
  • Avnet Boards Forums
  • More
  • Cancel
Avnet Boards Forums
ZUBoard standalone DPDMA example not working with ZUBoard1CG and DPEMMC module
  • Forum
  • Documents
  • Members
  • Mentions
  • Sub-Groups
  • Tags
  • More
  • Cancel
  • New
Join Avnet Boards Forums to participate - click to join for free!
Actions
  • Share
  • More
  • Cancel
Forum Thread Details
  • State Not Answered
  • Replies 33 replies
  • Subscribers 327 subscribers
  • Views 4712 views
  • Users 0 members are here
Related

standalone DPDMA example not working with ZUBoard1CG and DPEMMC module

fbt
fbt over 1 year ago

Hi,

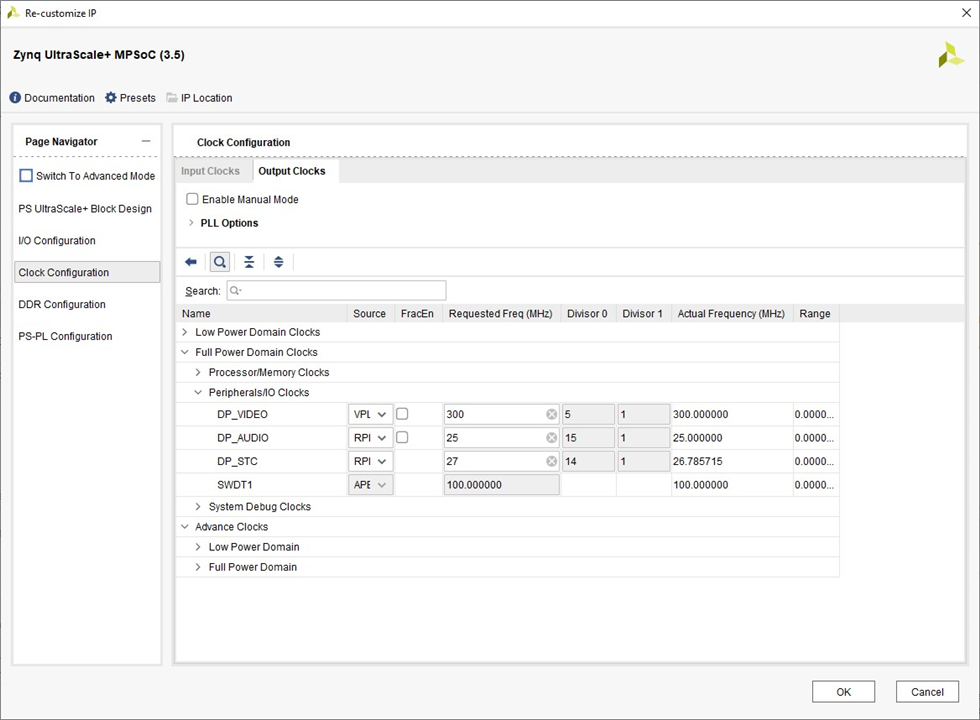
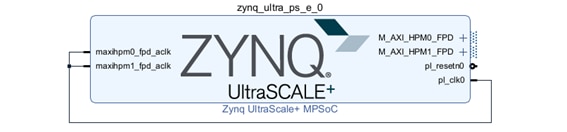
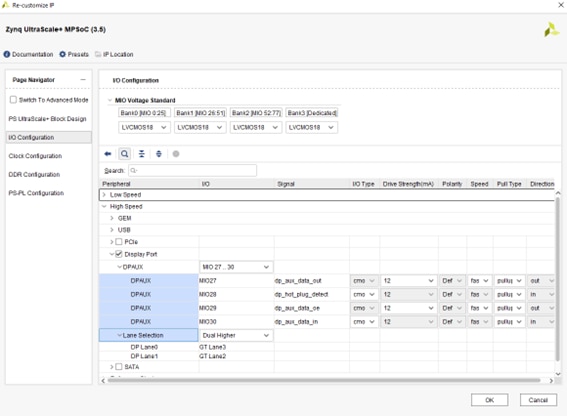
I'm trying to run xdpdma reference example from Vitis 2023.1 in a ZUBoard1CG with a DPEMMC module connected to J2 High Speed Expansion Connector. The block diagram just include a single zynq ultrascale mpsoc IP, with enabled Display Port configured as follow:

image

image

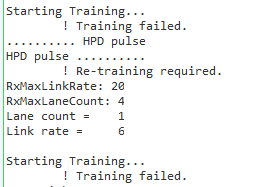
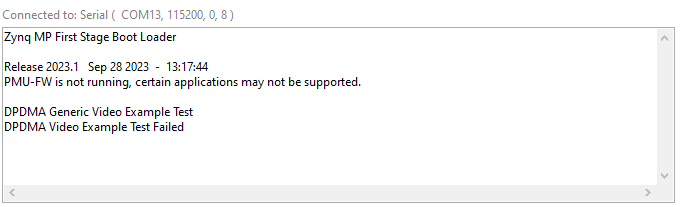
After generating the bitstream and exporting the platform, i created a standalone application in Vitis 2023.1 by importing the xdpdma_video_example into workspace. However, when i try to run this example, the test fails, showing the following messages:

image

The problem seems to be related to the initialization of the DisplayPort TX core (XDpPsu_InitializeTx). Does any of you have any idea about which is the problem?. It is possible to get a standalone reference design from Avnet for successfully integrate the DPEMMC module with ZUBoard1CG board?. It is very frustrating to buy a module with such a poor support as this, with just a brief description and an schematic. Any help will be appreciated. Thanks

  • Sign in to reply
  • Cancel

Top Replies

  • FPGA_Zealot
    FPGA_Zealot over 1 year ago in reply to FPGA_Zealot +2
    Does anyone know the Vivado xsa file used for this Petalinux project?
  • narrucmot
    narrucmot over 1 year ago +2
    I realize what you are asking for is a standalone application to use with the ZUBoard + DP-eMMC HSIO add-on module that, unfortunately, we are unable to provide at this time. However, the known-good Vivado…
  • fbt
    fbt over 1 year ago +1
    hi! ... nobody at avnet can provide a working Vivado project and standalone application for using the DP-eMMC module as DisplayPort? In addition, from the AVNET official page for DP-eMMC module it is stated…
  • fbt
    0 fbt over 1 year ago

    hi! ... nobody at avnet  can provide a working Vivado project and standalone application for using the DP-eMMC module as DisplayPort? In addition, from the AVNET official page for DP-eMMC module it is stated that "A Vivado project PetaLinux BSP with these features enabled is provided, allowing users to quickly add a PC-like user experience to their ZUBoard 1CG dev board.", however, this "project" is not available from the links provided, nor the web page indicated into the card included with the module (avnet.me/dpemmc). Very frustrating.

    • Cancel
    • Vote Up +1 Vote Down
    • Sign in to reply
    • Verify Answer
    • Cancel
  • fbt
    0 fbt over 1 year ago

    Hi! ... any help on this will be really appreciated. I could successfully run the xdpdma_video_example but, despite the display port input is detected by the monitor, the screen remains blank. Thanks

    • Cancel
    • Vote Up +1 Vote Down
    • Sign in to reply
    • Verify Answer
    • Cancel
  • FPGA_Zealot
    0 FPGA_Zealot over 1 year ago

    So I have tried to get it working with the DPPsuDMA example in Vitis and it keeps failing training on different displays, different cables, and lower lane rates...

    I used this config in the block diagram:

    # Enable DisplayPort using PS GTR0 and GTR1
    set_property -dict [list \
    CONFIG.PSU__DPAUX__PERIPHERAL__IO {MIO 27 .. 30} \
    CONFIG.PSU__DP__LANE_SEL {Dual Lower} \
    CONFIG.PSU__DISPLAYPORT__PERIPHERAL__ENABLE {1}] [get_bd_cells zynq_ultra_ps_e_0]
     
    # Set the DisplayPort reference clock to 135 MHz
    set_property -dict [list \
    CONFIG.PSU__DP__REF_CLK_SEL {Ref Clk0} \
    CONFIG.PSU__DP__REF_CLK_FREQ {135}] [get_bd_cells zynq_ultra_ps_e_0]


    Here is the output in the UART.
    image

    • Cancel
    • Vote Up +1 Vote Down
    • Sign in to reply
    • Verify Answer
    • Cancel
  • FPGA_Zealot
    0 FPGA_Zealot over 1 year ago in reply to fbt

    How did you get it working?

    • Cancel
    • Vote Up +1 Vote Down
    • Sign in to reply
    • Verify Answer
    • Cancel
  • fbt
    0 fbt over 1 year ago in reply to FPGA_Zealot

    Hi FPGA_Zealot , the config i'm using in the block diagram is the same as yours ... however, check these parameters for output clocks, and disable the Enable Manual Mode option if requered for getting the right actual frequencies.

    image

    After platform generation, i can successfully run the xdpdma_video_example code from vitis, as you can see from the output in the UART, but as reported, despite the display port input is detected by the monitor, the screen remains blank after trying with different monitors, cables, ... Hope we can get it working. Best regards

    image

    • Cancel
    • Vote Up +1 Vote Down
    • Sign in to reply
    • Verify Answer
    • Cancel
  • narrucmot
    0 narrucmot over 1 year ago

    Your ZynqMP PS GTR, DPAUX, and RefClk settings look correct.  I see on the Xilinx support forums a user had a similar issue as this and found the solution was a change in the Vitis BSP settings.

    https://support.xilinx.com/s/question/0D52E00006iHmXiSAK/standalone-displayport-on-zcu102?language=en_US

    • Cancel
    • Vote Up 0 Vote Down
    • Sign in to reply
    • Verify Answer
    • Cancel
  • flyingbean
    0 flyingbean over 1 year ago in reply to fbt

    Try this configuration at BSP for DP example api:

    image

    • Cancel
    • Vote Up 0 Vote Down
    • Sign in to reply
    • Verify Answer
    • Cancel
  • fbt
    0 fbt over 1 year ago in reply to flyingbean

    Hi flyingbean , thanks a lot for your answer. The avbuf option is not available from Vitis 2023.1, as you can see:

    image

    In addition, for live video = 0 and memory to datapath configuration for DP Tx, as i consider it is applicable for this particular case, it is supposed that dppsu driver must be selected, right?. Witing for your reply. Thanks!.

    • Cancel
    • Vote Up 0 Vote Down
    • Sign in to reply
    • Verify Answer
    • Cancel
  • fbt
    0 fbt over 1 year ago in reply to narrucmot

    Hi narrucmot , thanks also for your reply. In my BSP configuration i had already selected the driver dppsu for component psu_dp, but the screen is still blank. I hope it will be possible to find any other option to solve the reported problem. Thanks!

    • Cancel
    • Vote Up 0 Vote Down
    • Sign in to reply
    • Verify Answer
    • Cancel
  • flyingbean
    0 flyingbean over 1 year ago in reply to fbt

    Just for clarification of the demo source codes here.

    1. BSP configuration of yours was right.

    2. Here is the example codes of psu_dpdma(I think you did right work too):

    image

    3. You might need to reconfigure the Video format at the source codes as this:

    /*******************************************************************************
     *
     * Copyright (C) 2017 Xilinx, Inc.  All rights reserved.
     *
     * Permission is hereby granted, free of charge, to any person obtaining a copy
     * of this software and associated documentation files (the "Software"), to deal
     * in the Software without restriction, including without limitation the rights
     * to use, copy, modify, merge, publish, distribute, sublicense, and/or sell
     * copies of the Software, and to permit persons to whom the Software is
     * furnished to do so, subject to the following conditions:
     *
     * The above copyright notice and this permission notice shall be included in
     * all copies or substantial portions of the Software.
     *
     * Use of the Software is limited solely to applications:
     * (a) running on a Xilinx device, or
     * (b) that interact with a Xilinx device through a bus or interconnect.
     *
     * THE SOFTWARE IS PROVIDED "AS IS", WITHOUT WARRANTY OF ANY KIND, EXPRESS OR
     * IMPLIED, INCLUDING BUT NOT LIMITED TO THE WARRANTIES OF MERCHANTABILITY,
     * FITNESS FOR A PARTICULAR PURPOSE AND NONINFRINGEMENT. IN NO EVENT SHALL
     * XILINX BE LIABLE FOR ANY CLAIM, DAMAGES OR OTHER LIABILITY,
     * WHETHER IN AN ACTION OF CONTRACT, TORT OR OTHERWISE, ARISING FROM, OUT OF
     * OR IN CONNECTION WITH THE SOFTWARE OR THE USE OR OTHER DEALINGS IN THE
     * SOFTWARE.
     *
     * Except as contained in this notice, the name of the Xilinx shall not be used
     * in advertising or otherwise to promote the sale, use or other dealings in
     * this Software without prior written authorization from Xilinx.
     *
    *******************************************************************************/
    /*****************************************************************************/
    /**
    *
    * @file xdpdma_video_example.c
    *
    *
    * This file contains a design example using the DPDMA driver (XDpDma)
    * This example demonstrates the use of DPDMA for displaying a Graphics Overlay
    *
    * @note
    *
    * None.
    *
    * <pre>
    * MODIFICATION HISTORY:
    *
    * Ver   Who Date     Changes
    * ----- --- -------- -----------------------------------------------
    * 1.0	aad 10/19/17	Initial Release
    * 1.1   aad 02/22/18    Fixed the header
    *</pre>
    *
    ******************************************************************************/
    
    /***************************** Include Files *********************************/
    
    #include "xil_exception.h"
    #include "xil_printf.h"
    #include "xil_cache.h"
    #include "xdpdma_video_example.h"
    
    /************************** Constant Definitions *****************************/
    #define DPPSU_DEVICE_ID		XPAR_PSU_DP_DEVICE_ID
    #define AVBUF_DEVICE_ID		XPAR_PSU_DP_DEVICE_ID
    #define DPDMA_DEVICE_ID		XPAR_XDPDMA_0_DEVICE_ID
    #define DPPSU_INTR_ID		151
    #define DPDMA_INTR_ID		154
    #define INTC_DEVICE_ID		XPAR_SCUGIC_0_DEVICE_ID
    
    #define DPPSU_BASEADDR		XPAR_PSU_DP_BASEADDR
    #define AVBUF_BASEADDR		XPAR_PSU_DP_BASEADDR
    #define DPDMA_BASEADDR		XPAR_PSU_DPDMA_BASEADDR
    
    #define BUFFERSIZE			1920 * 1080 * 4		/* HTotal * VTotal * BPP */
    #define LINESIZE			1920 * 4			/* HTotal * BPP */
    #define STRIDE				LINESIZE			/* The stride value should
    													be aligned to 256*/
    
    /************************** Variable Declarations ***************************/
    u8 Frame[BUFFERSIZE] __attribute__ ((__aligned__(256)));
    XDpDma_FrameBuffer FrameBuffer;
    
    /**************************** Type Definitions *******************************/
    
    /*****************************************************************************/
    /**
    *
    * Main function to call the DPDMA Video example.
    *
    * @param	None
    *
    * @return	XST_SUCCESS if successful, otherwise XST_FAILURE.
    *
    * @note		None
    *
    ******************************************************************************/
    int main()
    {
    	int Status;
    
    	Xil_DCacheDisable();
    	Xil_ICacheDisable();
    
    	xil_printf("DPDMA Generic Video Example Test \r\n");
    	Status = DpdmaVideoExample(&RunCfg);
    	if (Status != XST_SUCCESS) {
    			xil_printf("DPDMA Video Example Test Failed\r\n");
    			return XST_FAILURE;
    	}
    
    	xil_printf("Successfully ran DPDMA Video Example Test\r\n");
    
        return XST_SUCCESS;
    }
    
    /*****************************************************************************/
    /**
    *
    * The purpose of this function is to illustrate how to use the XDpDma device
    * driver in Graphics overlay mode.
    *
    * @param	RunCfgPtr is a pointer to the application configuration structure.
    *
    * @return	XST_SUCCESS if successful, else XST_FAILURE.
    *
    * @note		None.
    *
    *****************************************************************************/
    int DpdmaVideoExample(Run_Config *RunCfgPtr)
    
    {
    	u32 Status;
    	/* Initialize the application configuration */
    	InitRunConfig(RunCfgPtr);
    	Status = InitDpDmaSubsystem(RunCfgPtr);
    	if (Status != XST_SUCCESS) {
    				return XST_FAILURE;
    	}
    
    	SetupInterrupts(RunCfgPtr);
    	xil_printf("Generating Overlay.....\n\r");
    	GraphicsOverlay(Frame, RunCfgPtr);
    
    	/* Populate the FrameBuffer structure with the frame attributes */
    	FrameBuffer.Address = (INTPTR)Frame;
    	FrameBuffer.Stride = STRIDE;
    	FrameBuffer.LineSize = LINESIZE;
    	FrameBuffer.Size = BUFFERSIZE;
    
    	XDpDma_DisplayGfxFrameBuffer(RunCfgPtr->DpDmaPtr, &FrameBuffer);
    
    	return XST_SUCCESS;
    }
    
    /*****************************************************************************/
    /**
    *
    * The purpose of this function is to initialize the application configuration.
    *
    * @param	RunCfgPtr is a pointer to the application configuration structure.
    *
    * @return	None.
    *
    * @note		None.
    *
    *****************************************************************************/
    void InitRunConfig(Run_Config *RunCfgPtr)
    {
    	/* Initial configuration parameters. */
    		RunCfgPtr->DpPsuPtr   = &DpPsu;
    		RunCfgPtr->IntrPtr   = &Intr;
    		RunCfgPtr->AVBufPtr  = &AVBuf;
    		RunCfgPtr->DpDmaPtr  = &DpDma;
    		RunCfgPtr->VideoMode = XVIDC_VM_1920x1080_60_P;
    		RunCfgPtr->Bpc		 = XVIDC_BPC_8;
    		RunCfgPtr->ColorEncode			= XDPPSU_CENC_RGB;
    		RunCfgPtr->UseMaxCfgCaps		= 1;
    		RunCfgPtr->LaneCount			= LANE_COUNT_2;
    		RunCfgPtr->LinkRate				= LINK_RATE_540GBPS;
    		RunCfgPtr->EnSynchClkMode		= 0;
    		RunCfgPtr->UseMaxLaneCount		= 1;
    		RunCfgPtr->UseMaxLinkRate		= 1;
    }
    
    /*****************************************************************************/
    /**
    *
    * The purpose of this function is to initialize the DP Subsystem (XDpDma,
    * XAVBuf, XDpPsu)
    *
    * @param	RunCfgPtr is a pointer to the application configuration structure.
    *
    * @return	None.
    *
    * @note		None.
    *
    *****************************************************************************/
    int InitDpDmaSubsystem(Run_Config *RunCfgPtr)
    {
    	u32 Status;
    	XDpPsu		*DpPsuPtr = RunCfgPtr->DpPsuPtr;
    	XDpPsu_Config	*DpPsuCfgPtr;
    	XAVBuf		*AVBufPtr = RunCfgPtr->AVBufPtr;
    	XDpDma_Config *DpDmaCfgPtr;
    	XDpDma		*DpDmaPtr = RunCfgPtr->DpDmaPtr;
    
    
    	/* Initialize DisplayPort driver. */
    	DpPsuCfgPtr = XDpPsu_LookupConfig(DPPSU_DEVICE_ID);
    	XDpPsu_CfgInitialize(DpPsuPtr, DpPsuCfgPtr, DpPsuCfgPtr->BaseAddr);
    	/* Initialize Video Pipeline driver */
    	XAVBuf_CfgInitialize(AVBufPtr, DpPsuPtr->Config.BaseAddr, AVBUF_DEVICE_ID);
    
    	/* Initialize the DPDMA driver */
    	DpDmaCfgPtr = XDpDma_LookupConfig(DPDMA_DEVICE_ID);
    	XDpDma_CfgInitialize(DpDmaPtr,DpDmaCfgPtr);
    
    	/* Initialize the DisplayPort TX core. */
    	Status = XDpPsu_InitializeTx(DpPsuPtr);
    	if (Status != XST_SUCCESS) {
    		return XST_FAILURE;
    	}
    	/* Set the format graphics frame for DPDMA*/
    	Status = XDpDma_SetGraphicsFormat(DpDmaPtr, RGBA8888);
    	if (Status != XST_SUCCESS) {
    			return XST_FAILURE;
    	}
    	/* Set the format graphics frame for Video Pipeline*/
    	Status = XAVBuf_SetInputNonLiveGraphicsFormat(AVBufPtr, RGBA8888);
    	if (Status != XST_SUCCESS) {
    			return XST_FAILURE;
    	}
    	/* Set the QOS for Video */
    	XDpDma_SetQOS(RunCfgPtr->DpDmaPtr, 11);
    	/* Enable the Buffers required by Graphics Channel */
    	XAVBuf_EnableGraphicsBuffers(RunCfgPtr->AVBufPtr, 1);
    	/* Set the output Video Format */
    	XAVBuf_SetOutputVideoFormat(AVBufPtr, RGB_8BPC);
    
    	/* Select the Input Video Sources.
    	 * Here in this example we are going to demonstrate
    	 * graphics overlay over the TPG video.
    	 */
    	XAVBuf_InputVideoSelect(AVBufPtr, XAVBUF_VIDSTREAM1_NONE,
    							XAVBUF_VIDSTREAM2_NONLIVE_GFX);
    	/* Configure Video pipeline for graphics channel */
    	XAVBuf_ConfigureGraphicsPipeline(AVBufPtr);
    	/* Configure the output video pipeline */
    	XAVBuf_ConfigureOutputVideo(AVBufPtr);
    	/* Disable the global alpha, since we are using the pixel based alpha */
    	XAVBuf_SetBlenderAlpha(AVBufPtr, 0, 0);
    	/* Set the clock mode */
    	XDpPsu_CfgMsaEnSynchClkMode(DpPsuPtr, RunCfgPtr->EnSynchClkMode);
    	/* Set the clock source depending on the use case.
    	 * Here for simplicity we are using PS clock as the source*/
    	XAVBuf_SetAudioVideoClkSrc(AVBufPtr, XAVBUF_PS_CLK, XAVBUF_PS_CLK);
    	/* Issue a soft reset after selecting the input clock sources */
    	XAVBuf_SoftReset(AVBufPtr);
    
    	return XST_SUCCESS;
    }
    
    /*****************************************************************************/
    /**
    *
    * The purpose of this function is to setup call back functions for the DP
    * controller interrupts.
    *
    * @param	RunCfgPtr is a pointer to the application configuration structure.
    *
    * @return	None.
    *
    * @note		None.
    *
    *****************************************************************************/
    void SetupInterrupts(Run_Config *RunCfgPtr)
    {
    	XDpPsu *DpPsuPtr = RunCfgPtr->DpPsuPtr;
    	XScuGic		*IntrPtr = RunCfgPtr->IntrPtr;
    	XScuGic_Config	*IntrCfgPtr;
    	u32  IntrMask = XDPPSU_INTR_HPD_IRQ_MASK | XDPPSU_INTR_HPD_EVENT_MASK;
    
    	XDpPsu_WriteReg(DpPsuPtr->Config.BaseAddr, XDPPSU_INTR_DIS, 0xFFFFFFFF);
    	XDpPsu_WriteReg(DpPsuPtr->Config.BaseAddr, XDPPSU_INTR_MASK, 0xFFFFFFFF);
    
    	XDpPsu_SetHpdEventHandler(DpPsuPtr, DpPsu_IsrHpdEvent, RunCfgPtr);
    	XDpPsu_SetHpdPulseHandler(DpPsuPtr, DpPsu_IsrHpdPulse, RunCfgPtr);
    
    	/* Initialize interrupt controller driver. */
    	IntrCfgPtr = XScuGic_LookupConfig(INTC_DEVICE_ID);
    	XScuGic_CfgInitialize(IntrPtr, IntrCfgPtr, IntrCfgPtr->CpuBaseAddress);
    
    	/* Register ISRs. */
    	XScuGic_Connect(IntrPtr, DPPSU_INTR_ID,
    			(Xil_InterruptHandler)XDpPsu_HpdInterruptHandler, RunCfgPtr->DpPsuPtr);
    
    	/* Trigger DP interrupts on rising edge. */
    	XScuGic_SetPriorityTriggerType(IntrPtr, DPPSU_INTR_ID, 0x0, 0x03);
    
    
    	/* Connect DPDMA Interrupt */
    	XScuGic_Connect(IntrPtr, DPDMA_INTR_ID,
    			(Xil_ExceptionHandler)XDpDma_InterruptHandler, RunCfgPtr->DpDmaPtr);
    
    	/* Initialize exceptions. */
    	Xil_ExceptionInit();
    	Xil_ExceptionRegisterHandler(XIL_EXCEPTION_ID_IRQ_INT,
    			(Xil_ExceptionHandler)XScuGic_DeviceInterruptHandler,
    			INTC_DEVICE_ID);
    
    	/* Enable exceptions for interrupts. */
    	Xil_ExceptionEnableMask(XIL_EXCEPTION_IRQ);
    	Xil_ExceptionEnable();
    
    	/* Enable DP interrupts. */
    	XScuGic_Enable(IntrPtr, DPPSU_INTR_ID);
    	XDpPsu_WriteReg(DpPsuPtr->Config.BaseAddr, XDPPSU_INTR_EN, IntrMask);
    
    	/* Enable DPDMA Interrupts */
    	XScuGic_Enable(IntrPtr, DPDMA_INTR_ID);
    	XDpDma_InterruptEnable(RunCfgPtr->DpDmaPtr, XDPDMA_IEN_VSYNC_INT_MASK);
    
    }
    /*****************************************************************************/
    /**
    *
    * The purpose of this function is to generate a Graphics frame of the format
    * RGBA8888 which generates an overlay on 1/2 of the bottom of the screen.
    * This is just to illustrate the functionality of the graphics overlay.
    *
    * @param	RunCfgPtr is a pointer to the application configuration structure.
    * @param	Frame is a pointer to a buffer which is going to be populated with
    * 			rendered frame
    *
    * @return	Returns a pointer to the frame.
    *
    * @note		None.
    *
    *****************************************************************************/
    u8 *GraphicsOverlay(u8* Frame, Run_Config *RunCfgPtr)
    {
    	u64 Index;
    	u32 *RGBA;
    	RGBA = (u32 *) Frame;
    	/*
    		 * Red at the top half
    		 * Alpha = 0x0F
    		 * */
    	for(Index = 0; Index < (BUFFERSIZE/4) /2; Index ++) {
    		RGBA[Index] = 0x0F0000FF;
    	}
    	for(; Index < BUFFERSIZE/4; Index ++) {
    		/*
    		 * Green at the bottom half
    		 * Alpha = 0xF0
    		 * */
    		RGBA[Index] = 0xF000FF00;
    	}
    	return Frame;
    }
    

    It was done on Vivado 2018.2, which should be fine for 2023.1.

    4. DP video clock. I don't know where is 135MHz video ref clock from. DP aux signal clock is from PS side, not Video clock.

    • Cancel
    • Vote Up 0 Vote Down
    • Sign in to reply
    • Verify Answer
    • Cancel
>
element14 Community

element14 is the first online community specifically for engineers. Connect with your peers and get expert answers to your questions.

  • Members
  • Learn
  • Technologies
  • Challenges & Projects
  • Products
  • Store
  • About Us
  • Feedback & Support
  • FAQs
  • Terms of Use
  • Privacy Policy
  • Legal and Copyright Notices
  • Sitemap
  • Cookies

An Avnet Company © 2025 Premier Farnell Limited. All Rights Reserved.

Premier Farnell Ltd, registered in England and Wales (no 00876412), registered office: Farnell House, Forge Lane, Leeds LS12 2NE.

ICP 备案号 10220084.

Follow element14

  • X
  • Facebook
  • linkedin
  • YouTube