element14 Community
element14 Community
    Register Log In
  • Site
  • Search
  • Log In Register
  • About Us
  • Community Hub
    Community Hub
    • What's New on element14
    • Feedback and Support
    • Benefits of Membership
    • Personal Blogs
    • Members Area
    • Achievement Levels
  • Learn
    Learn
    • Ask an Expert
    • eBooks
    • element14 presents
    • Learning Center
    • Tech Spotlight
    • STEM Academy
    • Webinars, Training and Events
    • Learning Groups
  • Technologies
    Technologies
    • 3D Printing
    • FPGA
    • Industrial Automation
    • Internet of Things
    • Power & Energy
    • Sensors
    • Technology Groups
  • Challenges & Projects
    Challenges & Projects
    • Design Challenges
    • element14 presents Projects
    • Project14
    • Arduino Projects
    • Raspberry Pi Projects
    • Project Groups
  • Products
    Products
    • Arduino
    • Avnet Boards Community
    • Dev Tools
    • Manufacturers
    • Multicomp Pro
    • Product Groups
    • Raspberry Pi
    • RoadTests & Reviews
  • Store
    Store
    • Visit Your Store
    • Choose another store...
      • Europe
      •  Austria (German)
      •  Belgium (Dutch, French)
      •  Bulgaria (Bulgarian)
      •  Czech Republic (Czech)
      •  Denmark (Danish)
      •  Estonia (Estonian)
      •  Finland (Finnish)
      •  France (French)
      •  Germany (German)
      •  Hungary (Hungarian)
      •  Ireland
      •  Israel
      •  Italy (Italian)
      •  Latvia (Latvian)
      •  
      •  Lithuania (Lithuanian)
      •  Netherlands (Dutch)
      •  Norway (Norwegian)
      •  Poland (Polish)
      •  Portugal (Portuguese)
      •  Romania (Romanian)
      •  Russia (Russian)
      •  Slovakia (Slovak)
      •  Slovenia (Slovenian)
      •  Spain (Spanish)
      •  Sweden (Swedish)
      •  Switzerland(German, French)
      •  Turkey (Turkish)
      •  United Kingdom
      • Asia Pacific
      •  Australia
      •  China
      •  Hong Kong
      •  India
      •  Korea (Korean)
      •  Malaysia
      •  New Zealand
      •  Philippines
      •  Singapore
      •  Taiwan
      •  Thailand (Thai)
      • Americas
      •  Brazil (Portuguese)
      •  Canada
      •  Mexico (Spanish)
      •  United States
      Can't find the country/region you're looking for? Visit our export site or find a local distributor.
  • Translate
  • Profile
  • Settings
GIZMO 2
  • Products
  • Dev Tools
  • Single-Board Computers
  • GIZMO 2
  • More
  • Cancel
GIZMO 2
Blog Hadron Vortex G2 - First images from case build
  • Blog
  • Forum
  • Documents
  • Files
  • Members
  • Mentions
  • Sub-Groups
  • Tags
  • More
  • Cancel
  • New
Join GIZMO 2 to participate - click to join for free!
  • Share
  • More
  • Cancel
Group Actions
  • Group RSS
  • More
  • Cancel
Engagement
  • Author Author: Former Member
  • Date Created: 15 May 2015 2:03 AM Date Created
  • Views 1402 views
  • Likes 3 likes
  • Comments 6 comments
  • RoadTest
  • vortex_g2
  • lucie_tozer
  • gizmo2
  • enclosures
Related
Recommended

Hadron Vortex G2 - First images from case build

Former Member
Former Member
15 May 2015

Deciding to choose a new and unfamiliar material was maybe a bad idea at first, I was a out of my comfort zone and was putting off getting started with using it.


Well that was until I made my very first cut... from then on, I knew aluminium composite was going to be a great choice of material to use for not only this but also future projects. It's strong, has a professional metallic finish and is very easy to work with.


The top of the case is all but finished, some tidying up needed but overall I'm happy with the outcome. There's a few minor faults and places where the dremel went too deep, but as a first time use of a new material, going by instincts alone on how to approach the desired results I feel the outcome is positive.


Without further ado... onto the pictures from the very beginning image enjoy!!


It's a marked sheet..

image


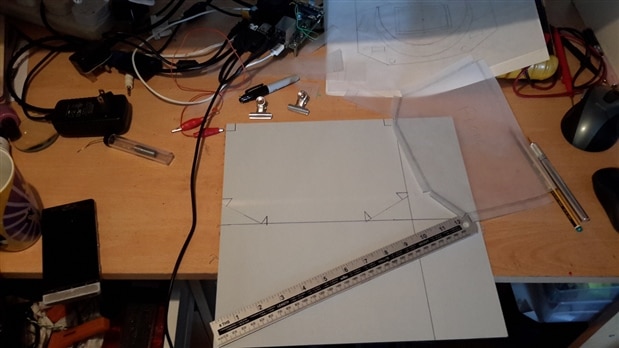
A problem halved... For the first few cuts, I went with scoring through the aluminium on both sides and into the polycarbonate core then snapping along a straight edge.

image


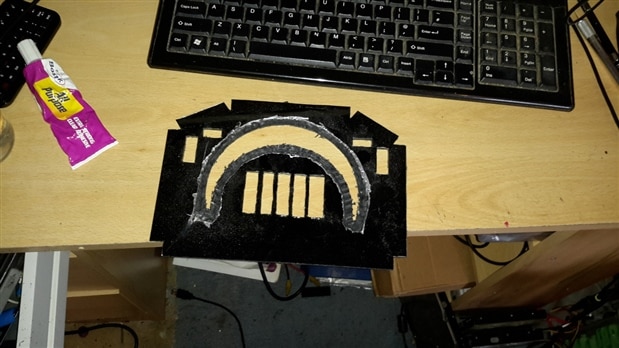
It's in the detail... For the detail cuts, I started off trying to use the dremel with the twist bits; It soon got messy so I tried carrying on with the knife, It turns out that the polycarbonate core is very soft and it's easy enough to cut straight through.

image


Send it to the mill!!.. Not wanting to have to be perfect in matching the half moon shape of the translucent acrylic, I set about slowly but surely scraping away the polycarbonate from the underside hoping to leave just the thin aluminium outer that would mask off a roughly cut cut shape. The dremel and a selection of engraving and milling bits were the choice of weapons!!

image


A glimmer of silver light!!

image


Rough but good enough... I'm shocked at how easy this was!!

image


Moons galore!! The rough cut acrylic resting lazily on top of it's predecessor. It's time to say hello to your new life.

image


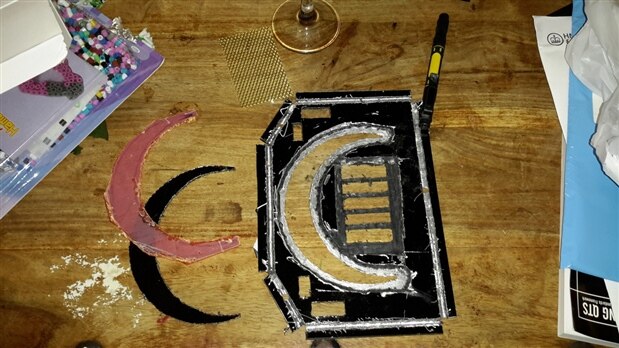
Finding it's place. The rough acrylic doesn't have to fit perfectly, from the other side it should be masked into a perfect half moon by the thin layer of aluminium left behind. The metal grille also finds it's place. Troughs were made around the edges of the flaps with the dremel and milling bits so the edges will fold neatly down.

image


A last look.. It's time to peel off the protective cover and see the final result.. There's evidence of the dremel being pushed too hard around the edges where the folds are going to go.. pah!! hope it works out..

image


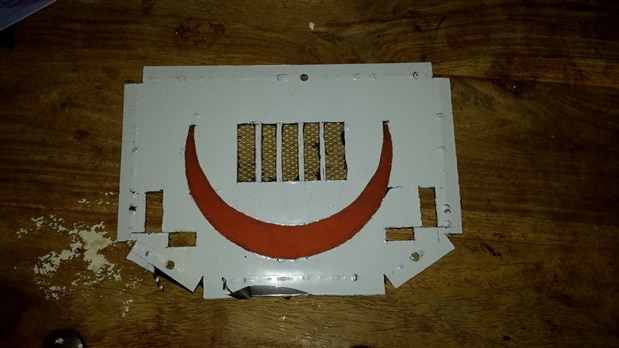
  Pulling the cover.. The protective film is off showing the final result, there's some minor repair work needed but altogether a good result for a first run.

image


The flaps around the edges have been pushed into place, most of the damage caused by the dremel cutting grooves smoothed itself out as they were folded down!!

image


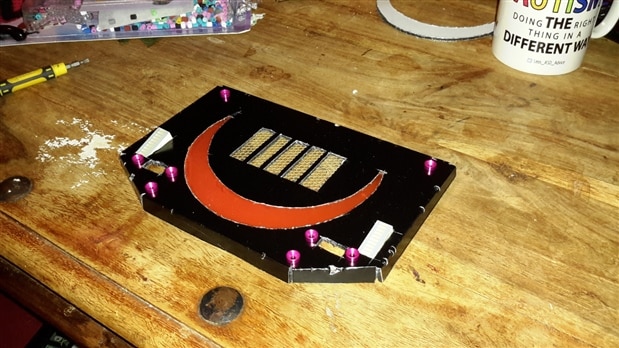
A final detail check, trying to get an idea of how the complete unit is going to look.

image


One last look before it's time to start on the other parts of the case. There's still a bit of work to do with this piece and undoubtedly some attempt at tidying it up and restoring or hiding some of the damage, I have some ideas to hide those dings around the edges from becoming too complacent with the dremel but it's a happy success for this first piece..

image

  • Sign in to reply

Top Comments

  • Former Member
    Former Member over 10 years ago +3
    shabaz Thanks! I was surprised how easy it was to work with. The orange halfmoon shape is where the light chaser from my previous post is going to be, Hopefully it's going to work out as well as it does…
  • shabaz
    shabaz over 10 years ago +2
    Hi Lucie, It is already looking like a nice case! Impressive that it was formed into a non-rectangular and non-boxy shape with curved inset etc.. And it was great to see the step-by-step photos to see…
  • DAB
    DAB over 10 years ago +1
    Good post. I like the step by step approach and honest commentary on the issues you discovered. It helps the rest of us understand how you got to the final product. DAB
  • Former Member
    Former Member over 10 years ago in reply to fustini

    your welcome!


    It really is worth trying it out. The one I used has a soft polycarbonate core and is quite common(ive started noticing metallic wall and door signs are often made with it). Im led to believe there are types with other core materials like fibreboard which would really change the gameplan.


    Believe it or not its far easier to cut that acryllic sheet, I found very gently scoring it twice then applying some pressure on the third cut generally gets through the aluminium layer, once through that, you can feel the change of material by the way the knife travels through it.


    Let me know how you get on, the more I do with it the better results im getting image


    Lucie

    • Cancel
    • Vote Up +1 Vote Down
    • Sign in to reply
    • More
    • Cancel
  • fustini
    fustini over 10 years ago

    wow, thanks for the tip on aluminum composite!  I will have to share it with my hackerspace (Pumping Station: One)

    • Cancel
    • Vote Up 0 Vote Down
    • Sign in to reply
    • More
    • Cancel
  • DAB
    DAB over 10 years ago

    Good post.


    I like the step by step approach and honest commentary on the issues you discovered.


    It helps the rest of us understand how you got to the final product.


    DAB

    • Cancel
    • Vote Up +1 Vote Down
    • Sign in to reply
    • More
    • Cancel
  • Former Member
    Former Member over 10 years ago

    shabaz Thanks! I was surprised how easy it was to work with. The orange halfmoon shape is where the light chaser from my previous post is going to be, Hopefully it's going to work out as well as it does in my imagination!!


    balearicdynamics It came from here http://plasticonline.co.uk/other-materials/aluminium-composite.html The large 30cm x 30cm (12"x12") piece in the first post was only £3.56. I got two of the black anodised ones and one of the brushed steel effect ones. And yes, certainly milling would be so much a better option and would work well with this material if you have the machinery at your disposal.


    The brushed steel effect sheet still needs to be put to use but thats for another day!


    Some extra little snippets:


    -Once a shape has been scored through an aluminium surface, it's easy to lift a corner and peel the aluminium off with some pliers leaving the polycarbonate behind.


    -The polycarbonate core is soft enough to just push a sharp knife straight through.


    - Unfortunately the usual  solutions don't work to bond polycarbonate. Either a regular superglue or epoxy can be used but to achieve the same type of natural bond that you achieve with regular plastic glue's, you need to obtain methyl chloride which is apparently easy enough to find online.


    Looking forward to presenting the final case with LCD front panel!


    Lucie

    • Cancel
    • Vote Up +3 Vote Down
    • Sign in to reply
    • More
    • Cancel
  • balearicdynamics
    balearicdynamics over 10 years ago

    Hi Lucie, great work!


    I am thinking how this maybe good to be milled too. The handmade work sounds very well, with my compliments image


    What is the thickness of this surface? What is the price and where did you bought it? Nearby you or online ?


    Cheers, Enrico

    • Cancel
    • Vote Up 0 Vote Down
    • Sign in to reply
    • More
    • Cancel
>
element14 Community

element14 is the first online community specifically for engineers. Connect with your peers and get expert answers to your questions.

  • Members
  • Learn
  • Technologies
  • Challenges & Projects
  • Products
  • Store
  • About Us
  • Feedback & Support
  • FAQs
  • Terms of Use
  • Privacy Policy
  • Legal and Copyright Notices
  • Sitemap
  • Cookies

An Avnet Company © 2025 Premier Farnell Limited. All Rights Reserved.

Premier Farnell Ltd, registered in England and Wales (no 00876412), registered office: Farnell House, Forge Lane, Leeds LS12 2NE.

ICP 备案号 10220084.

Follow element14

  • X
  • Facebook
  • linkedin
  • YouTube