element14 Community
element14 Community
    Register Log In
  • Site
  • Search
  • Log In Register
  • Community Hub
    Community Hub
    • What's New on element14
    • Feedback and Support
    • Benefits of Membership
    • Personal Blogs
    • Members Area
    • Achievement Levels
  • Learn
    Learn
    • Ask an Expert
    • eBooks
    • element14 presents
    • Learning Center
    • Tech Spotlight
    • STEM Academy
    • Webinars, Training and Events
    • Learning Groups
  • Technologies
    Technologies
    • 3D Printing
    • FPGA
    • Industrial Automation
    • Internet of Things
    • Power & Energy
    • Sensors
    • Technology Groups
  • Challenges & Projects
    Challenges & Projects
    • Design Challenges
    • element14 presents Projects
    • Project14
    • Arduino Projects
    • Raspberry Pi Projects
    • Project Groups
  • Products
    Products
    • Arduino
    • Avnet Boards Community
    • Dev Tools
    • Manufacturers
    • Multicomp Pro
    • Product Groups
    • Raspberry Pi
    • RoadTests & Reviews
  • About Us
  • Store
    Store
    • Visit Your Store
    • Choose another store...
      • Europe
      •  Austria (German)
      •  Belgium (Dutch, French)
      •  Bulgaria (Bulgarian)
      •  Czech Republic (Czech)
      •  Denmark (Danish)
      •  Estonia (Estonian)
      •  Finland (Finnish)
      •  France (French)
      •  Germany (German)
      •  Hungary (Hungarian)
      •  Ireland
      •  Israel
      •  Italy (Italian)
      •  Latvia (Latvian)
      •  
      •  Lithuania (Lithuanian)
      •  Netherlands (Dutch)
      •  Norway (Norwegian)
      •  Poland (Polish)
      •  Portugal (Portuguese)
      •  Romania (Romanian)
      •  Russia (Russian)
      •  Slovakia (Slovak)
      •  Slovenia (Slovenian)
      •  Spain (Spanish)
      •  Sweden (Swedish)
      •  Switzerland(German, French)
      •  Turkey (Turkish)
      •  United Kingdom
      • Asia Pacific
      •  Australia
      •  China
      •  Hong Kong
      •  India
      •  Korea (Korean)
      •  Malaysia
      •  New Zealand
      •  Philippines
      •  Singapore
      •  Taiwan
      •  Thailand (Thai)
      • Americas
      •  Brazil (Portuguese)
      •  Canada
      •  Mexico (Spanish)
      •  United States
      Can't find the country/region you're looking for? Visit our export site or find a local distributor.
  • Translate
  • Profile
  • Settings
RIoTboard
  • Products
  • Dev Tools
  • Single-Board Computers
  • RIoTboard
  • More
  • Cancel
RIoTboard
Blog Automate Uboot build with Eclipse
  • Blog
  • Forum
  • Documents
  • Files
  • Members
  • Mentions
  • Sub-Groups
  • Tags
  • More
  • Cancel
  • New
Join RIoTboard to participate - click to join for free!
  • Share
  • More
  • Cancel
Group Actions
  • Group RSS
  • More
  • Cancel
Engagement
  • Author Author: tusharp
  • Date Created: 14 Jul 2014 8:07 AM Date Created
  • Views 1131 views
  • Likes 1 like
  • Comments 0 comments
  • tusharp
  • kepler
  • Ubuntu
  • uboot
  • build
  • freescale
  • imx6
  • eclipse
  • riotboard
  • embedded
  • riot
  • cortex-a9
  • mx-6s
  • arm
  • arm9
  • linux
Related
Recommended

Automate Uboot build with Eclipse

tusharp
tusharp
14 Jul 2014

Recently i was going through freescale document AN4173 on building uboot using eclipse.

The document was released with an old version of eclipse and on windows, and being a linux user I thought to give it a try on a newer version of eclipse (kepler) on ubuntu.


  1. We will download and install eclipse on Ubuntu.
  2. Configure and build uboot sources using eclipse


Download Cross Compiler

git clone git://github.com/embest-tech/fsl-linaro-toolchain.git

Download Uboot:

git clone git://github.com/embest-tech/u-boot-imx.git -b embest_imx_3.0.35_4.0.0


Build Uboot from command line:

cd u-boot-imx/

export ARCH=arm

export CROSS_COMPILE=~/fsl-linaro-toolchain/bin/arm-fsl-linux-gnueabi-

make distclean

make mx6solo_RIoTboard_config

make


Now we will try the same using eclipse IDE (just for fun image).


Download eclipse bundle from https://www.eclipse.org/downloads/packages/release/Kepler/SR2

se3m1f.jpg

I am using ubuntu 14.04 32 bit so will use 32 bit eclipse kepler.

qravbr.jpg


We need to configure eclipse IDE for Uboot builds.


Open Eclipse executable by click on it.

2ec3zb9.jpg


Click File > New > Project

Select C/C++ > C Project


image


Select Project Type > Executable > Empty Project.

Select Toolchains > Cross GCC

name the project and Click next.

xqky1l.jpg


Select both Debug & Release, click Next.

2lv214.jpg


Click Finish to complete project creation.

select Project > Properties on menubar or  hit {alt+enter} on keyboard to display the properties windows.


image


Highlight C/C++ build and select Builder settings

image


uncheck Generate Makefiles automatically.

Update the Build Directory with uboot source code path.

15yer1z.jpg


Select Behaviour

Empty the Build(incremental build) field.

Change clean to distclean


2wmhsfq.jpg


Next we need to pass the environment variables for Cross Compilation.

Highlight C/C++ build > Environment


image


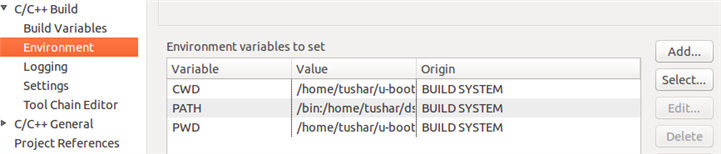
Click on ADD and create variable to pass cross compiler to build system.

NAME:  CROSS_COMPILE

VALUE: arm-fsl-linux-gnueabi-


Tick add to all configurations.


image


Similarly update the target architecture with ARCH variable.

NAME:  ARCH

VALUE: arm

Tick add to all configurations.


image


Similarly update path with cross compiler location

NAME:  PATH

VALUE: /home/tushar/riot_github/fsl-linaro-toolchain/bin/

Tick add to all configurations.


image


Highlight C/C++ build > Settings, select Binary Parsers

Untick Elf Parser and Tick on GNU Elf Parser

Click OK to save settings and close window.


image


If you are trying the tutorial on Windows select PE Windows Parser.


Select Project > Make Target > Build  in menubar or  hit {shift+f9} in keyboard to get make targets menu.


image


We have two activities (make mx6solo_RioTboard_config & clean) to be performed on project, so we create two targets.


Click Add and create as shown below.


imageimage


Once configured we have two build targets.


image


with all setting completed we will proceed to build our bootloader.

Hit {shift+f9} to pop up the build target window.


image


Select distclean & click build

2n0ldud.jpg


a “make distclean” command will run removing all the object and temporary files.

On build complete we will get below in console window.

ao2rg6.jpg


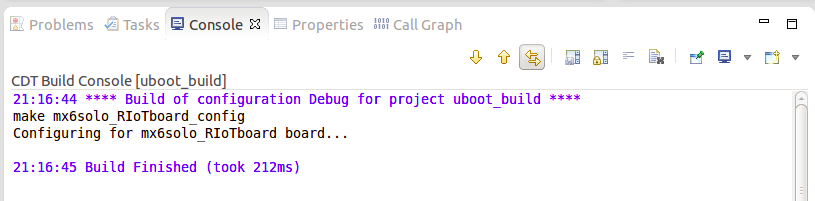
Again Hit {shift+f9} to pop up the build target window.

Select mx6solo_RIoTboard_config & click build.


image


a “make mx6solo_RIoTboard_config” command will run and configure the uboot to be build for Riotboard.

On config complete we will get below in console window.


image


With the above build we have a uboot source ready for Riotboard.

In menubar Select Project > Build Project to fire the make command and build the bootloader.


image


On build complete we will get in console ...


image


Our shiny new bootloader is available at “~/u-boot-imx/u-boot.bin” and ready to be booted.


You can refer document DOC-68087 for flashing uboot using linux platform.


  • Sign in to reply
element14 Community

element14 is the first online community specifically for engineers. Connect with your peers and get expert answers to your questions.

  • Members
  • Learn
  • Technologies
  • Challenges & Projects
  • Products
  • Store
  • About Us
  • Feedback & Support
  • FAQs
  • Terms of Use
  • Privacy Policy
  • Legal and Copyright Notices
  • Sitemap
  • Cookies

An Avnet Company © 2025 Premier Farnell Limited. All Rights Reserved.

Premier Farnell Ltd, registered in England and Wales (no 00876412), registered office: Farnell House, Forge Lane, Leeds LS12 2NE.

ICP 备案号 10220084.

Follow element14

  • X
  • Facebook
  • linkedin
  • YouTube