


I’ve had the opportunity to use the RIoTboard for a while now and use some of the graphics capabilities available on the board. The board comes bundled with lots of peripherals and has good Android support as expected from an IoT board. I made sure to have the RIoTboard manual and i.MX6 reference manual with me before playing with some graphics apps.
In this post I will be using the Linaro Ubuntu distro provided by RIoT community. We will focus on how to create and run some simple graphics apps using the OpenGL profile available on RIoTboard. OpenGL is a lightweight API for graphics processing. With Open GLES it provides a low-level applications programming interface (API) between software applications and hardware or software graphics engines.
I am using a LCD8000-97CLCD8000-97C LCD display for this demonstration, but you can use any standard HDMI monitor to connect to the RIoTboard.
Some pre-requisites:
- RIoTboardRIoTboard
- A 5V 1A power supplyA 5V 1A power supply
- UART8000-U debug cableUART8000-U debug cable
- LCD8000-97C LCD displayLCD8000-97C LCD display
- USB MouseUSB Mouse
- USB KeyboardUSB Keyboard
- Linaro Ubuntu flashed onto RIoTboard
- LVDS Cable (Kit content of LCD8000-97C)
- A standard Ethernet cable with a working Internet connection.
Below is a snapsort of RIoTboard based on the i.MX 6Solo processor from Freescale.
<html><head><title>Jive SBS</title></head>
<body><font face="arial,helvetica,sans-serif">
<b>Error</b><br><font size="-1">
An general error occurred while processing your request.
</font></font></body></html>
Setup:
We need to connect our display to the (J2) LVDS connector.
Connect an Ethernet cable to the Ethernet Port (J15) on the RIoTboard and make sure you have a working Internet connection.
Power on the board and you will get the startup screen as shown below.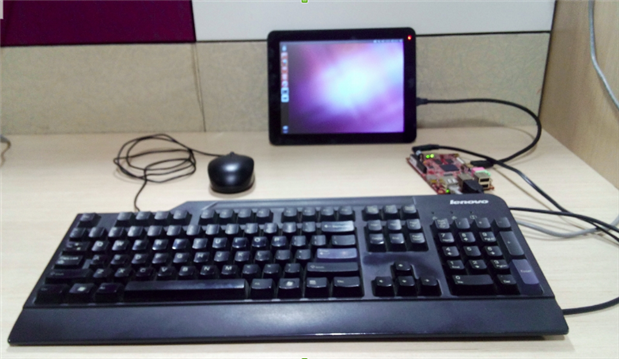
This is a snapshot of my setup showing the LCD screen after the RIoTboard boots up with Linux. By default the RIoTboard uses an HDMI output. If you get a blank screen or have a screen resolution problem, then you need to configure/edit the ‘uboot’ params as configured below for the LCD screen.
Follow below steps to configure LCD display
- Connect UART8000-U debug cable to (J18). Open up a terminal program on your host computer and connect to USB serial port.
- Power on the board and at the time of booting it will ask to press any key to enter into 'uboot', by pressing any key you can see U-Boot prompt as shown below.
U-Boot >>
Enter exactly as below.
setenv bootargs console=ttymxc1,115200 init=/init nosmp video=mxcfb0:dev=ldb,bpp=32 video=mxcfb1:off vmalloc=400M androidboot.console=ttymxc1 androidboot.hardware=freescale
Then save the changes:
U-Boot >> saveenv
Let’s get Started :
Before starting with an OpenGL app, you will need to update the Linaro Ubuntu OS on the Riotboard. A working Internet connection is required to do this.
First, update the libraries and packages on the OS, this will ensure we have all dependencies resolved.
Run the below command on the terminal.
# sudo apt-get update
Then you will need update your Riotboard with some graphics libraries.
# sudo apt-get opengl gles2 egl freeglut3 freeglut3-dev
# sudo apt-get libglu1-mesadev mesa-common-dev
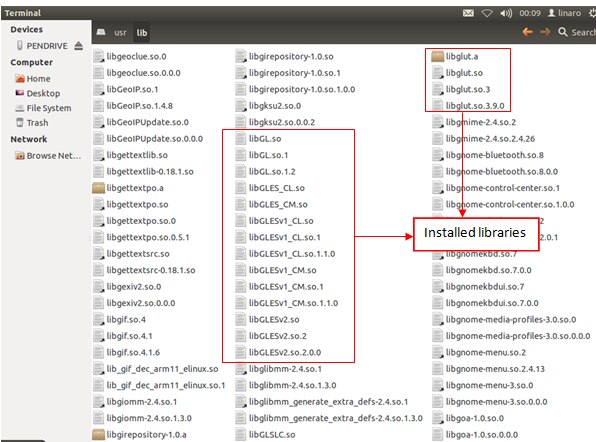
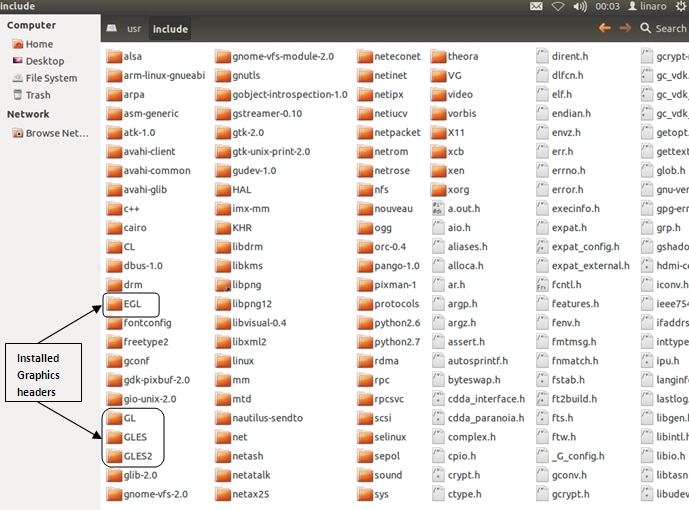
The above commands will install OpenGL, glut and mesa libraries and headers which provides a development platform for users. After installation, the headers for the above installed libraries can be found in /usr/include.
Screenshot of the installed Libraries from my Riotboard
Screenshot of the installed Graphics Headers from my Riotboard
Creating a simple OpenGL app:
I will demonstrate two applications that use the OpenGL libraries:
- How to get platform details.
- Draw a square using OpenGL libraries.
The source code for both apps (es2_info.c & square.c) can be found in attachment1.
A bit of explanation on apps
Using es2_info.c, you can see the supported library details and the hardware that handles graphics on the RIoTboard. The code is taken from Mesahttp://cgit.freedesktop.org/mesa/demosbundle. Mesa is a collection of open-source libraries that implement OpenGL and supports hardware-accelerated 3D rendering and 3D graphics. You can find more information on Mesa here and here.
Using the code in square.c, I am able to draw a simple square using the OpenGL, GLU and GLUT libraries.
Running our graphics apps on RIoTboard ...
Now we will compile and run the above samples in a terminal on the RIoTboard.
We will use the es2_info.c for demonstration.
Compile the application
# gcc es2_info.c -lEGL -lGLESv2
During compilation we link the libraries (lEGL & lGLESv2), this ensures our application is able to get proper graphics libraries support. We installed these libraries in an earlier step using the apt-get command.
Execute the application
# ./a.out
After executing the above binary, we can see the output below which shows the supported EGL extensions and vendor (i.e Vivante Corporation) and OpenGL profile (Open GL ES2.0) as well as the extensions supported by the platform..
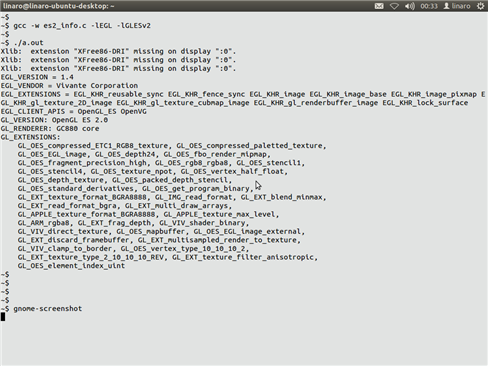
From above we confirm the Linux environment is ready to support graphics development.
Next we will write an application to use the OpenGL feature available on the RIoTboard.
Our application code square.c is available in attachment1.
We introduce a new library here called glut, gluthttp://www.opengl.org/resources/libraries/glut/is used for system level IO , window control and input event monitoring.
use below commands to compile square.c.
# gcc square.c -lGL –lglut
Now execute the application
# ./a.out
Once you execute the above application, you can see a window displaying a red square.
The Vivante hardware is being used to create the window and draw the square inside it.
The below image is what I get on my LCD .

Conclusion
Using the above example I have demonstrated how we can create simple graphic applications on the RIoTboard using OpenGL and other graphics libraries supported by the Vivante GPU.
You can find more examples in the Open Source Mesa project.
Make sure you play around with other mesa OpenGL examples I have shared in attachment2.
These examples show how to use the graphics libraries and the GPU 2D and 3D features.
Hope you had fun and enjoyed this cool demonstration.
If you have any questions, post them in the comments below and I'll do my best to answer them

