IntroI recently set up a couple of demos on I.MX 6 based boards for one of the tech suport guys to take to the Designing with Freescale seminar in Warsaw. The best of the bunch was a RIoTboard demo showcasing compatibility with a portable LCD display, camera and WiFi. The demo creation process is simple enough for a relative beginner to follow and when completed makes for a great platform for Android development.
Equipment RequiredFor this project you will require the following:
Flashing the board
For the demo, we flashed the image to the RIoTboard itself. Putting the image on a bootable SD card is also possible and instructions for this are in the RIoTboard user manual.
First create a working directory to make things easier, in this example I used C:\riot, if you feel the need to use a different directory remember to alter any paths in this guide where appropriate. Next, go to www.element14.com/riotboard and find the Quick links box. You will need to download both the Android OS Image (Android Image.zip) and Android Tools (tools.zip) to C:\riot. Once the zip files have been downloaded extract them both with your preferred archiving software. Copy u-boot-mx6solo-RIoTboard.bin from C:\riot\Android Image and the three files boot.img, recovery.img and system.img from C:\riot\Android Image\eMMC to C:\riot\tools\tools\Mfgtools-Rel-4.1.0_130816_MX6DL_UPDATER\profiles\mx6dl linux update\os firmware\files\android and overwrite any files if prompted.
Set the on board dip switch to serial download mode as shown
Now remove all the cables and reset the DIP switches as follows to enable booting from the eMMC:
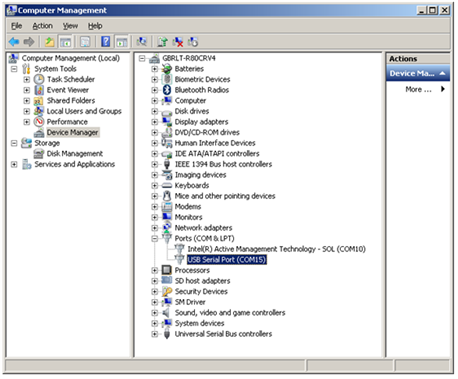
Install the UARTIf this is the first time using the UART8000-U with your PC then you may need to install compatible drivers. The driver I used was CDM 2.08.30 WHQL Certified. This is available from the FTDI website.
setenv bootargs console=ttymxc1,115200 init=/init nosmp video=mxcfb0:dev=ldb,bpp=32 video=mxcfb1:off fbmem=10M vmalloc=400M androidboot.console=ttymxc1 androidboot.hardware=freescale
Hit enter on your keyboard then type in:
saveenv
Congratulations, you now have a fully functional RIoTboard demo! Both the WiPi and the CAM8100-U are plug and play and supported by the newly installed image, just plug them into one of the USB ports and have fun! Hungry for more? Click here for part 2!
|