

Microstack GPS and Raspberry Pi Geocaching
-
Microstack GPS and Raspberry Pi Geocaching
- Everything I am using:
- The basic Idea
- So the first things first get the Pi up and running
- The Plan for the Code
-
The GPS Code
- Geocaches.txt
-
microgps.py
- 1. Import all libraries and set up GPS
- 2. Import all the geocache locations into a nested array so we can reference them easily
- 3. connect to the GPS and get our location
- 4. function to calculate distance from our location to each cache
- 6. store distance in gpsdata.txt
- 7. Set time_lapse for loop
- 9. Now put it all together and you get:
- Getting the Screen to work
- Finishing off the python and text files
- Getting the GPS system to auto run on boot
I recently got a microstack GPSmicrostack GPS and base boardbase board, and I was initially struggling to think of a good fun project to do with it until I went walking across the tops of my local moors and thought, geocaching would be really cool and far easier to do with a bit of tech helping you out.
The current problem is that to go geocaching you either need to be good at reading OS maps accurately and have the right map for the area, or have an expensive GPS system, even the cheapest of gps systems cost more than £80.
Would the raspberry pi and the new Microstack GPS module and a display bring that down to less than £80 and then you have the freedom to disassemble it and use it as something else when you're at home and no geocaching (the other 364 days of the year).
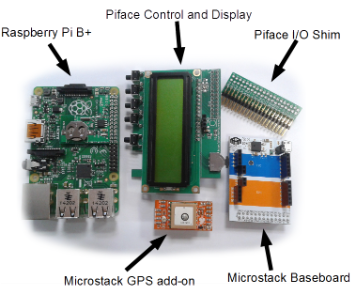
Everything I am using:
Raspberry Pi Module B+Raspberry Pi Module B+
Microstack BaseboardMicrostack Baseboard
Microstack GPSMicrostack GPS
Piface I/O SHIMPiface I/O SHIM
Piface Control and DisplayPiface Control and Display
(if you need to buy a pi then it is cheaper to buy a Raspberry Pi ARaspberry Pi A for this project (fewer USB ports and no ethernet are the main differences) but I only have a B and a B+ so I used my B+.
Let me set the scene a bit better. In my spare time I am both a scout leader and a cub leader, and when we go to camp we often set up some sort of temporary geocaching route. However where we go we often do not have enough maps for all the teams to have one so we usually do the geocaching using distances and keep the caches fairly close together and give them a compass. However if a group gets lost they have no map and so the leader that is following them has to put them right again. So to get rid of these problems, a GPS system that gives them a distance from their current position, would be great and mean that they couldn't get lost as it would always give them the directions from their current position.
The basic Idea
So my idea for the project is to use the GPS module to get their location, read the list of geocaches on the Pi, choose the nearest cache automatically, then display the distance on the screen.
Simple, in theory.
So the first things first get the Pi up and running
I recommend using the Rasbian image as it is very easy to use and has very few problems, Download Raspbian Image. Once Rasbian is installed, plug in a keyboard, screen, and any other peripherals that you want, also plug the Microstack base board onto the gpio pins of the Pi and then the GPS onto the base board, pretty easy as all the Microstack stuff is colour coded and it's almost impossible to get it wrong.

Now you need to install all the python libraries for the Microstack add-ons and the GPSpackages. This is very easy as it is in the Rasbian repository and so can be installed using the commands
sudo apt-get install python3-microstacknode
sudo apt-get install gpsd gpsd-clients python-gps
The Plan for the Code
I hate to develop any code without first having a plan, this allows me to get the entire project sorted in my head and also allows me to do something else and then comeback to the project and still remember all the important points about the project. My actual plan was a scribbled diagram on a piece of paper so I digitised it to make it readable, hopefully this will allow you all to understand what I'm planning on doing.
CLICK IMAGE TO ZOOM
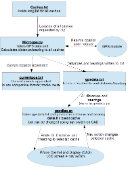
So Basically I am going to have two python files, one to deal with the gps and one to deal with the control and display, this alleviates any lag caused by waiting for the GPS module to reply, therefore giving me6 a faster response by the control and display.
The GPS Code
Okay so now we have the board setup with both all the hardware and the software we need to start developing the python code.
The first bit of code I made was the microgps.py script this needed a geocaches.txt file to reference so lets make that first.
Geocaches.txt
This contains a longitude and a latitude for all the geocaches that we want to use, I went to five decimal places when entering these as that is accurate to about 1m which is about as good as you'll get out of a civilian gps system (and more accurate than we'll ever need. For ease I entered it in a csv layout so that when finished I can export an excel spreadsheet of grid references into a csv file and then rename to a txt file then it will work with the python scripts, no retyping needed.
This is my layout for the geocaches.txt
long1,lat1
long2,lat2
long3,lat3
Notice, no spaces anywhere.
microgps.py
This is the main Python script, This will get our location from the Microstack GPS do all the calculations and conversions and output the distance for each geocache ready for displaying.
So what it needs to do is:
1. Import all the necessary libraries and set up the gps
2. Import all the geocache locations into a nested array so we can reference them easily
then it needs to continuously loop:
3. connect to the GPS and get our location
4. function to calculate distance from our location to each cache
5. recursive loop to calculate distance from our location to each cache
6. store distance in gpsdata.txt
7. Set time_lapse for loop
8. append current location to currentpos.csv (keeps log of route in csv format)
So we will be going through each of these points separately then combining them into the whole script.
1. Import all libraries and set up GPS
so we are going to use time to set a pause after each loop, math to help us calculate the distances and the microstack library.
we also need to set up the gps as an object in the script
###import libraries and set up gps
import sys,math,time,microstacknode.gps.l80gps
gps=microstacknode.gps.l80gps.L80GPS()
so that's that.
2. Import all the geocache locations into a nested array so we can reference them easily
So now we need to import all of the geocache Coordinates into a nested array so we can access them more easily than having to open read and close a file every time. If we do eventually have a geocache list that is ridiculously long we may have to revert to reading the file every time, line by line but for now lets just have it in an array.
So these lines of code will open the file read the whole file, split each line into a new element of the array, then split each geocache element into the long and lat elements.Therefore it is nested in two layers the top layer is each geocache the next layer is the long and lat for each cache. so the lat for cache 4 would be indexed as caches[4][1]. The fourth cache, latitude. Easy.
The print command was just used to check it was working properly feel free to delete or comment it out if you want if you don't want it to print the complete caches array every time the program starts.
cachefile=open("/home/pi/geocaches.txt","r")
caches=cachefile.read().split("\n")
for i in range(0,len(caches)):
  caches[i]=caches[i].split(",")
print("caches:",caches)
3. connect to the GPS and get our location
Okay so now we have everything set up and ready to go lets start the actual run loop. The first bit is all about connecting to the GPS and getting our location accurately.
while current_pos==False:
    try:          # try command used to prevent crash when no response from GPS
        current_pos=gps.gpgll          # gets current GPS position
    except (microstacknode.gps.l80gps.DataInvalidError, microstacknode.gps.l80gps.NMEAPacketNotFoundError):          # if no GPS response or if response is invalid
          file=open("/home/pi/gpsdata.txt","w")              # writes error code to the text file that the display scripts reads from
            file.write("ERRORSIGNAL")
            file.close()
            time.sleep(1)                    #pauses before retry to connect to GPS
print(current_pos)                                # for debugging
current_pos=[current_pos["longitude"],current_pos["latitude"]]          #extracts long and lat fromdata returned by GPS
print(current_pos[0],current_pos[1])              # for debugging
a=str(current_pos[0])+", "+str(current_pos[1])+"\n"                    # prepares long and lat for writing to file
file=open("currentpos.txt","a")                                        # writes current position to file for import as CSV to google map maker engine
file.write(a)
file.close()
4. function to calculate distance from our location to each cache
This was fairly tricky until Dudley sent me a link to this webpage, which was absolutely fantastic. I just adapted the formula for python and entered it as a function at the top of the script just beneath the imports.
I named the function dist_calc and it accepts the long and lat for both current location and destination then it returns the distance in metres to the destination.
def dist_calc(lat1,lon1,lat2,lon2):
    d=math.acos(math.sin(math.radians(lat1))*math.sin(math.radians(lat2))+math.cos(math.radians(lat1))*math.cos(math.radians(lat2))*math.cos(math.radians(lon1-lon2)))    # calculates dist from lon1,lat1 to lon2,lat2 as a fraction of earth's circumference
    return (d*6373000)                    #returns distance in metres
As you can see I had to convert all the angles from degrees to radians before using any trig function as python only deals with radians, annoying but no big deal.
The variable d is the fraction of the circumference of the world of the distance to destination, so you simply times it by the distance round the world in the the units you want to use, I.E. there are 6,373,000 metres (roughly (yes I appreciate that the world is actually an oblate spheroid but this is only roughly) ) around the world, so d*6373000 is the distance in metres.
5. recursive loop to calculate distance from our location to each cache
Now we need to put the distance to each cache into a new array ready to be passed to the display python script. To do this we need to create a new list then append to it a two element array containing the distance to each cache, so similar to the caches array but distance instead of long and lat.
So here's the code.
dist=list()          # makes an empty list
for i in range(0,len(caches)-1):    # loops once per cache
  lon1=float(caches[i][0])          # next four lines prepare the current coords and the destination coords for the calculations
  lon2=current_pos[0]
  lat1=float(caches[i][1])
  lat2=current_pos[1]
  dist.append(str(dist_calc(lat1,lon1,lat2,lon2)))    # appends the distance to the cache to the end of the dist list
  print(dist)                        # used for debugging cache read/dist_calc/dist append errors
6. store distance in gpsdata.txt
Now we have the array with the distance to each cache we need to store that in the text file so that the display python script can access it.
This is very easy.
data=""
for i in range(0,len(dist)-1):
    data+=str(i)+","+str(dist[i])+"\n"
    file=open("/home/pi/gpsdata.txt","w")
    file.write(data)
    file.close()
Done.
7. Set time_lapse for loop
To help reduce power consumption and preserve battery life we are also going to add a time lapse to the main loop to slow down the refresh, but as we get closer to a point we need to speed the refresh up. To do this we are going to find the minimum distance to a cache and base our time lapse off of that. If it is not time to refresh then python will go into a loop that does nothing but checks the time and waits until it is time to refresh.
    mindist=float(min(dist))
    if mindist==0:None
    elif mindist<30:time_lapse=0.1
    elif mindist<100:time_lapse=2
    elif mindist>=100:time_lapse=5
    end_time=time.time()+time_lapse
    while time.time()<=end_time:None
8. Append current location to currentpos.csv (keeps log of route in csv format)
In order to keep a log of our route we are going to put all the gps data we get into a log file which will be a csv file to make it easy to import into a spreadsheet or even straight into google maps as a route. This file will be called currentpos.csv (I know the naming isn't strictly true to it's purpose but I started by simply over writing the file each time then changed to appending without changing the file name, bad planning on my part, sorry) but the code is very simple.
  a=str(current_pos[0])+", "+str(current_pos[1])+"\n"
  file=open("currentpos.csv","a")
  file.write(a)
  file.close()
This code simply prepares var "a" which contains the long and lat in a csv friendly format. Then apppends it to a new line in currentpos.csv. Thereby recording your route as you walk it.
9. Now put it all together and you get:
import sys, math, time
import microstacknode.gps.l80gps
#import pifacecad
gps=microstacknode.gps.l80gps.L80GPS()


def dist_calc(lat1,lon1,lat2,lon2):
    d=math.acos(math.sin(math.radians(lat1))*math.sin(math.radians(lat2))+math.cos(math.radians(lat1))*math.cos(math.radians(lat2))*math.cos(math.radians(lon1-lon2)))
    return (d*6373000)


cachefile=open("/home/pi/geocaches.txt","r")
caches=cachefile.read().split("\n")
#cad=pifacecad.PiFaceCAD()
#cad.lcd.backlight_on()
#cad.lcd.cursor_off()
#cad.lcd.blink_off()
for i in range(0,len(caches)):
  caches[i]=caches[i].split(",")
print("caches:",caches)
start_time=time.time()
time_lapse=15


a=1
while a:
  current_pos=False
  while current_pos==False:
  try:
  current_pos=gps.gpgll
  except (microstacknode.gps.l80gps.DataInvalidError, microstacknode.gps.l80gps.NMEAPacketNotFoundError):
  file=open("/home/pi/gpsdata.txt","w")
  file.write("ERRORSIGNAL")
  file.close()
  time.sleep(1)
  print(current_pos)
  current_pos=[current_pos["longitude"],current_pos["latitude"]]
  print(current_pos[0],current_pos[1])
  a=str(current_pos[0])+", "+str(current_pos[1])+"\n"
  file=open("currentpos.csv","a")
  file.write(a)
  file.close()

  lon2=current_pos[0]
  lon1=float(caches[0][0])
  lat2=current_pos[1]
  lat1=float(caches[0][1])
  dist=list()
  print(dist)


  for i in range(0,len(caches)-1):
  lon1=float(caches[i][0])
  lon2=current_pos[0]
  lat1=float(caches[i][1])
  lat2=current_pos[1]
  dist.append(str(dist_calc(lat1,lon1,lat2,lon2)))
  print(dist)

  data=""
  for i in range(0,len(dist)-1):
  data+=str(i)+","+str(dist[i])+"\n"
  file=open("/home/pi/gpsdata.txt","w")
  file.write(data)
  file.close()
  mindist=float(min(dist))
  #if mindist==0:None
  #elif mindist<30:time_lapse=0.1
  #elif mindist<100:time_lapse=2
  #elif mindist>=100:time_lapse=5
  end_time=time.time()+time_lapse
  while time.time()<=end_time:None
PHEW! Half way there,
Now to get the screen working.....
Getting the Screen to work
Okay, so for the Piface Control and Display we are going to have a different python script running parallel to the GPS python script so that the display doesn't suffer from any lag caused by the GPS. So we are going to call it geodisp.py.
This script is going to:
1. initialise and set up the control and display
Loop
2. read the distances file (gpsdata.txt)
3. display distance and heading of selected cache
4. if nav switch is being pressed or tweaked then change selected cache
5. pause a bit to reduce flicker on screen from constant refresh
This script is actually a lot shorter than the geodisp.py script. So lets start
1. Initialise and set up the control and display
Okay so here we are going to import the modules we need and set up the piface control and display screen in preparation for displaying the data, and also setting up initial variables.
time.sleep(3)          #Allows the gps script to go through boot and get into main loop before this script starts.
import pifacecad
cad=pifacecad.PiFaceCAD()
cad.lcd.backlight_on()
cad.lcd.cursor_off()
cad.lcd.blink_off()
selection=0          #selection var is the variable we will use as the index of the cache we are display on the CaD
2. read the distances file (gpsdata.txt)
Here we are going to read the gpsdata.txt file into a nested list (YAY! nested lists!).
Okay so first read the data into a variable then split each line into an element then split each element into the separate values.
while True:              #this is the main run loop
  file=open("/home/pi/gpsdata.txt","r")    #next 3 lines open and read the data file
  data=file.read()
  file.close()
  if data=="ERRORSIGNAL":              #if the data file contains the error code for no signal then write error message on CaD
      cad.lcd.home()
      cad.lcd.write("Error: NO SIGNAL\nNEED VIEW OF SKY")
  else:
      data=data.split("\n")            # if there is no error message in the data file then split the variable at each new line
      for i in range(0,len(data)):          # for each element in the list
            data[i]=data[i].split(",")      # Split each element into the ID,distance, (split at each comma)
      dist=list()                          # make a new empty list
      for i in range(0,len(data)-1):        # loop for the number of elements in the data list (the number of caches)
            dist.append(float(data[i][1]))  # adds the distance of each cache to dist
3. display distance of selected cache
This is going to display all the information for the currently selected cache on the control and display
cad.lcd.home()              #resets the cursor position on the CaD to the first character on the top line
  cad.lcd.write("ID: "+str(data[selection][0])+str(selection)+"\nDist: "+str(data[selection][1]))          #write the cache's id number, distance to cache onto the screen
Wow, that was easy!
4. If nav switch is being pressed or tweaked then change selected cache
This will allow the user to change the selected cache to a different one, for example if they have just completed one then their closest cache will be the one they are at, but they want to know where the next one is. So they can use the nav button to change the selected cache.
if cad.switches[7].value and selection!=len(dist)-1:                                        # if the nav switch is being tweaked right and the selected cache is not the highest ID then:
    selection+=1                                            #increase the selection ID for which cache to display by 1
    while cad.switches[5].value or cad.switches[6].value or cad.switches[7].value: None    # if the nav switch is being pressed or tweaked at all then wait until it is not
elif cad.switches[6].value and selection>0:                                                  # if the nav switch is being tweaked left and the selected cache is not the lowest ID (0) then:
    selection-=1                                            # decrease the selection ID for which cache to display by 1
    while cad.switches[5].value or cad.switches[6].value or cad.switches[7].value: None    # is the nav switch is being pressed or tweaked at all then wait until it is not
elif cad.switches[5].value and selection!=dist.index(min(dist)):                            # if the nav switch is being pressed  and the currently selected cache is not the closest one then:
    selection=dist.index(min(dist))                          # set the selected cache to the closest cache
    while cad.switches[5].value or cad.switches[6].value or cad.switches[7].value: None    # if the nav switch is being pressed or tweaked at all then wait until it is not
5. pause a bit to reduce flicker on screen from constant refresh
This is DEFINITELY the hardest bit of the whole project.
Here goes.....
time.sleep(0.2)
This just slows the refresh of the CAD module down so that the screen doesn't constantly flicker due to it refreshing so quickly.
Okay so now to put everything together. Simply stick it all together in the order above, like so....
import sys,time,math
import pifacecad
time.sleep(3)
cad=pifacecad.PiFaceCAD()
cad.lcd.backlight_on()
cad.lcd.cursor_off()
cad.lcd.blink_off()
selection=0
while True:
  file=open("/home/pi/gpsdata.txt","r")
  data=file.read()
  file.close()
  if data=="ERRORSIGNAL":
    cad.lcd.home()
    cad.lcd.write("Error: NO SIGNAL\nNEED VIEW OF SKY")
  else:
    data=data.split("\n")
    for i in range(0,len(data)):
      data[i]=data[i].split(",")
      dist=list()
    for i in range(0,len(data)-1):
      dist.append(float(data[i][1]))
    cad.lcd.home()
    cad.lcd.write("ID: "+str(data[selection][0])+str(selection)+"\nDist: "+str(data[selection][1]))
  if cad.switches[7].value and selection!=len(dist)-1:
    selection+=1
    while cad.switches[5].value or cad.switches[6].value or cad.switches[7].value: None
  elif cad.switches[6].value and selection>0:
    selection-=1
    while cad.switches[5].value or cad.switches[6].value or cad.switches[7].value: None
  elif cad.switches[5].value and selection!=dist.index(min(dist)):
    selection=dist.index(min(dist))
    while cad.switches[5].value or cad.switches[6].value or cad.switches[7].value: None
  elif cad.switches[5].value and dist[selection]<=0:
    #caches=caches.pop(dist.index(min(dist)))
    while cad.switches[5].value or cad.switches[6].value or cad.switches[7].value: None
  time.sleep(0.1)
Finishing off the python and text files
Okay so now you need to make sure all of your geocache scripts and files are nice and organised in one place as moving them will be awkward later.
You will also need to create the other two files that the data is going to be written in as it may cause errors if these files do not exist when the scripts try to read them
I have all my geocache files in a folder called microstack_geocache in my home directory to do this simply go to the place where your files currently are and then type into the terminal
sudo mkdir ~/microstack_geocache

sudo cp geodisp.py ~/microstack_geocache/
sudo cp  microgps.py ~/microstack_geocache/
sudo cp geocaches.txt ~/microstack_geocache/

sudo vi ~/microstack_geocache/gpsdata.txt
Then press Esc+shift+; to bring up the vi control at the bottom of the screen then type "wq" and press enter to save and quit
sudo vi ~/microstack_geocache/currentpos.csv
Then press Esc+shift+; then "wq" then enter to save and quit
You should now have 5 files in ~/microstack_geocache ; 2 python scripts and 3 text files.
it may also be worth giving full access to the text files just in case they are limited access at the moment, to do this type in the terminal:
sudo chmod 777 ~/microstack_geocaches/*.txt
this will give everyone full access to any text file in ~/microstack_geocaches/
Okay so that's all the python scripts and text files sorted. Now let's talk about the Linux and Raspberry Pi side of things.
Getting the GPS system to auto run on boot
This is fairly easy and only involves one file of four lines and three lines of code in the terminal.
The general idea is to write an executable file that will run at start and set the two python scripts running.
So first lets write the executable file.
sudo vi /etc/init.d/start.sh
will create a new file in the init.d directory or open the start.sh script if you have one already (I always use start.sh so I almost always already have one)
in this file you will need three lines of code
#!/bin.bash
python3 ~/microstack_geocache/microgps.py &  #this will run the python script in the background, change the file reference if you script is not saved in ~/microstack_geocache/
python3 ~/microstack_geocache/geodisp.py &  #this will also run in the background , REMEMBER to change the file reference if you need to
no press Esc+chist+; and type "wq" enter to save and quit
now we need to tell the Pi to run this start script on boot, if you have already done this then you do not need to go through this process again, but it won't do any harm if you are unsure.
In the terminal type:
sudo chmod +x /etc/init.d/start.sh
sudo update-rc.d start.sh defaults 99
This will make the start.sh script executable and then tells the Pi to run it on boot.
Simple.
Now make sure everything is plugged in correctly and powered properly, then reboot your board to (hopefully) start your geocaching.
Top Comments