element14 Community
element14 Community
    Register Log In
  • Site
  • Search
  • Log In Register
  • Community Hub
    Community Hub
    • What's New on element14
    • Feedback and Support
    • Benefits of Membership
    • Personal Blogs
    • Members Area
    • Achievement Levels
  • Learn
    Learn
    • Ask an Expert
    • eBooks
    • element14 presents
    • Learning Center
    • Tech Spotlight
    • STEM Academy
    • Webinars, Training and Events
    • Learning Groups
  • Technologies
    Technologies
    • 3D Printing
    • FPGA
    • Industrial Automation
    • Internet of Things
    • Power & Energy
    • Sensors
    • Technology Groups
  • Challenges & Projects
    Challenges & Projects
    • Design Challenges
    • element14 presents Projects
    • Project14
    • Arduino Projects
    • Raspberry Pi Projects
    • Project Groups
  • Products
    Products
    • Arduino
    • Avnet & Tria Boards Community
    • Dev Tools
    • Manufacturers
    • Multicomp Pro
    • Product Groups
    • Raspberry Pi
    • RoadTests & Reviews
  • About Us
  • Store
    Store
    • Visit Your Store
    • Choose another store...
      • Europe
      •  Austria (German)
      •  Belgium (Dutch, French)
      •  Bulgaria (Bulgarian)
      •  Czech Republic (Czech)
      •  Denmark (Danish)
      •  Estonia (Estonian)
      •  Finland (Finnish)
      •  France (French)
      •  Germany (German)
      •  Hungary (Hungarian)
      •  Ireland
      •  Israel
      •  Italy (Italian)
      •  Latvia (Latvian)
      •  
      •  Lithuania (Lithuanian)
      •  Netherlands (Dutch)
      •  Norway (Norwegian)
      •  Poland (Polish)
      •  Portugal (Portuguese)
      •  Romania (Romanian)
      •  Russia (Russian)
      •  Slovakia (Slovak)
      •  Slovenia (Slovenian)
      •  Spain (Spanish)
      •  Sweden (Swedish)
      •  Switzerland(German, French)
      •  Turkey (Turkish)
      •  United Kingdom
      • Asia Pacific
      •  Australia
      •  China
      •  Hong Kong
      •  India
      •  Korea (Korean)
      •  Malaysia
      •  New Zealand
      •  Philippines
      •  Singapore
      •  Taiwan
      •  Thailand (Thai)
      • Americas
      •  Brazil (Portuguese)
      •  Canada
      •  Mexico (Spanish)
      •  United States
      Can't find the country/region you're looking for? Visit our export site or find a local distributor.
  • Translate
  • Profile
  • Settings
NXP Semiconductors
  • Products
  • Manufacturers
  • NXP Semiconductors
  • More
  • Cancel
NXP Semiconductors
Documents Take your S12ZVML-MINIKIT for a test drive!
  • Blog
  • Forum
  • Documents
  • Events
  • Quiz
  • Polls
  • Members
  • Mentions
  • Sub-Groups
  • Tags
  • More
  • Cancel
  • New
Join NXP Semiconductors to participate - click to join for free!
Actions
  • Share
  • More
  • Cancel
Engagement
  • Author Author: yoSoyTono
  • Date Created: 31 Jan 2019 2:45 PM Date Created
  • Last Updated Last Updated: 31 Jan 2019 5:33 PM
  • Views 921 views
  • Likes 2 likes
  • Comments 2 comments
Related
Recommended

Take your S12ZVML-MINIKIT for a test drive!

The S12ZVML-MINIKIT evaluation kit is based on the 16-bit S12 MagniVRegistered S12ZVM microcontroller and is engineered for 3-phase BLDC and PMSM sensorless motor control applications, also work for DC applications requiring load switching and load current monitoring. The S12ZVML-MINIKIT uses an S12ZVML MCU —integrating an automotive voltage regulator, a LIN physical interface, and a gate driver unit able to drive up to six external MOSFETs.


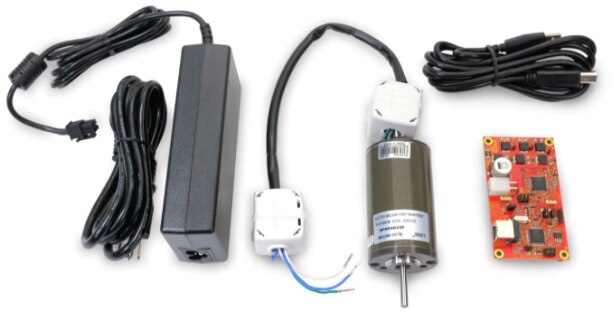
The S12ZVML-MINIKIT evaluation kit contains the hardware you need to kick start your Motor Control design:

  • S12ZVML-MINIBRD reference design board
  • 3-phase Linix 45ZWN24-40 40W PM motor
  • 12V/7A Power Supply and cable
  • (Type B, US/Canada st.) USB cable
  • Get started card with support package information

image


The software tools you require to run the S12ZVML-MINIKIT evaluation kit are:

  • The S12ZVML-MINIBRD Quick Start Package (QSP) including the S12ZVML-MINIBRD Quick Start Guide, the S12ZVML-MINIBRD User Guide, S12ZVML-MINIBRD Schematics, and the dedicated Motor Control Application Software
  • An Integrated Development Environment (IDE) —S12ZVML-MINIKIT performs better using CodeWarriorRegistered for MCUs (Eclipse IDE)
  • The OSBDM hardware driver Version 12 (Win XP/Vista/7/8/10) from P&E for debug interfacing
  • A run-time debugging tool —S12ZVML-MINIKIT performs better using the FreeMASTER tool and optionally FreeMASTER Communication Driver. The source code for using the Communication Driver is already included in the example project.


Ready? Let's take your S12ZVML-MINIKIT for a test drive following these ten steps!


PLUG IT!

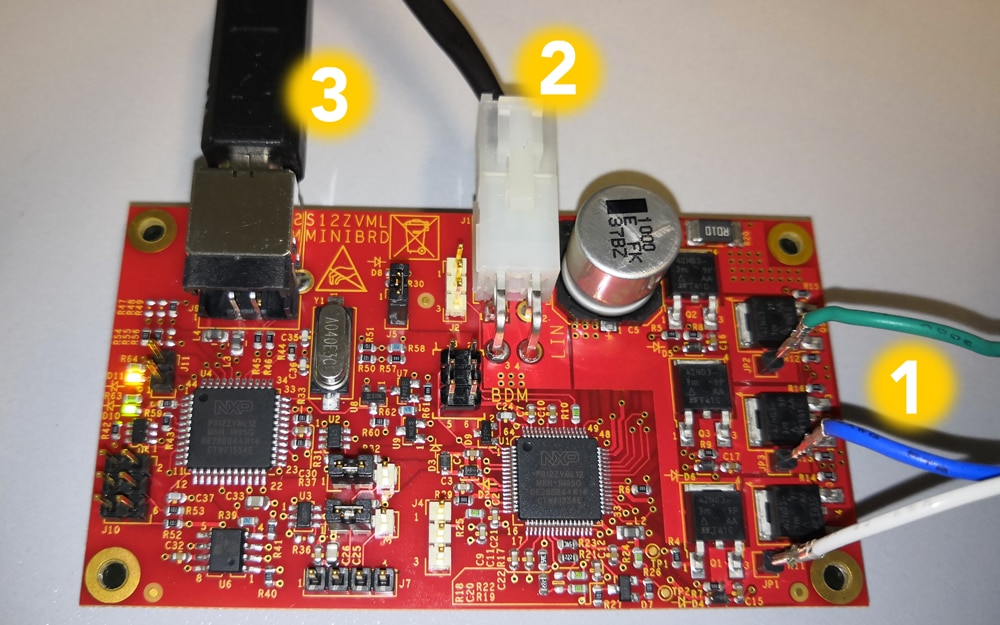
1. Connect the S12ZVML-MINIBRD with the PM Motor joining motor phase lines into JP1, JP2, and JP3 pins —phase order not specified.

2. Plug the 12V power supply for powering both the S12ZVML MCU and the 3-Phase PM Motor.

3. Plug the USB cable for debugging.

image

BUILD AND LOAD!

4. Choose the motor control driving control you will be using for then build the application and load it into the S12ZVML MCU: a BLDC with six-step commutation control or a PMSM with the field-oriented control.

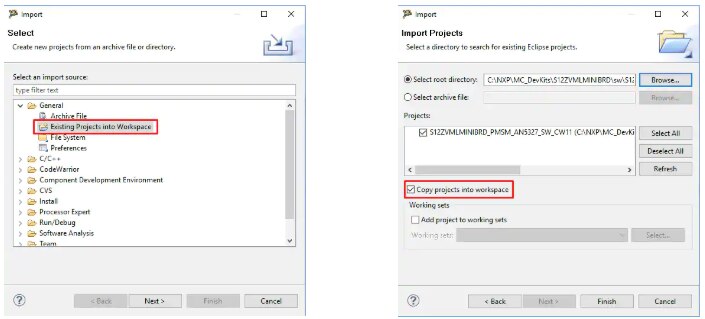
5. Import your project into the IDE. In CodeWarrior you should follow: File > Import > General > Existing Project into Workspace and then choose the selected motor control application type. Be aware the default path is c:\NXP\MC_DevKits\S12ZVMLMINIBRD\sw\.. and that you can check the option for copy selected project into your workspace.

image

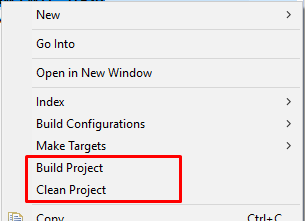
5. Build the project – OPTIONAL

These steps shouldn't be necessary since they are executed automatically in CodeWarrior, but just in case you are prompted:

Right click on the imported project and select Clean project from the contextual menu. Then Right click on the imported project and select Build project

S12ZVML-MINIKIT build

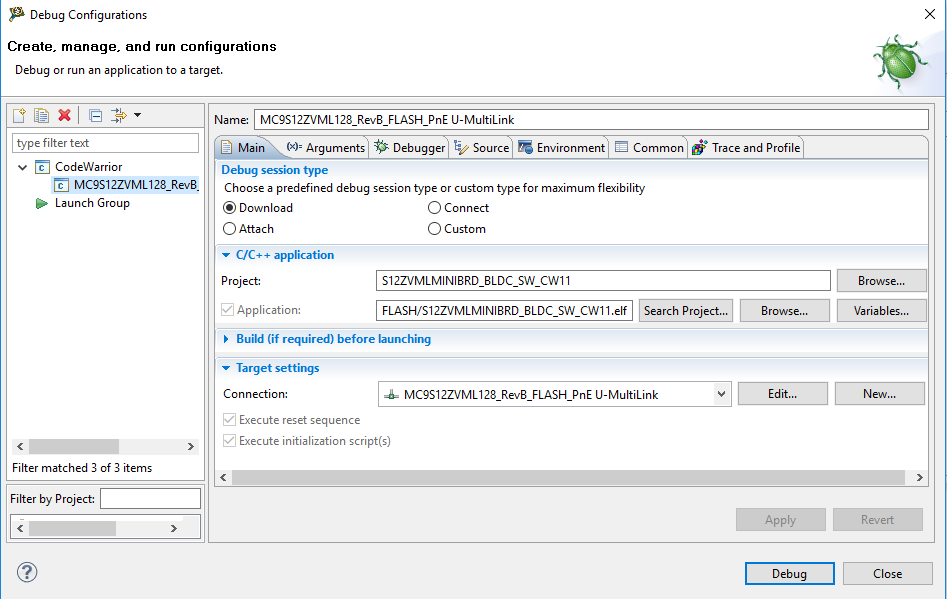
6. Debug the loaded code into MCU. If using CodeWarrior you should follow: Run > Debug Configuration > select predefined debug configuration and then click on Debug to load built code into the S12ZVML MCU.

CodeWarrior

7. Let code run by clicking on the Resume button (or press F8 key), and use the Disconnect button to avoid interference between CW debugger and FreeMASTER tool.


START DEBUGGING

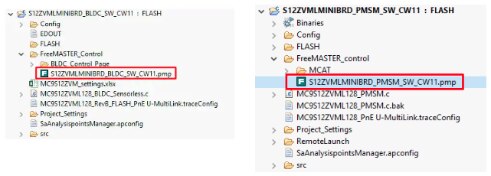
8. Debug your motor control application. You should run the appropriate *.pmp file from your application project folder if using FreeMASTER.

You may start it by double click directly from CodeWarrior project explorer

image

9. Start a connection with the S12ZVML MCU by clicking the Stop icon.

The connection parameters are already predefined in FreeMASTER project, you may change them in project options or using the Connection Wizard.

10. Your motor should be now running! Go to Control page tab to set the required motor rpms and turn on the motor drive.

image


Or simply you can watch the S12ZVML-MINIKIT step-by-step set-up video:

You don't have permission to edit metadata of this video.
Edit media
x
image
Upload Preview
image

  • RoadTest
  • dc motor
  • bldc
  • s12zvml
  • motor control
  • pmsm
  • 3-phase bldc
  • s12zvml-minibrd
  • magniv
  • s12zvml-minikit
  • 3-phase pmsm
  • Share
  • History
  • More
  • Cancel
  • Sign in to reply

Top Comments

  • radeks
    radeks over 6 years ago in reply to MARK2011 +1
    Hello Mark2011, thank you for your notice. It seems that the latest version of quick start package wasn't uploaded on the web yet. I will report it immediately. Back to described issue) It is obvious that…
  • radeks
    radeks over 6 years ago in reply to MARK2011

    Hello Mark2011,

    thank you for your notice.

    It seems that the latest version of quick start package wasn't uploaded on the web yet.
    I will report it immediately.

    Back to described issue)
    It is obvious that there is a problem with the path to AMMCLib.
    The installation package automatically downloads the latest AMMCLib version.
    The AMMCLib from version 1.1.15 is located in a different folder (we abandoned legacy C:\Freescale folder and now use c:\NXP folder).
    Please edit AMMCLib path at three places in project settings (see pictures below) and replace "Freescale" by "NXP" string.
    That will fix your project. I would like to also recommend cleaning your project before a new build.

       imageimage

    image


    In meantime, we will publish the latest version project with fixed paths.


    I hope it helps you.


    Best regards

    Radek Sestak

    NXP Semiconductors

    • Cancel
    • Vote Up +1 Vote Down
    • Sign in to reply
    • More
    • Cancel
  • MARK2011
    MARK2011 over 6 years ago

    Hi!

    What could be the reason for the following errors right after importing the example to the workspace?

    image

    image

    I apologize for the false alarm.

    It seems I had have destroyed something in the AMMCLIB


    • Cancel
    • Vote Up 0 Vote Down
    • Sign in to reply
    • More
    • Cancel
element14 Community

element14 is the first online community specifically for engineers. Connect with your peers and get expert answers to your questions.

  • Members
  • Learn
  • Technologies
  • Challenges & Projects
  • Products
  • Store
  • About Us
  • Feedback & Support
  • FAQs
  • Terms of Use
  • Privacy Policy
  • Legal and Copyright Notices
  • Sitemap
  • Cookies

An Avnet Company © 2025 Premier Farnell Limited. All Rights Reserved.

Premier Farnell Ltd, registered in England and Wales (no 00876412), registered office: Farnell House, Forge Lane, Leeds LS12 2NE.

ICP 备案号 10220084.

Follow element14

  • X
  • Facebook
  • linkedin
  • YouTube