Table of Contents
Introduction
It’s easy to get reasonable quality sound (about as good as an early generation iPod) from a Pi. This ultra-short blog post shows how to do it at a low cost, and with no messing about with seeking out scripts or drivers.
I tested it on a Pi 4, but it should work on most modern Pi boards.
Here's a 30-second demo:
What is Needed?
The Google search term is i2s board. I2S is a digital protocol that runs over three wires (it can be more wires, but the types of boards that will be discussed here use three), plus the supply connections (GND and 5V often). The I2S board converts from I2S to analog audio. I2S works both ways; you can also get audio input boards, but this blog solely focuses on audio output.
Almost any I2S-capable board will be OK. I2S boards exist with line-level audio output or with a built-in power amplifier for directly connecting speakers. For this blog post, I’m using an I2S board intended for driving a single speaker (mono), but the connections to the Pi, and the configuration, are identical regardless of what board is used, whether it is stereo or not.
The board used in this demo is called MAX98357 I2S Board.
You’ll also need jumper wires and a speaker or two, depending on whether the board contains a mono or stereo speaker output. If you’re using a board with just line output, then theoretically, you could use it with headphones, although that’s not normally advised. If you use a board containing a PCM5102 chip, for example, then the line-level output is quite powerful and will work with earphones/headphones at a pinch.
Connections
There are five connections required usually. Three connections provide the I2S digital signals transmitted from the Pi to the audio board, and two connections carry the power.
The single diagram below is all you need; it shows the five connections from the Pi to the example audio board used in this blog. The pin numberings are labeled; refer to the diagram to see where the pins are on the Pi.

There's another view of the pin detail on the pi in the diagram below:

Here is what it looks like all wired up:

High Power Audio Output
Note: Some I2S boards may consume a lot of power, in which case it’s not advisable to power them from the Pi. Such high-power boards should be provided with a separate power supply (the GND connection is still needed to the Pi since it acts as a return for the I2S digital signals).
Configuration
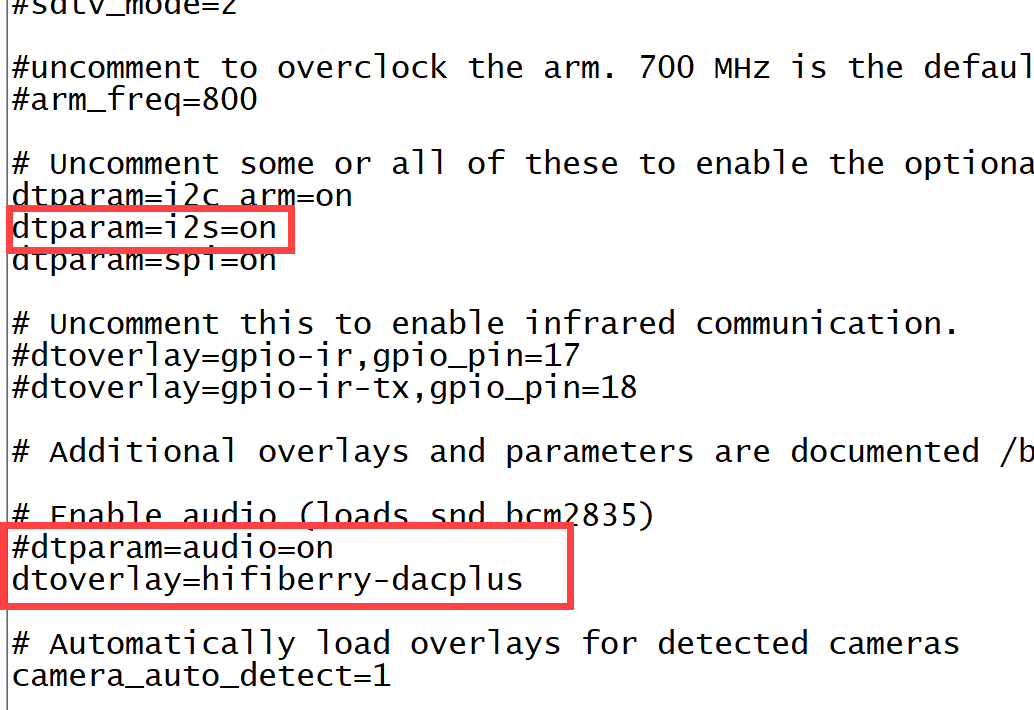
There is not much to do. As a super-user (e.g. using sudo), edit the file called /boot/config.txt as shown highlighted in the screenshot below.
Specifically, you're making three changes:
(1) Uncomment (i.e. remove the #) the line dtparam=i2s=on
(2) Comment (i.e. add the #) to the line dtparam=audio=on
(3) Add the line dtoverlay=hifiberry-dacplus
All of the configuration is shown completed in the screenshot below, in red. Once you’ve done the changes, save the file, and reboot! All is done.

Using It
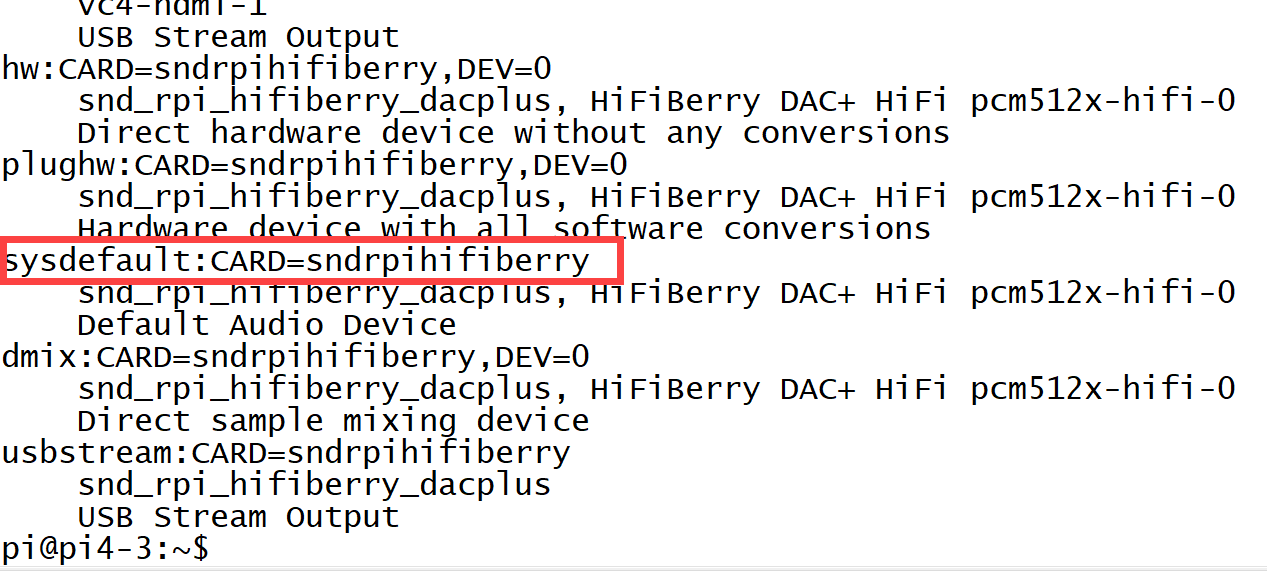
First, some tests. If you type at the terminal prompt aplay -L you should see the following:

If you type aplay -l (i.e. lower-case L), then the following should appear:

Transfer or download a .wav file and a .mp3 file onto your Pi. Both will be used because some examples require WAV format, while others also work with MP3 files. If the WAV examples do not work, then MP3 won't work either. It is best to try the simpler WAV format first if you're troubleshooting.
Here is a WAV file example: type aplay mywavfilename.wav and sound should come out of the speaker!

Here’s a MP3 file example; for this example, I installed the mplayer application first, by typing the following:
sudo apt-get install player
The command line syntax for mplayer is: mplayer -ao alsa mymp3filename.mp3 and if you type that, you’ll see the following appear, along with the sound output from the speaker:

Here is a Python example. Type the following into a file called (say) mysoundprog.py:
import timeimport pygamepygame.init()pygame.mixer.music.load('v1.mp3')pygame.mixer.music.play()time.sleep(15)pygame.mixer.music.stop()
Run it by typing python mysoundprog.py and you should hear the file playing!

Summary
It is pretty easy to get fairly decent sound out of a Pi. Typically, just five jumper wire connections are needed to popular I2S boards. The Pi emits digital signals that are converted into analog by the I2S board. Some boards contain a built-in amplifier for speakers.
In terms of configuration, a single configuration file needs to be edited on the Pi.
The example in this blog was tested using the Raspberry Pi OS (desktop version, without the extra applications) and with a Raspberry Pi model 4B, but the information here should work on any other modern Pi, including the upcoming Pi 5.
If you have difficulties, please let me know (if I do not know the answer, others for sure will), and don't forget to supply a copy-paste or screenshot of the troubleshooting test commands and output mentioned in the blog post. If you have any suggestions, then it would be great to hear them.
Thanks for reading!

