


Thanks to element14's RoadTest program, I managed to get my hands upon a Raspbmc bundle. I can definitely say that it has bought much smiles to my face, as I appreciate the value and flexibility afforded by the open source media centre software XBMC. While the bundle has almost everything you need as a foundation for a media centre, if you don't dare to venture past what is provided, you might never come to fully appreciate the flexibility and power that lies within.
In this blog post, I will try to cover some of the things you might want to consider to complete and add the finishing touches to your Raspbmc based media centre.
What do YOU need in your system?
I think the first thing you should consider is your actual needs. The Raspbmc kit is not for everybody, as it does take a bit of patience to use (due to the slightly underpowered nature of the Raspberry Pi) and requires a bit of tweaking to establish a stable, optimized configuration for your needs.
If what you need is a basic media centre to play a very limited number of formats, but you need it to be simple, reliable, aesthetically pleasing and stable out of the box - maybe you should consider a dedicated commercial media centre. These although limited will offer you the simplicity which you're looking for. If you need something that will drive TV tuners, do your TV recording for you, serve large banks of hard drives filled with media content or to play Blu-Ray content on a regular basis, then you are probably better served by a Home Theatre PC.
The Raspbmc kit serves the niche which sits in-between the two. Maybe you have a smaller media library, in a variety of formats. Maybe you want some flexibility, but don't want a full-blown home theatre PC. You might also be a more advanced user, one who is willing to approach configuration settings to tweak things to their liking. If so, then you're just the person who would appreciate the kit.
Once you have established that the Raspbmc kit is right for you, it's time to think about which accessories you will need. Part of doing this will involve envisioning usage scenarios. Remember that your Raspbmc setup can be completely different from anyone else's in order to meet your needs!
Ideally, my home theatre set-up will be to my HDMI based TV, and will allow the use of USB connected storage (bus powered hard drives, self-powered hard drives and USB flash drives) as well as networked streaming. I'd probably opt for wireless initially, with a view to transfer to wired once I get the cabling in. As my room is fairly big, I will probably need a USB extension lead to keep the keypad receiver in range.

Knowing this, I would definitely need to consider purchasing a powered USB hub to provide the power to the drives, an USB extension lead for the keyboard receiver, and a Wi-Fi card. Additionally to this, purchasing a case for the Raspberry Pi is also a good idea.
Other users may find it necessary, depending on their needs, to purchase HDMI to DVI cables for monitors, HDMI to VGA adapters (for older monitors and TVs), powered speakers (say, for use with the 3.5mm audio output with connectivity that doesn't include audio), longer Ethernet leads or an Ethernet switch to hook up several Ethernet based devices in the home theatre cabinet or even external optical drives to play content directly from optical disc. They might also wish to upgrade or change their remote control setup and opt for a different keyboard/mouse set-up which they prefer.
It's important to visualize exactly how you will use the system to ensure you have the hardware you need to implement it (or that you know that you will need to get it). The Raspberry Pi itself will not be able to power bus-powered drives and is likely to reboot upon hot-plugging of any USB devices into its downstream ports, hence the recommendation for a quality powered hub (preferably one which does not back-feed the Raspberry Pi with power, otherwise you may see strange behaviour and SD card corruption).
Something else you will probably need depending on your media library are optional codecs from the Raspberry Pi store. These keys are tied to the CPU serial number and may be purchased in order to enable hardware-based decoding of MPEG-2 and VC-1 codecs and are inexpensive. I recommend that you purchase these if you wish to watch such content (e.g. if you have DVDs you wish to play through it, or MPEG/TS recordings, or Blu-Ray images).
Configure It Up!
Plugging the system together is pretty easy as you can tell from my RoadTest, however, configuring it up takes some time. Here are some common configuration tasks which you might want to look at in order to get the most out of your system:
Raspbmc Settings Applet
This applet provides you access to many of the settings which are specific to the Raspberry Pi distribution. The first thing new users to the kit should do is to start by ensuring you have reliable network connectivity and selecting Update Now, and OK. Allow Raspbmc to reboot.
The update process will take about 20 minutes on the first time, and will result in a loop of reboots. Don't worry. This is normal. Just be patient and wait for it to complete - if you don't, you may break your installation.
Once it has finally settled down, settings you will likely want to change inside the applet include:
- Your wireless adapter's SSID, encryption mode and encryption key settings
- Overclocking Settings (Pre-set or Custom)
- Codec License Keys (enter them in the dialogue to enable use of the decoders)
- Services which are enabled
System Settings
Other than that, there is a plethora of system settings available under the System -> Settings dialogue which are worthy of mention. Likely settings you would change are:
- Video Output Resolution and Refresh Rate
- Video Calibration (allows you to move subtitles, compensate for overscan so that your edges aren't cut off and correct for pixel aspect ratio)
- Audio Output type
- Device Name
- Services (e.g. Airplay)
- Power Saving/Sleep settings
- Time-zone/Locale/Language
- Weather Location
- Add-ons
- Skins
Config.txt
On the first FAT partition of your SD card (by default, mounted first when plugged into a desktop machine), there is a configuration file called config.txt which holds many settings which may be tweaked. Adjusting settings related to HDMI modes may be necessary in some cases to get some adapters going. If you can see the screen, you will not likely have to deal with it at all, but if not, do give some settings a tweak. A full list of settings are included here.
Parameters worth being aware of include that which are related to overclocking - for example, if your Pi will not boot anymore, you may remove this from your config.txt and have it "return to life" without losing everything. Likewise, if you get some noise or sync difficulties, playing with config_hdmi_boost may increase the signal drive sufficiently to enable longer cables to be driven.
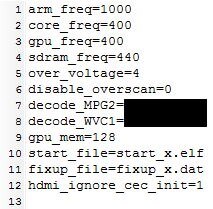
For example, after some hard pushing at custom overclocking, adding my licenses in, this is what my config.txt looks like:
I've made a pretty basic video walking through some of these menus (by no means complete) just to show my system in action, however, this was taken really early on (so I hadn't even got the video calibration completed at that time), and nor did I get around to putting in that powered hub yet. Rest assured, now I can see from edge to edge on the screen!
(Please bear with me - I'm on a slow connection, and the video may still be uploading when you view this post - ETA is ~25 minutes from post time)
Don't be afraid to explore and tweak some of these settings, and keep Raspbmc up to date for the latest bug fixes and new features.
Update: I've put up another video which covers Advanced Overclocking, Video Calibration and Airplay - which works. I've also managed to get Live TV streaming from my mumudvb as well (via IPTV Add-on, although not video).
Mix it Up
The best part of the whole Raspberry Pi experience is that it's not all or nothing. If you don't like Raspbmc, you can try OpenELEC, another XBMC based media centre built for the Raspberry Pi (amongst others). It's as simple as re-imaging the card by downloading an image off the Raspberry Pi Organization's website and writing it to your card using dd (under Linux) or W32DiskImager (under Windows). If you don't want to use it as a media centre, you can explore many other options which are opened to you in the embedded form factor.
In Closing
Raspbmc based media centres can come in a variety of different shapes and sizes. If you're interested in getting one going and want to read a few more tips, check out my RoadTest review of the kit offered by element14, or visit my personal blog for more random technology posts.
---
Thanks to element14 for providing the unit for review and for their support of the community.
