element14 Community
element14 Community
    Register Log In
  • Site
  • Search
  • Log In Register
  • About Us
  • Community Hub
    Community Hub
    • What's New on element14
    • Feedback and Support
    • Benefits of Membership
    • Personal Blogs
    • Members Area
    • Achievement Levels
  • Learn
    Learn
    • Ask an Expert
    • eBooks
    • element14 presents
    • Learning Center
    • Tech Spotlight
    • STEM Academy
    • Webinars, Training and Events
    • Learning Groups
  • Technologies
    Technologies
    • 3D Printing
    • FPGA
    • Industrial Automation
    • Internet of Things
    • Power & Energy
    • Sensors
    • Technology Groups
  • Challenges & Projects
    Challenges & Projects
    • Design Challenges
    • element14 presents Projects
    • Project14
    • Arduino Projects
    • Raspberry Pi Projects
    • Project Groups
  • Products
    Products
    • Arduino
    • Avnet Boards Community
    • Dev Tools
    • Manufacturers
    • Multicomp Pro
    • Product Groups
    • Raspberry Pi
    • RoadTests & Reviews
  • Store
    Store
    • Visit Your Store
    • Choose another store...
      • Europe
      •  Austria (German)
      •  Belgium (Dutch, French)
      •  Bulgaria (Bulgarian)
      •  Czech Republic (Czech)
      •  Denmark (Danish)
      •  Estonia (Estonian)
      •  Finland (Finnish)
      •  France (French)
      •  Germany (German)
      •  Hungary (Hungarian)
      •  Ireland
      •  Israel
      •  Italy (Italian)
      •  Latvia (Latvian)
      •  
      •  Lithuania (Lithuanian)
      •  Netherlands (Dutch)
      •  Norway (Norwegian)
      •  Poland (Polish)
      •  Portugal (Portuguese)
      •  Romania (Romanian)
      •  Russia (Russian)
      •  Slovakia (Slovak)
      •  Slovenia (Slovenian)
      •  Spain (Spanish)
      •  Sweden (Swedish)
      •  Switzerland(German, French)
      •  Turkey (Turkish)
      •  United Kingdom
      • Asia Pacific
      •  Australia
      •  China
      •  Hong Kong
      •  India
      •  Korea (Korean)
      •  Malaysia
      •  New Zealand
      •  Philippines
      •  Singapore
      •  Taiwan
      •  Thailand (Thai)
      • Americas
      •  Brazil (Portuguese)
      •  Canada
      •  Mexico (Spanish)
      •  United States
      Can't find the country/region you're looking for? Visit our export site or find a local distributor.
  • Translate
  • Profile
  • Settings
Raspberry Pi Projects
  • Products
  • Raspberry Pi
  • Raspberry Pi Projects
  • More
  • Cancel
Raspberry Pi Projects
Blog Getting Started with the MicroPython in PyCharm for Raspberry Pi Pico.
  • Blog
  • Documents
  • Events
  • Polls
  • Members
  • Mentions
  • Sub-Groups
  • Tags
  • More
  • Cancel
  • New
Join Raspberry Pi Projects to participate - click to join for free!
  • Share
  • More
  • Cancel
Group Actions
  • Group RSS
  • More
  • Cancel
Engagement
  • Author Author: maxpowerr
  • Date Created: 6 Jan 2023 5:48 PM Date Created
  • Views 25739 views
  • Likes 14 likes
  • Comments 11 comments
  • pycharm
  • raspberry pi pico
  • micropython
Related
Recommended

Getting Started with the MicroPython in PyCharm for Raspberry Pi Pico.

maxpowerr
maxpowerr
6 Jan 2023

This article is for those who have played enough with simple IDEs like Thonny and Mu Editor. Who needs an advanced Python development environment with cool features like code completion, debugging, error highlighting, and to help you write better Python code by providing tips and tricks. This is a more advanced IDE for professional developers or experienced programmers. A beginner can still use it, but it might be too complicated to get started. If you're already familiar with Python and used to using Pycharm, you might want to stick with it because it supports MicroPython.

In my opinion, this is the best IDE for writing Python code today. It offers an impressive array of out-of-the-box features that will help you reach your full potential without too much customization.

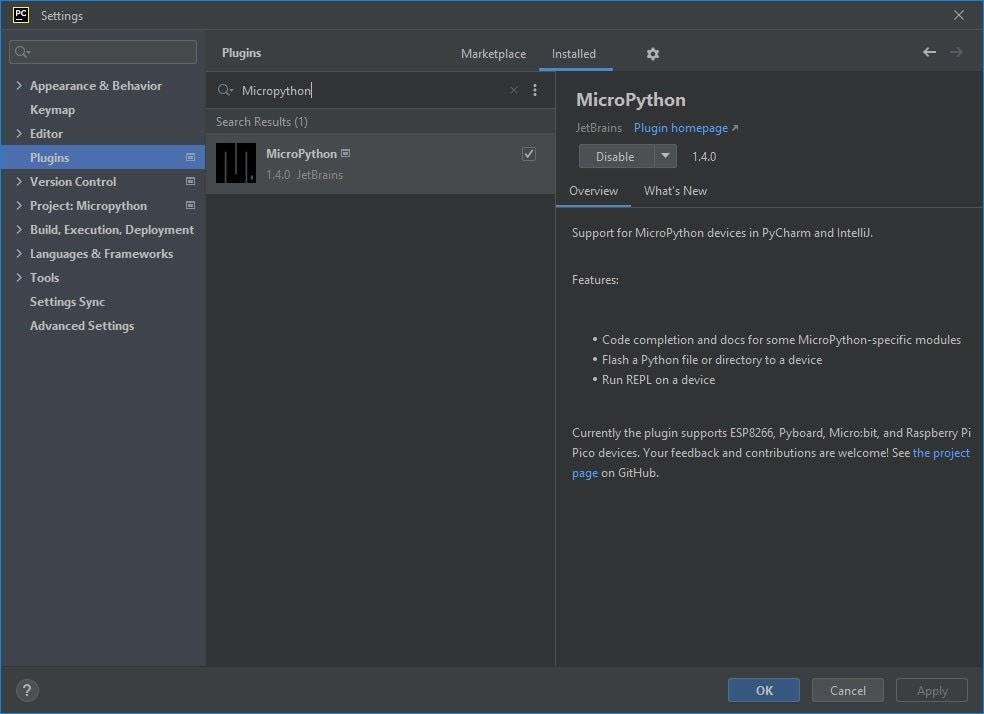
Install MicroPython Plugin for PyCharm

After installing PyCharm and opening, go to File>Settings>Plugins>Marketplace and search for MicroPython. Install it.

image

Start New Project

image

With it installed, we are ready to start our MicroPython project! Go to File > New Project and name your project whatever you want. If you expand the only extensible thing on this page, the project interpreter, you will see the automatic detection of the python installation earlier. You don't need to do anything other than click CREATE. You have made a project in Python!

In order to run our project on Raspberry Pi Pico, we need to enable MicroPython support. In PyCharm, go to File > Preferences > Languages and Platforms > MicroPython. Check the Enable MicroPython support box. Select Raspberry Pi Pico from the dropdown list for device type. And check the box Auto-detect device path so that the IDE will automatically determine which port the Raspberry Pi Pico is connected to. If the IDE could not determine which port the Raspberry Pi Pico is connected to, then you need to open the Device Manager and find the port yourself and enter it in the Device path line.

image

In settings, goto Project:YourName>Project Stucture. Right-click .idea and mark it as Excluded. The files in this .idea folder are specific settings just for PyCharm, and Excluding it prevents these files from being copied to your Raspberry Pi Pico, where they would be worthless and take up space.

image

Adding a file to your project

image

Check your project structure. If you don't see the file manager, click the 1:Project button below and to the left of File, or press alt+1. You should see that folder with the same name as your project. I have MicroPythonTest. Here we will create the file that we are going to send to our Raspberry Pi Pico.

Right-click on your folder name, goto New>Python File. Call it main.py

image

After creating the file in the editor, a yellow warning will appear on top, it says that certain packages are missing to work with the Raspberry Pi Pico. In order to install them, click on the link Missing required MicroPython Packeges on the right and PyCharm will install the missing packages itself.

image

At the bottom of the editor window, you'll see the package installation progress until a pop-up window says you're done.

image


Upload a program

image

For example, I decided to use a simple program to blink an LED.

In order to upload the main.py file to the Raspberry Pi Pico, you need to right-click the main.py file in the project browser on the left and go to the "Run Flash main.py" item.

image


Below you will see the process of connecting, downloading the file and rebooting the Raspberry Pi Pico.

image

And our program begins to work.

image


Example is more difficult

Blinking an LED was a fairly simple example. What if our project uses more than one file?

For this example, I decided to take the T-PicoC3 board. This board with RP2040 and ESP32-C 3 MCUs and 1.14 inch IPS display. I will review this board in my next post.

image

I created a project that contains three files:

- main.py is where the main program code is located.
- tft_config.py display configuration code.
- vga1_bold_16x32.py bitmaps for use with the text method.

This example prints the string "Hello!" in random colors in random places on the display.

image


It is possible to upload each file to the Raspberry Pi Pico individually, but this is not very convenient. Therefore, in order to download all the files at a time, you need to right-click in the file manager on the project folder on the right and select Mark Directory as > Sources Root from the drop-down menu.

image


After that, right-click on the project folder and select "Run Flash (name of your folder)".

image


At the bottom of the Flash Micropython window you will see the files being uploaded to the Raspberry Pi Pico.

image


And our program begins to work.

image


File Management

There are several commands to manage files on Raspberry Pi Pico. To do this, click on the MicroPuthon tab below and the MicroPython REPL window will open. At the command line, you need to enter import os and then enter os.listdir () and then a list of files loaded on the Raspberry Pi Pico will appear.

image


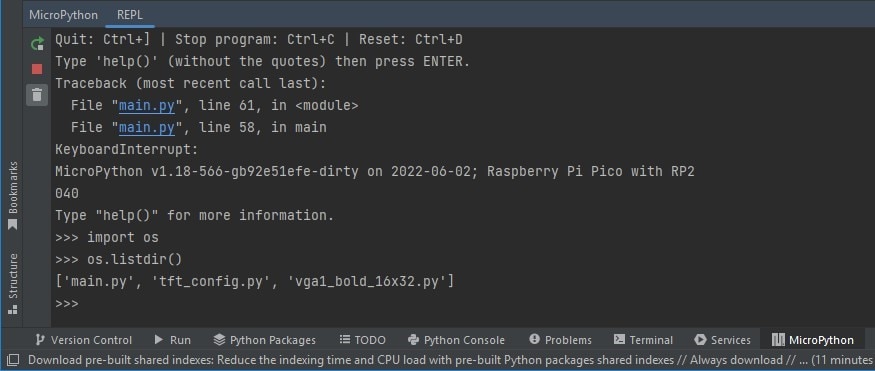
In order to remove one of the files, you need to enter the command os.remove('File name').

image

If you need to remove all files from the Raspberry Pi Pico, then select Tool > MicroPython > Remove All Files from MicroPython Device from the top menu.

image


P.S

This is basically the default setting for MicroPython in PyCharms, which I use myself. I hope this article will be useful to someone. Write your comments and questions.

  • Sign in to reply
  • maxpowerr
    maxpowerr over 2 years ago in reply to user4517

    Thank you. Visual studio code also has the ability to use MicroPython for Raspberry Pico. But in my opinion PyCharm is a bit more convenient.

    • Cancel
    • Vote Up 0 Vote Down
    • Sign in to reply
    • More
    • Cancel
  • maxpowerr
    maxpowerr over 2 years ago in reply to user4517

    I will try to do a couple more articles with work in the PyCharm environment. In addition, I want to try writing a plugin for PyCharm to make working with Raspberry Pico even more convenient.
    Intellisense works for all the files in your project, just add the library you need to the project.
    Here is the MQTT library on MicroPython (https://github.com/micropython/micropython-lib/tree/master/micropython/umqtt.simple).

    • Cancel
    • Vote Up 0 Vote Down
    • Sign in to reply
    • More
    • Cancel
  • user4517
    user4517 over 2 years ago

    BTW: I would love to see more articles based on using PyCharms environment. When I get comfortable with it I will want to be able to follow a couple of moderate then advanced tutorials.  I hope you will do that at some point.

    Just having the Intellisense makes programming for PI Pico so much easier. I hope the files include the Pico W. Do you know if there is a source for other libraries that can be added to PyCharms to support Intellisense? I'm interested in using MQTT for example.

    • Cancel
    • Vote Up 0 Vote Down
    • Sign in to reply
    • More
    • Cancel
  • user4517
    user4517 over 2 years ago

    Thanks. I have wanted to have intellisense but had issues with Visual Studio. I was not aware that PyCharm also included a pretty good REPL. All on windows, which is even better. I haven't tried debugging but hope that is possible. If not this is better than nothing 100

    Thanks again.

    • Cancel
    • Vote Up 0 Vote Down
    • Sign in to reply
    • More
    • Cancel
  • shabaz
    shabaz over 2 years ago in reply to maxpowerr

    Totally agree. I like that it can hunt out usage of functions and definitions easily, and check a lot of code as I go.

    The "Structure" window helps me a lot with large chunks of code. 

    The whole suite of Jetbrains IDEs are great from what little I've seen. I like that they are all similar, so it is possible to code with C, or Python, or Android, or whatever, with the same functionality tailored for the language. So for instance, with the C version (CLion), I can use the Structure window to see C variables and functions:

    image

    And if I run PyCharm, the same thing is there, now for Python functions and variables:

    image

    • Cancel
    • Vote Up 0 Vote Down
    • Sign in to reply
    • More
    • Cancel
>
element14 Community

element14 is the first online community specifically for engineers. Connect with your peers and get expert answers to your questions.

  • Members
  • Learn
  • Technologies
  • Challenges & Projects
  • Products
  • Store
  • About Us
  • Feedback & Support
  • FAQs
  • Terms of Use
  • Privacy Policy
  • Legal and Copyright Notices
  • Sitemap
  • Cookies

An Avnet Company © 2025 Premier Farnell Limited. All Rights Reserved.

Premier Farnell Ltd, registered in England and Wales (no 00876412), registered office: Farnell House, Forge Lane, Leeds LS12 2NE.

ICP 备案号 10220084.

Follow element14

  • X
  • Facebook
  • linkedin
  • YouTube