 | Raspberry Pi Projects - How does your IoT garden grow? Join Les Pounder as he works on his IoT Garden! Watch him integrate technology into his garden and maintain the health of his favorite plants. Check out our other Raspberry Pi Projects on the projects homepage | Previous Part |
| All Raspberry Pi Projects | ||
| This is the Final Part |
The final project!
In previous projects we have used sensors to detect soil moisture and relay that data to us via email, forcing us to go outside and water the garden. Then we developed a self watering system based on the same sensor, which was connected to a pumping system that fed water to our garden all controlled by the humble Raspberry Pi Zero W.
In this final project we shall create another device that will enable us to water the garden from our desk / sofa. This uses the Google AIY kit that came as part of a special issue of The MagPi magazine but it is now being offered for sale via other retailers. Using this kit we build an interface that enables our voice to trigger watering the garden, all we need to do is press a button and speak the words “water the garden”. This message is sent over the network using MQTT (Message Query Telemetry Transport) which uses a publisher - broker - subscriber model to send messages to devices that are listening on a particular “topic” in this case a Raspberry Pi Zero W will be listening for these messages, and when it receives them it will trigger a relay to life, connecting a peristaltic pump to 12V power supply and pumping water from a water butt and to our thirsty garden.
MQTT?
In this project we use MQTT to relay messages from one device to another. Ideally we need three devices on the network
- A Publisher: The Raspberry Pi 3 AIY Kit which sends the trigger phrase across the network
- A Broker: Any computer running the MQTT broker software. In this project we use the Pi Zero W.
- A Subscriber: The Pi Zero W, which is looking for the trigger phrase and acts upon it.
But for this project the Pi Zero W that is watering our garden is both a broker and a subscriber. This is acceptable for our small network but for larger projects, with multiple publishers / subscribers it would be prudent to use a machine as a broker.
MQTT works by the publisher and subscriber both being on the same topic, similar to a channel. The publisher sends a message using a certain topic, and the subscriber receives it. A real world example of this model is YouTube. Content is created by Publishers, who upload it to their channel (Topic). YouTube then acts as a Broker, offering the content to Subscribers who will choose what Channels (Topics) to watch.
- For this project you will need
- A Google AIY kit
- A Raspberry Pi 3
- Pi Zero W
- A transparent waterproof box
- USB battery
- Jumper jerky (Dupont connections)
- Relay Board
- 12V Peristaltic Pump
- Plastic hose to match diameter of pump
- 12V power supply (for outdoor use)
- Waterproof box to store everything, also for 12V power supply!
- Water Butt / Storage
All of the code for this project can be downloaded from my Github repo.
Building the hardware
Raspberry Pi 3 AIY Kit
The kit comes with a round arcade button, but I had a lot of triangular buttons that I wanted to test.
The hardware build is split into two, as we have two machines to work on. First we shall start the build on the Raspberry Pi 3 AIY Kit.
Building and configuring the Google AIY kit is straightforward, and for the latest guidance head over to https://aiyprojects.withgoogle.com/ where you can also learn how to check, debug and configure the kit.
To assemble the kit refer to https://aiyprojects.withgoogle.com/voice/#assembly-guide
For debug and testing the kit https://aiyprojects.withgoogle.com/voice/#users-guide
In order to create this project we need to turn on billing for our project. But don’t worry as we get 60 minutes of free use per month. To turn on billing follow the guidance at https://aiyprojects.withgoogle.com/voice/#makers-guide-3-1--change-to-the-cloud-speech-api
For this part of the project, expect to dedicate around 90 minutes to build and test the kit.
Pi Zero W Controller
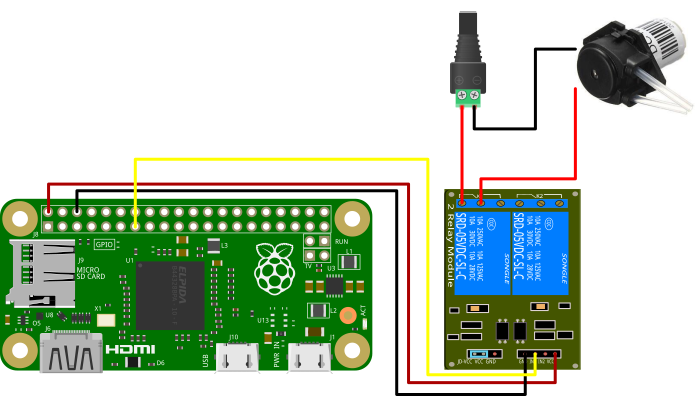
The other part of the project is our trust Pi Zero W connected to a relay, used to control the 12V circuit for our peristaltic pump which will pump water from a water butt to our plants using a rotating motion to “squeeze” the water through the connected plastic hose. The relay is controlled from the GPIO of our Pi. In this case we connect the relay to 5V, GND and the Input of the relay to GPIO27. This is the same as in Project 2, but we have changed the GPIO used to control the relay as GPIO17 was a little twitchy in our tests.
Relay Connection
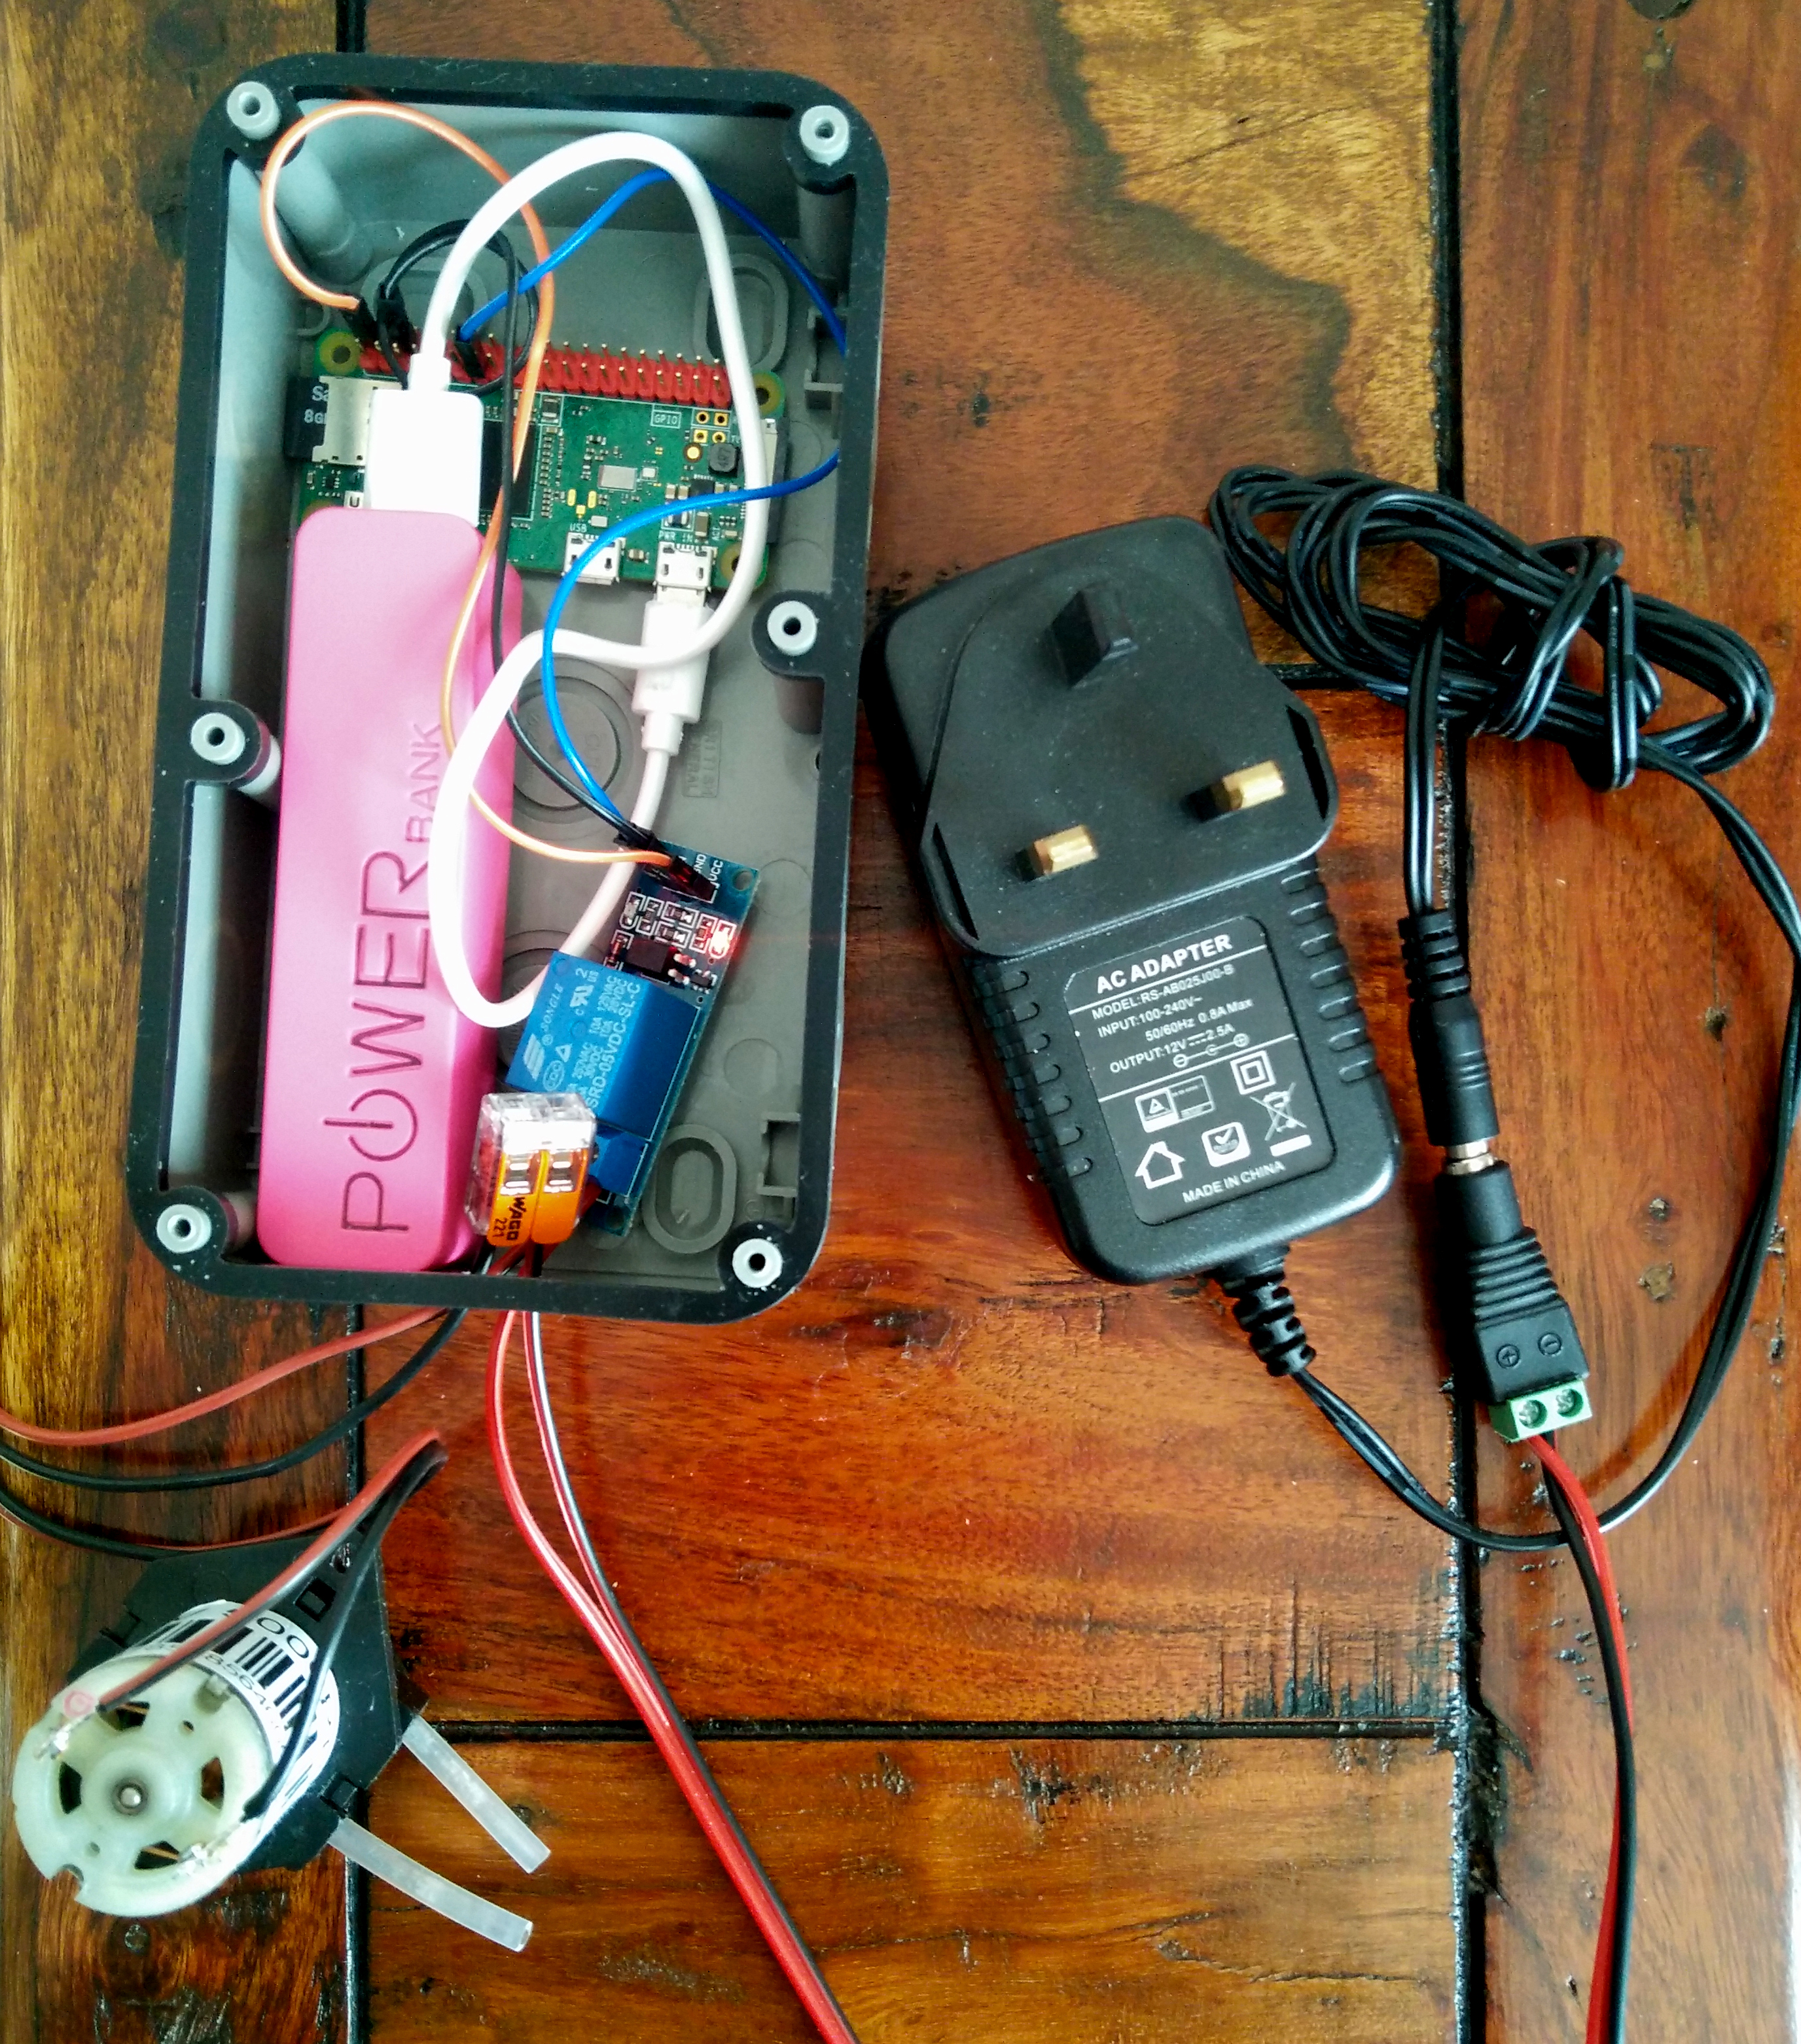
Connect the relay to GPIO27 using the female to female jumper jerky connectors as per the diagram. You will also need to provide the 12V power supply to the peristaltic pump. The + connection from the 12V supply goes to the relay, via the normally open connection, the icon looks like an open switch.

Software Build
Connect up your keyboard, mouse, HDMI, micro SD card, and finally power up the Pi Zero W to the desktop. You will need to setup WiFi on your Pi Zero W, and make a note of the IP address for future use in a Terminal type the following.
hostname -i
Still in the terminal and now let's install the MQTT software that will turn our Pi Zero W into a broker, an MQTT term for a device that manages the messages passed from the Publisher (our Pi3 AIY Kit) and the Subscriber (also our Pi Zero W).
sudo apt update sudo apt install mosquitto
Now let's start the MQTT broker service on the Pi Zero W. We need to do this so that it can make the connection between our Pi3 and Pi Zero W. In the Terminal type
sudo service mosquitto start
With that running we can now perform the final install before starting the code. This will install the MQTT library for Python 3. In the Terminal type
sudo pip3 install paho-mqtt
So that’s all the configuration completed, lets open the Python 3 editor from the Programming menu and start writing Python code. For this you will need to create a new file and save it as Garden-Watering-Device.py.
We start the code for our Pi Zero W by importing three libraries. From GPIO Zero we import the DigitalOutputDevice class, used to create a connection from our Pi Zero W to the relay. We then import time, used to control how long we water the garden for. Lastly we import the MQTT client.
from gpiozero import DigitalOutputDevice
import time
import paho.mqtt.client as mqtt
Next we create an object used to connect our relay to the GPIO via GPIO pin 27.
relay = DigitalOutputDevice(27)
Our next step is to create a function which will contain the code necessary to connect our Pi Zero W to the MQTT network we have created. This function will connect and provide a code which will identify if we have connected to the network correctly. Then the Pi Zero W is configured to be a subscriber listening on the topic “garden”.
def on_connect(client, userdata, flags, rc):
        print("Connected with result code "+str(rc))
        client.subscribe("garden")
Another function but this time the function will react to messages over the MQTT network. The first step of the function is to create a variable called “message” and this will store the payload, converted to a string. Then using string slicing we remove the unwanted data from the message, which goes from position 2 in the string, to the second to last position. Then we print the message for debug purposes.
def on_message(client, userdata, msg):
        message = str(msg.payload)
        message = message[2:(len(message)-1)]
        print(message)
Still inside the function we now create a conditional test that will check the contents of the “message” variable against a hard coded value, in this case “water garden”. If the result of the test is True, so the two match, then we print to the shell that the watering has started. Then the relay is turned on, a pause of 2 seconds for testing purposes, then the relay is turned off. The code then waits for 10 seconds before ending the function.
       if(message=="water garden"):
                print("Watering Garden")
                relay.on()
                time.sleep(2)
                relay.off()
                time.sleep(10)
Outside of the function we now move on to the code that will call the functions. First we create an object, “client” and in there we store the MQTT client function. Then we connect to the network using our on_connect function., then we call the on_message function to handle receiving messages. We then connect to the MQTT network, specifying the IP address of the broker, which is this Pi Zero W, so we can use 127.0.0.1. Lastly we instruct MQTT to constantly loop and check for messages.
client = mqtt.Client()
client.on_connect = on_connect
client.on_message = on_message
client.connect("BROKER IP ADDRESS", 1883, 60)
client.loop_forever()
That's all of the code for this part of the project. Save the code and click on Run to test it. If all works correctly now is the time to move on and the next step is to make the code exectubale and enable it to run when the Pi Zero W boots.
So how can we make it executable? In order to do this there are two steps to take. First we need to add a line to the top of our Python code which instructs Python where to find the interpreter.
#!/usr/bin/python3
With that complete, we now need to go back to the terminal, and we need to issue a command to make the Python file executable from the terminal. The command is.
sudo chmod +x Garden-Watering-Device.py
Now in the same terminal, launch the project by typing
./Garden-Watering-Device.py
Now the project will run in the terminal, Waiting for the correct message to be sent over MQTT.
So how can we have the code run on boot? Well this is quite easy really. In the terminal we need to issue a command to edit our crontab, a file that contains a list of applications to be run at a specific time/date/occasion. To edit the crontab, issue the following command in the terminal.
sudo crontab -e
If this is the first time that you have used the crontab, then it will ask you to select a text editor, for this tutorial we used nano, but everyone has their favourite editor!
With crontab open, navigate to the bottom of the file and add the following line.
@reboot /home/pi/Garden-Watering-Device.py
Then press Ctrl + X to exit, you will be asked to save the file, select Yes.
Power down the Pi Zero W, place it in a waterproof container along with a USB battery power source and the 12V circuit for our pump. Power up the Pi Zero W, and the first part of this project is complete. Time to move on to the Raspberry Pi 3 AIY Kit.
Raspberry Pi 3 AIY Kit
Now connect up your keyboard, mouse, HDMI, micro SD card, and finally power up the Raspberry Pi 3 AIY kit to the desktop.
Before we start any coding we need to install the Python3 MQTT library. So open a Terminal and type.
sudo pip3 install paho-mqtt
After a few moments the software will be installed. Close the Terminal window.
Starting the code for this part of the process and luckily for us there is some pre-written code for this project. To use the code click on the Dev Terminal icon on the desktop. This will launch a special version of the Terminal, with all of the software setup completed enabling us to use the AIY software. With the terminal open type
cd src/
Inside the src directory there are a number of files, but in particular we are interested in cloudspeech_demo.py. Before any changes are made, make a backup of the file just in case!
cp cloudspeech_demo.py cloudspeech_demo_backup.py
So now that we have a backup of the code, we need to edit the original file. For this we used IDLE3 to edit the file, and to open it type.
Idle3 cloudspeech_demo.py
Inside the file we need to make a few additions. Firstly we need to add two extra libraries. Time to control the pace of the project, and the MQTT library.
Add these to the imports.
import time
import paho.mqtt.client as mqtt
Just after the imports we need to add a function that will handle connecting to our MQTT network. This will return a result code, 0 means we are connected with no issue.
def on_connect(client, userdata, flags, rc):
        print("Connected with result code "+str(rc))
The next section to edit is the main() function, this is used to detect voice input using a recognizer function. This will listen for audio, record and then translate using the cloud. Lets add another recognizer phrase that will listen for the phrase “water the garden”.
recognizer.expect_phrase('water the garden')
Still inside the main function, we now move into a series of if..elif conditional statements. You can see the final elif is a test to see if the word “blink” has been recognised. After this elif, create a new elif test, this time it will check to see if the phrase “water the garden” has been spoken.
elif 'water the garden' in text:
So when this phrase is recognised we print to the Python shell that the watering has started, this is a debug step that can be left out. We then create an object called “client” that stores a reference to the MQTT library. We then use that object to connect to the network using the function we created earlier.
               print('Watering Garden')
                client = mqtt.Client()
                client.on_connect = on_connect
Next we connect to the broker, in this case our Pi Zero W will be the broker so we need to know its IP address. We also connect to the default MQTT port, 1883, and set a 60 second wait until timeout. To the MQTT network we then publish on the “garden” topic the phrase “water garden”, which our subscriber, the Pi Zero W is listening for.
               client.connect("BROKER IP ADDRESS", 1883, 60)
               client.publish("garden","water garden")
Still inside the elif conditional test, we add a few lines of code that will turn on the LED inside the pushbutton that comes in the AIY kit. This will be a response to running the code and watering the garden. After a second we then turn off the LED ending the code for the conditional test, and the code for this part of the project.
               led.set_state(aiy.voicehat.LED.ON)
               time.sleep(1)
               led.set_state(aiy.voicehat.LED.OFF)
               time.sleep(1)
Save the code, and exit from IDLE3. We need to run the code from the dev terminal so type the following.
./cloudspeech_demo.py
When ready press the button and say the magic words “water the garden”. You should now see the text appear on the screen, and the LED flash once. The message “water garden” will be sent over MQTT to our Pi Zero W, and it will start to water the garden.


