


Interfacing Nine DS18B20 Temperature sensors with Raspberry Pi and Displaying sensor data Using Python
I have gone through some tutorials for interfacing the DS18B20, In those, They have given the explanation of how to interface the DS18B20 using Arduino Platforms Only. The least countable people explained how to interface with DS18B20 With the Raspberry using Python, in that they have interfaced only One single DS18B20. Here in this project, I am explaining How To Interface Nine(9) DS18B20 Temperature sensors with Raspberry pi 4 B.
For one of the projects, I needed to interface with 9 Waterproof Temperature sensors and Relay and Proximity sensors. Using python Programming to read the temperature From the DS18B20 was not easy initially. After a lot of Workout In the final, I read multiple DS18B20 temperatures Data. in this project I have used Raspberry Pi 4 B and Raspbian os Bullseye.

DS18B20

Pinout Of DS18B20

DS18B20 Sensor Specifications
- Programmable Digital Temperature Sensor
- Communicates using the 1-Wire method
- Operating voltage: 3V to 5V
- Temperature Range: -55°C to +125°C
- Accuracy: ±0.5°C
- Output Resolution: 9-bit to 12-bit (programmable
- A unique 64-bit address enables multiplexing
- Conversion time: 750ms at 12-bit
- Programmable alarm options
- Available as To-92, SOP, and even as a waterproof sensor
Where to use DS18B20 Sensor
The DS18B20 is a 1-wire programmable Temperature sensor from maxim integrated. It is widely used to measure temperature in hard environments like in chemical solutions, mines or soil, etc. The constriction of the sensor is rugged and also can be purchased with a waterproof option making the mounting process easy. It can measure a wide range of temperatures from -55°C to +125° with a decent accuracy of ±5°C. Each sensor has a unique address and requires only one pin of the MCU to transfer data so it is a very good choice for measuring the temperature at multiple points without compromising many of your digital pins on the microcontroller.
How to use the DS18B20 Sensor?
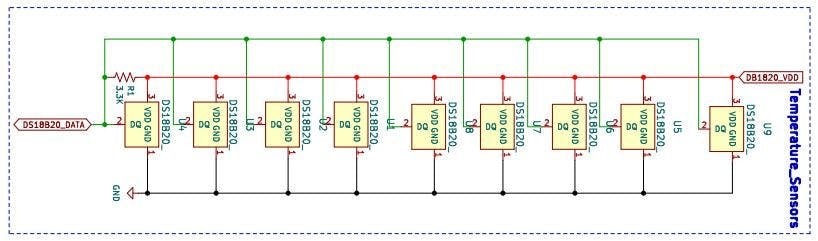
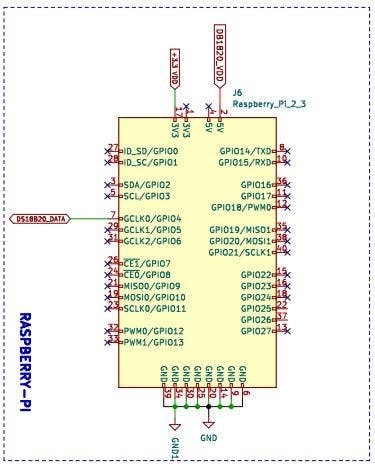
The sensor works with the method of 1-Wire communication. It requires only the data pin connected to the microcontroller with a pull-up resistor and the other two pins are used for power as shown below.

The pull-up resistor is used to keep the line in a high state when the bus is not in use. The temperature value measured by the sensor will be stored in a 2-byte register inside the sensor. This data can be read using the 1- wire method by sending in a sequence of data. There are two types of commands that are to be sent to read the values, one is a ROM command and the other is a function command.
Configuring The Raspberry Pi to communicate with DS18B20 Using 1- wire Communication
In the raspberry pi, We need to enable the Interfaces after the fresh installation of Raspbian OS.
To enable the one-wire interface use
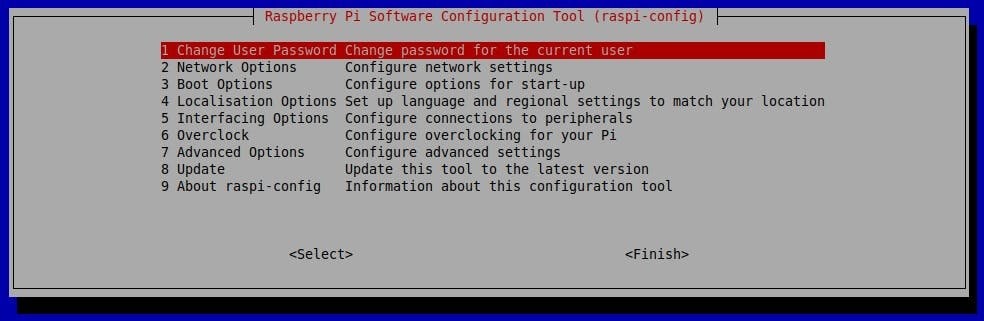
sudo raspi-config
Scroll to the interfacing option and click on it and then enable the One-wire Interface.
To add support for OneWire, we first need to open up the boot config file, and this can be done by running the following command. to do that I have used a nano text editor, you can use Terminal for that by entering the below command
sudo nano /boot/config.txtNext At the bottom of this file enter the following.
dtoverlay=w1-gpioOnce done save and exit by pressing CTRL + X any enter Yes(Y). . Now reboot the Pi by running the following command.
sudo rebootOnce the Raspberry Pi has booted back up, we need to run modprobe so we can load the correct modules.
sudo modprobe w1-gpioThen
sudo modprobe w1-thermNow change into the devices directory and use the ls command to see the folders and files in the directory.
cd /sys/bus/w1/devices
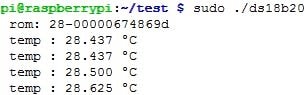
lsList the file and a 28-xxxxxxxxxxxx device directory (e.g. here is 28-00000674869d) will be found. This is the ROM of DS18B20. If more than one DS18B20 is connected, you will find a certain directory of more than one.
cd 28-00000674869dNow run the following cat command.
cat w1_slaveThe above command should output data but as you will notice it is not very user-friendly.
The first line should have a YES or NO at the end of it. If it is YES, then a second line with the temperature should appear. This line will look similar to something like t=12323, and you will need to do a bit of math to make this a usable temperature that we can understand easily. For example, in Celsius, you simply divide by 1000.

The YES in the first line indicates CRC check success (Data Valid ). The number following t= is the temperature, 28750 stands for 28.7 (C).
Graphical Representation of Interfacing of Multiple DS18B20 Temperature sensor with Raspberry Pi.

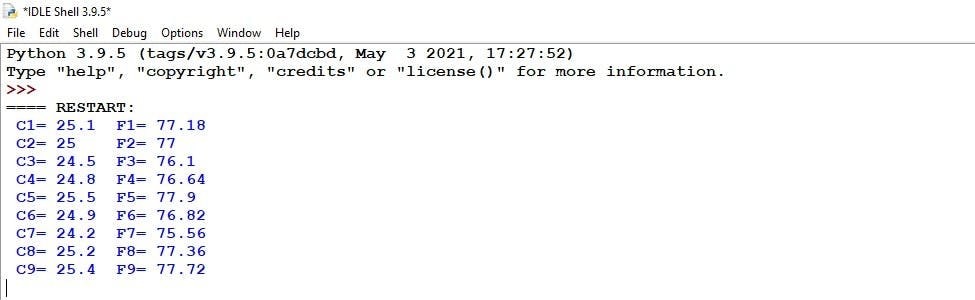
Output Of Nine DS18B20 Temperature Sensors
The output of the Project contains 9 DS18B20 Temperature Data in Celsius and Fahrenheit
CODE
import os
import glob
import time

# These  lines mount the device:
os.system('modprobe w1-gpio')
os.system('modprobe w1-therm')

base_dir = '/sys/bus/w1/devices/'
# Get all the filenames begin with 28 in the path base_dir.
device_folder = glob.glob(base_dir + '28*')[0]
device_folder1 = glob.glob(base_dir + '28*')[1]
device_folder2 = glob.glob(base_dir + '28*')[2]
device_folder3 = glob.glob(base_dir + '28*')[3]
device_folder4 = glob.glob(base_dir + '28*')[4]
device_folder5 = glob.glob(base_dir + '28*')[5]
device_folder6 = glob.glob(base_dir + '28*')[6]
device_folder7 = glob.glob(base_dir + '28*')[7]
device_folder8 = glob.glob(base_dir + '28*')[8]


device_file = device_folder + '/w1_slave'
device_file1 = device_folder1 + '/w1_slave'
device_file2 = device_folder2 + '/w1_slave'
device_file3 = device_folder3 + '/w1_slave'
device_file4 = device_folder4 + '/w1_slave'
device_file5 = device_folder5 + '/w1_slave'
device_file6 = device_folder6 + '/w1_slave'
device_file7 = device_folder7 + '/w1_slave'
device_file8 = device_folder8 + '/w1_slave'


def read_rom():
    name_file = device_folder+'/name'
    f = open(name_file,'r')
    #print('f:',f)
    return f.readline()


def read_rom1():
    name_file1 = device_folder1+'/name'
    g = open(name_file1,'r')
    #print('g:',g)
    return g.readline()

def read_rom2():
    name_file2 = device_folder2+'/name'
    h = open(name_file2,'r')
    #print('h:',h)
    return h.readline()

def read_rom3():
    name_file3 = device_folder3+'/name'
    i = open(name_file3,'r')
    #print('i:',i)
    return i.readline()

def read_rom4():
    name_file4 = device_folder4+'/name'
    j = open(name_file4,'r')
    #print('j:',j)
    return j.readline()

def read_rom5():
    name_file5 = device_folder5+'/name'
    k = open(name_file5,'r')
    #print('k:',k)
    return k.readline()

def read_rom6():
    name_file6 = device_folder6+'/name'
    l = open(name_file6,'r')
    #print('l:',l)
    return l.readline()

def read_rom7():
    name_file7 = device_folder7+'/name'
    m = open(name_file7,'r')
    #print('m:',m)
    return m.readline()

def read_rom8():
    name_file8 = device_folder8+'/name'
    n = open(name_file8,'r')
    #print('n:',n)
    return n.readline()

#reading temperature from folder


def read_temp_raw():
    f = open(device_file, 'r')
    lines = f.readlines()
    #print('raw_f',lines)
    f.close()
    return lines

def read_temp_raw1():
    g = open(device_file1, 'r')
    lines1 = g.readlines()
    #print('raw_g',lines1)
    g.close()
    return lines1

def read_temp_raw2():
    h = open(device_file2, 'r')
    lines2 = h.readlines()
    #print('raw_h',lines2)
    h.close()
    return lines2

def read_temp_raw3():
    i = open(device_file3, 'r')
    lines3 = i.readlines()
    #print('raw_i',lines3)
    i.close()
    return lines3

def read_temp_raw4():
    j = open(device_file4, 'r')
    lines4 = j.readlines()
    #print('raw_j',lines4)
    j.close()
    return lines4

def read_temp_raw5():
    k = open(device_file5, 'r')
    lines5 = k.readlines()
    #print('raw_k',lines5)
    k.close()
    return lines5


def read_temp_raw6():
    l = open(device_file6, 'r')
    lines6 = l.readlines()
    #print('raw_l',lines6)
    l.close()
    return lines6


def read_temp_raw7():
    m = open(device_file7, 'r')
    lines7 = m.readlines()
    #print('raw_m',lines7)
    m.close()
    return lines7

def read_temp_raw8():
    n = open(device_file8, 'r')
    lines8 = n.readlines()
    #print('raw_n',lines8)
    n.close()
    return lines8

#converting the temperature data to human readable form

def read_temp():
    lines = read_temp_raw()
    while lines[0].strip()[-3:] != 'YES':
        lines = read_temp_raw()
        equals_pos = lines[1].find('t=')
        temp_string = lines[1][equals_pos+2:]
        temp_c = float(temp_string) / 1000.0
        temp_f = temp_c * 9.0 / 5.0 + 32.0
        return temp_c, temp_f

def read_temp1():
    lines1 = read_temp_raw1()
    while lines1[1].strip()[-3:] != 'YES':
        lines1 = read_temp_raw1()
        equals_pos1 = lines1[1].find('t=')
        temp_string1 = lines1[1][equals_pos1 +2:]
        temp_c1 = float(temp_string1) / 1000.0
        temp_f1 = temp_c1 * 9.0 / 5.0 + 32.0
        return temp_c1, temp_f1

def read_temp2():
    lines2 = read_temp_raw2()
    while lines2[2].strip()[-3:] != 'YES':
        lines2 = read_temp_raw2()
        equals_pos2 = lines2[1].find('t=')
        temp_string2 = lines2[1][equals_pos2 +2:]
        temp_c2 = float(temp_string2) / 1000.0
        temp_f2 = temp_c2 * 9.0 / 5.0 + 32.0
        return temp_c2, temp_f2

def read_temp3():
    lines3 = read_temp_raw3()
    while lines3[3].strip()[-3:] != 'YES':
        lines3 = read_temp_raw3()
        equals_pos3 = lines3[1].find('t=')
        temp_string3 = lines3[1][equals_pos3 +2:]
        temp_c3 = float(temp_string3) / 1000.0
        temp_f3 = temp_c3 * 9.0 / 5.0 + 32.0
        return temp_c3, temp_f3

def read_temp4():
    lines4 = read_temp_raw4()
    while lines4[4].strip()[-3:] != 'YES':
        lines4 = read_temp_raw4()
        equals_pos4 = lines4[1].find('t=')
        temp_string4 = lines4[1][equals_pos4 +2:]
        temp_c4 = float(temp_string4) / 1000.0
        temp_f4 = temp_c4 * 9.0 / 5.0 + 32.0
        return temp_c4, temp_f4

def read_temp5():
    lines5 = read_temp_raw5()
    while lines5[5].strip()[-3:] != 'YES':
        lines5 = read_temp_raw5()
        equals_pos5 = lines5[1].find('t=')
        temp_string5 = lines5[1][equals_pos5 +2:]
        temp_c5 = float(temp_string5) / 1000.0
        temp_f5 = temp_c5 * 9.0 / 5.0 + 32.0
        return temp_c5, temp_f5

def read_temp6():
    lines6 = read_temp_raw6()
    while lines6[6].strip()[-3:] != 'YES':
        lines6 = read_temp_raw6()
        equals_pos6 = lines6[1].find('t=')
        temp_string6 = lines6[1][equals_pos6 +2:]
        temp_c6 = float(temp_string6) / 1000.0
        temp_f6 = temp_c6 * 9.0 / 5.0 + 32.0
        return temp_c6, temp_f6

def read_temp7():
    lines7 = read_temp_raw7()
    while lines7[7].strip()[-3:] != 'YES':
        lines7 = read_temp_raw7()
        equals_pos7 = lines7[1].find('t=')
        temp_string7 = lines7[1][equals_pos7 +2:]
        temp_c7 = float(temp_string7) / 1000.0
        temp_f7 = temp_c7 * 9.0 / 5.0 + 32.0
        return temp_c7, temp_f7

def read_temp8():
    lines8 = read_temp_raw8()
    while lines8[8].strip()[-3:] != 'YES':
        lines8 = read_temp_raw8()
        equals_pos8 = lines8[1].find('t=')
        temp_string8 = lines8[1][equals_pos8 +2:]
        temp_c8 = float(temp_string8) / 1000.0
        temp_f8 = temp_c8 * 9.0 / 5.0 + 32.0
        return temp_c8, temp_f8

while True:
    #READING TEMPERATURE DATA AND PRINTINTING THE VALUES OF INDIVIDUAL SENSOR
    print(' C1=%3.3f  F1=%3.3f'% read_temp())
    print(' C2=%3.3f  F2=%3.3f'% read_temp1())
    print(' C3=%3.3f  F3=%3.3f'% read_temp2())
    print(' C4=%3.3f  F4=%3.3f'% read_temp3())
    print(' C5=%3.3f  F5=%3.3f'% read_temp4())
    print(' C6=%3.3f  F6=%3.3f'% read_temp5())
    print(' C7=%3.3f  F7=%3.3f'% read_temp6())
    print(' C8=%3.3f  F8=%3.3f'% read_temp7())
    print(' C9=%3.3f  F9=%3.3f'% read_temp8())
    time.sleep(1)
