element14 Community
element14 Community
    Register Log In
  • Site
  • Search
  • Log In Register
  • Members
    Members
    • Benefits of Membership
    • Achievement Levels
    • Members Area
    • Personal Blogs
    • Feedback and Support
    • What's New on element14
  • Learn
    Learn
    • Learning Center
    • eBooks
    • STEM Academy
    • Webinars, Training and Events
    • Learning Groups
  • Technologies
    Technologies
    • 3D Printing
    • FPGA
    • Industrial Automation
    • Internet of Things
    • Power & Energy
    • Sensors
    • Technology Groups
  • Challenges & Projects
    Challenges & Projects
    • Design Challenges
    • element14 presents
    • Project14
    • Arduino Projects
    • Raspberry Pi Projects
    • Project Groups
  • Products
    Products
    • Arduino
    • Dev Tools
    • Manufacturers
    • Raspberry Pi
    • RoadTests & Reviews
    • Avnet Boards Community
    • Product Groups
  • Store
    Store
    • Visit Your Store
    • Choose Another Store
      • Europe
      •  Austria (German)
      •  Belgium (Dutch, French)
      •  Bulgaria (Bulgarian)
      •  Czech Republic (Czech)
      •  Denmark (Danish)
      •  Estonia (Estonian)
      •  Finland (Finnish)
      •  France (French)
      •  Germany (German)
      •  Hungary (Hungarian)
      •  Ireland
      •  Israel
      •  Italy (Italian)
      •  Latvia (Latvian)
      •  
      •  Lithuania (Lithuanian)
      •  Netherlands (Dutch)
      •  Norway (Norwegian)
      •  Poland (Polish)
      •  Portugal (Portuguese)
      •  Romania (Romanian)
      •  Russia (Russian)
      •  Slovakia (Slovak)
      •  Slovenia (Slovenian)
      •  Spain (Spanish)
      •  Sweden (Swedish)
      •  Switzerland(German, French)
      •  Turkey (Turkish)
      •  United Kingdom
      • Asia Pacific
      •  Australia
      •  China
      •  Hong Kong
      •  India
      •  Korea (Korean)
      •  Malaysia
      •  New Zealand
      •  Philippines
      •  Singapore
      •  Taiwan
      •  Thailand (Thai)
      • Americas
      •  Brazil (Portuguese)
      •  Canada
      •  Mexico (Spanish)
      •  United States
      Can't find the country/region you're looking for? Visit our export site or find a local distributor.
  • Translate
  • Profile
Raspberry Pi Projects
  • Products
  • Raspberry Pi
  • Raspberry Pi Projects
  • More
  • Cancel
Raspberry Pi Projects
Blog Rapiro: Putting it together and getting it to work
  • Blog
  • Documents
  • Events
  • Members
  • Mentions
  • Sub-Groups
  • Tags
  • More
  • Cancel
  • New
Raspberry Pi Projects requires membership for participation - click to join
Blog Post Actions
  • Subscribe by email
  • More
  • Cancel
  • Share
  • Subscribe by email
  • More
  • Cancel
Group Actions
  • Group RSS
  • More
  • Cancel
Engagement
  • Author Author: fvan
  • Date Created: 16 Feb 2014 4:02 PM Date Created
  • Views 2376 views
  • Likes 5 likes
  • Comments 126 comments
  • rpibeginner
  • robot
  • rapiro
  • raspberrypi
  • camera
  • raspberry_pi_projects
  • arduino
Related
Recommended

Rapiro: Putting it together and getting it to work

fvan
fvan
16 Feb 2014

  • Kit
  • Assembly
    • Rapiro
    • Raspberry Pi
  • Testing
    • Arduino Sketch
    • Commands via Pi
  • Thank you


Thanks to element14 and the Pi NoIR and Catch Santa Challenge, my daughter and I won a Rapiro kit with Raspberry Pi and Pi Camera.


In this post, I will describe my experiences in building and getting Rapiro up and running.


Kit


The kit came in a large white box, accompanied by a Raspberry Pi and Pi Camera.


image

The Rapiro kit comes in a big box which can be used later on to carry the assembled Rapiro.


image

All parts are neatly arranged in individual compartments.


Unfortunately, no instructions are provided with the kit.


After some searches on Rapiro's Kickstarter page and website, I was able to gather different pieces of information:

  • Photo gallery on how to assemble Rapiro
  • Arduino sketch for Rapiro
  • Power supply recommendations
  • Instructions on adding a Raspberry Pi and Pi Camera: here and here


Since Kickstarter rewards only started shipping about two to three week ago, there is not a lot of user feedback yet. Also, as I'm not a backer on Kickstarter, I am unable to post comments in order to ask questions etc ...


I've read that a discussion forum will be open soon, but until then, I'm on my own.


Assembly


Rapiro


Using the photo gallery, assembling Rapiro was easy. The photo instructions are very clear and make it very easy to compare with.


imageimage

Labeling the servos and connecting them to the control board to set the initial position of the servo.


imageimage

Passing the servo cables through the foreseen slots to the control board.


imageimage

Connecting the RGB LEDs and attaching the final piece of the kit.


The build took approximately 2 hours and did not require any soldering, only a screwdriver and some common sense.


Raspberry Pi


It's possible to expand Rapiro's capabilities by adding different components, such as:

  • Raspberry Pi and Pi Camera
  • Speakers
  • PSD distance sensor


These components do not come with the Rapiro Kit by default and Rapiro is able to function without them.


I installed the Raspberry Pi and Pi Camera as those were kindly provided by element14.


It's important to prepare your SD card in advance, as once the head is closed, there is no access to the SD card slot or HDMI port.

I installed the latest Raspbian, enabled camera support, wifi and ssh, in order to be able to control Rapiro remotely.


imageimage

Pi and camera are installed in Rapiro's head. Pi is connected and powered via GPIO pins.


image

Wi-Pi connected in the back of Rapiro's head.


Testing


Arduino Sketch


The Arduino sketch for Rapiro can be modified and uploaded using the Arduino IDE and the micro USB connection.


It's very useful to update the sketch to:

  • modify the initial position of the servos to properly align feet, arms, etc ... in case they weren't during installation
  • program new moves
  • ...


In my case for example, both feet weren't exactly sitting flat on the table and the waist was not propery aligned. So instead of taking everything apart to correct this, I modified the starting position of the feet's and waist's servos and uploaded the updated sketch.


// Fine angle adjustments (degrees)
int trim[MAXSN] = { 0,  // Head yaw
                    -5,  // Waist yaw
                    0,  // R Sholder roll
                    0,  // R Sholder pitch
                    0,  // R Hand grip
                    0,  // L Sholder roll
                    0,  // L Sholder pitch
                    0,  // L Hand grip
                    0,  // R Foot yaw
                    10,  // R Foot pitch
                    0,  // L Foot yaw
                    5}; // L Foot pitch


Commands via Pi


The Arduino sketch comes with some predefined movement sequences and positions. They can be called via the serial interface of the Pi.


I installed minicom:


pi@rapiro ~ $ sudo apt-get install minicom


I couldn't find an actual list of sequences documented anywhere, so I derived some from the Arduino code.

To execute them, you pass the sequence's number via the serial interface:


pi@rapiro ~ $ echo "#M6" | sudo minicom -b 57600 -o -D /dev/ttyAMA0


Here's a little demo:


You don't have permission to edit metadata of this video.
Edit media
x
image
Upload Preview
image


Thank you


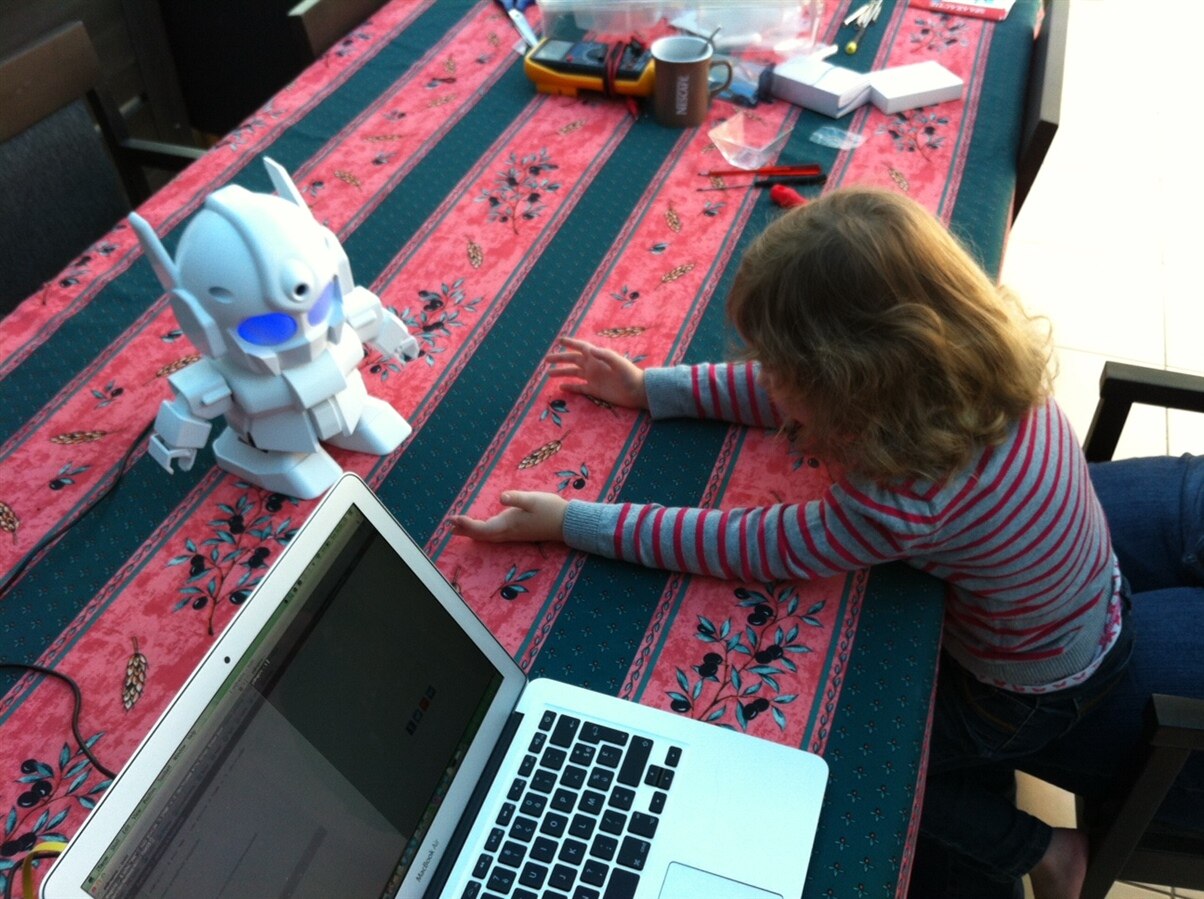
Our cats do not necessarily like our new robot friend, but we love him!


Thank you again for this awesome prize, and stay tuned for more adventures with Rapiro.


image


You don't have permission to edit metadata of this video.
Edit media
x
image
Upload Preview
image

  • Sign in to reply

Top Comments

  • DAB
    DAB over 9 years ago +1
    Looks like a lot of fun to play with. I look forward to your future posts as you learn how to manipulate the robot. DAB
  • Former Member
    Former Member over 9 years ago +1
    Thanks again to Frederick's hint I was able to get Icons for my Rapiro Control web page using css. See screen shot. Email if you want python script.
  • Former Member
    Former Member over 8 years ago +1
    Great explanation and the pics are really good!
  • fvan
    fvan over 8 years ago

    I fixed the many broken pictures in the blog post image

    • Cancel
    • Vote Up +1 Vote Down
    • Sign in to reply
    • More
    • Cancel
  • fvan
    fvan over 8 years ago in reply to Former Member

    Thanks!

    • Cancel
    • Vote Up 0 Vote Down
    • Sign in to reply
    • More
    • Cancel
  • Former Member
    Former Member over 8 years ago

    Great explanation and the pics are really good!

    • Cancel
    • Vote Up +1 Vote Down
    • Sign in to reply
    • More
    • Cancel
  • Former Member
    Former Member over 8 years ago in reply to fvan

    I bought it for my10 year old grandson.  He much prefers the Lego Minestorm robot.

    He is going to take a robotics course in school and they use lego.

    He just can't focus on Linux, Arduino, or Python programming languages.  Lego uses a icon based programing interface.

    Good deal on Rapiro, includes RPi, Camera, 9V PS, and assorted spare parts.

    • Cancel
    • Vote Up 0 Vote Down
    • Sign in to reply
    • More
    • Cancel
  • fvan
    fvan over 8 years ago in reply to Former Member

    Particular reason ?

    • Cancel
    • Vote Up 0 Vote Down
    • Sign in to reply
    • More
    • Cancel
>
element14 Community

element14 is the first online community specifically for engineers. Connect with your peers and get expert answers to your questions.

  • Members
  • Learn
  • Technologies
  • Challenges & Projects
  • Products
  • Store
  • About Us
  • Feedback & Support
  • FAQs
  • Terms of Use
  • Privacy Policy
  • Legal and Copyright Notices
  • Sitemap
  • Cookies

An Avnet Company © 2023 Premier Farnell Limited. All Rights Reserved.

Premier Farnell Ltd, registered in England and Wales (no 00876412), registered office: Farnell House, Forge Lane, Leeds LS12 2NE.

ICP 备案号 10220084.

Follow element14

  • Facebook
  • Twitter
  • linkedin
  • YouTube