element14 Community
element14 Community
    Register Log In
  • Site
  • Search
  • Log In Register
  • Community Hub
    Community Hub
    • What's New on element14
    • Feedback and Support
    • Benefits of Membership
    • Personal Blogs
    • Members Area
    • Achievement Levels
  • Learn
    Learn
    • Ask an Expert
    • eBooks
    • element14 presents
    • Learning Center
    • Tech Spotlight
    • STEM Academy
    • Webinars, Training and Events
    • Learning Groups
  • Technologies
    Technologies
    • 3D Printing
    • FPGA
    • Industrial Automation
    • Internet of Things
    • Power & Energy
    • Sensors
    • Technology Groups
  • Challenges & Projects
    Challenges & Projects
    • Design Challenges
    • element14 presents Projects
    • Project14
    • Arduino Projects
    • Raspberry Pi Projects
    • Project Groups
  • Products
    Products
    • Arduino
    • Avnet Boards Community
    • Dev Tools
    • Manufacturers
    • Multicomp Pro
    • Product Groups
    • Raspberry Pi
    • RoadTests & Reviews
  • About Us
  • Store
    Store
    • Visit Your Store
    • Choose another store...
      • Europe
      •  Austria (German)
      •  Belgium (Dutch, French)
      •  Bulgaria (Bulgarian)
      •  Czech Republic (Czech)
      •  Denmark (Danish)
      •  Estonia (Estonian)
      •  Finland (Finnish)
      •  France (French)
      •  Germany (German)
      •  Hungary (Hungarian)
      •  Ireland
      •  Israel
      •  Italy (Italian)
      •  Latvia (Latvian)
      •  
      •  Lithuania (Lithuanian)
      •  Netherlands (Dutch)
      •  Norway (Norwegian)
      •  Poland (Polish)
      •  Portugal (Portuguese)
      •  Romania (Romanian)
      •  Russia (Russian)
      •  Slovakia (Slovak)
      •  Slovenia (Slovenian)
      •  Spain (Spanish)
      •  Sweden (Swedish)
      •  Switzerland(German, French)
      •  Turkey (Turkish)
      •  United Kingdom
      • Asia Pacific
      •  Australia
      •  China
      •  Hong Kong
      •  India
      •  Korea (Korean)
      •  Malaysia
      •  New Zealand
      •  Philippines
      •  Singapore
      •  Taiwan
      •  Thailand (Thai)
      • Americas
      •  Brazil (Portuguese)
      •  Canada
      •  Mexico (Spanish)
      •  United States
      Can't find the country/region you're looking for? Visit our export site or find a local distributor.
  • Translate
  • Profile
  • Settings
Raspberry Pi Projects
  • Products
  • Raspberry Pi
  • Raspberry Pi Projects
  • More
  • Cancel
Raspberry Pi Projects
Blog Raspberry Pi Central Heating Controller Project
  • Blog
  • Documents
  • Events
  • Polls
  • Members
  • Mentions
  • Sub-Groups
  • Tags
  • More
  • Cancel
  • New
Join Raspberry Pi Projects to participate - click to join for free!
  • Share
  • More
  • Cancel
Group Actions
  • Group RSS
  • More
  • Cancel
Engagement
  • Author Author: Matt
  • Date Created: 18 Apr 2016 12:03 PM Date Created
  • Views 3834 views
  • Likes 7 likes
  • Comments 8 comments
  • rpiintermediate
  • rpiprojects
  • raspberrypi2
  • raspberry_pi_projects
  • designchallenges
  • piot
Related
Recommended

Raspberry Pi Central Heating Controller Project

Matt
Matt
18 Apr 2016

I’m building a home automation project which connects a Raspberry Pi to control my central heating. I wasn’t particularly happy ripping out all the existing controls, and wanted to piggyback onto them.. which helps if the Pi ever fails (I’ve still got the old controls to fall back on).image


I also didn’t want to mess with the existing heating control board, so bought a duplicate unit (British Gas UP2) from eBay for about £12.. I can perfect the project on that, and install it when I’m ready.


This set of videos goes through each step of the project.. starting off with opening the control board, an overview of what I want to do, and testing out the changes.


Opening up the Control Panel


This was a bit tricky.. it wasn’t quite obvious which plastic clips needed pushing in to pull the board out.. if you were doing this on your actual panel (not an eBay-bought duplicate) then this video should help work out what you need to do to get into it without damaging anything.


You don't have permission to edit metadata of this video.
Edit media
x
image
Upload Preview
image


Project Overview


Next up, I’ll quickly go over what I intend to do to piggyback onto the control board. There’s a project here which did exactly what I wanted to do. He’s not using a PiFace 2 like I intend to use, and he wants to be able to control the hot water as well, but everything else is the same.


You don't have permission to edit metadata of this video.
Edit media
x
image
Upload Preview
image


Safety First – Masking off the High Voltage Area


In this second video, I’ll show how I’m masking off the high voltage area of the board to make it a bit safer when I’m testing things out. Obviously most of the time the board is off, but this helps keep things safer when it is on without the cover.


You don't have permission to edit metadata of this video.
Edit media
x
image
Upload Preview
image


Identifying Solder Points


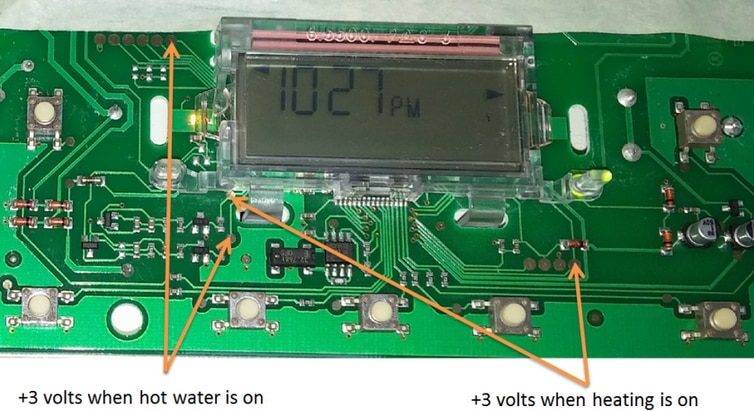
Luckily this blog gave me a good starting point, but it wasn’t clear where to get the status of the central heating.. I used a multimeter to find a spot which changed voltage when the system was on, and this diagram shows you what I found;


image


Soldering


Since I only needed 4 wires for this project (2 for the switch, and 2 for the system state), I took an old USB cable, cut the ends off, stripped the wires and soldered it to the board without much trouble.


image


Soldering Complete!


This shows the control board after the soldering has been completed.. it’s pretty simple soldering; the only tricky part was finding the points to connect to for the system state (on/off). I’ve stuck down some of the wires so that they don’t catch or get stuck underneath the control boards buttons.


You don't have permission to edit metadata of this video.
Edit media
x
image
Upload Preview
image


Testing the Wiring


Now that I’ve done the soldering, I’m testing out the wiring.. seeing whether connecting the two wires for the switch turns the central heating on, and when it is on, whether we get voltage on the other two wires to indicate the system state.


You don't have permission to edit metadata of this video.
Edit media
x
image
Upload Preview
image


Controlling from Software


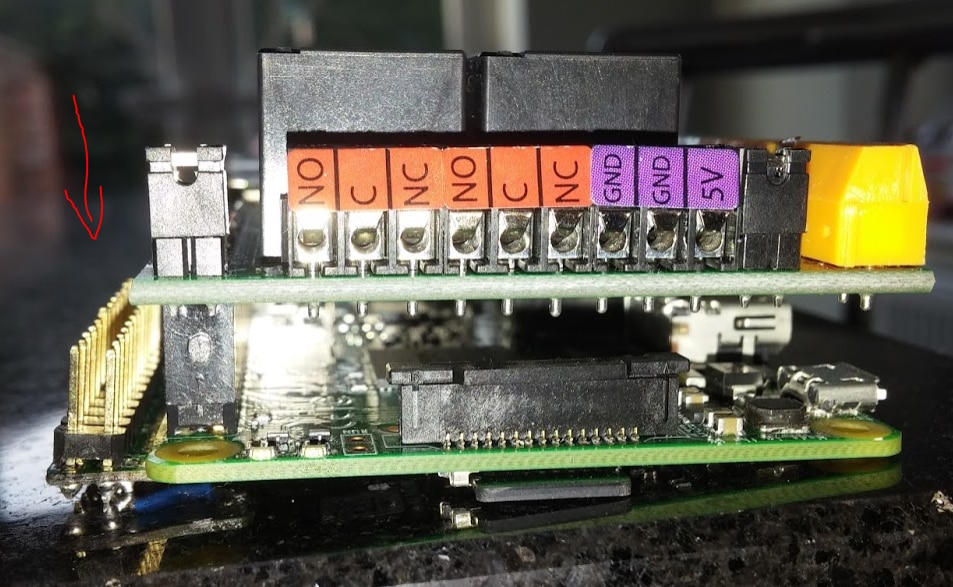
I’ve now hooked it up to the Pi Face 2 board, which can be controlled with a few lines of Python to simulate a button press, and detect the state of the system. It wasn't strictly necessary to use a Pi Face 2.. I just happened to have one that I wanted to use in a project. One disadvantage of the Pi Face 2 was that it can't talk to a 1-wire temperature sensor, so I ended up soldering on a Pi Wingman to give me easy access to the unused GPIO pins.


image


image


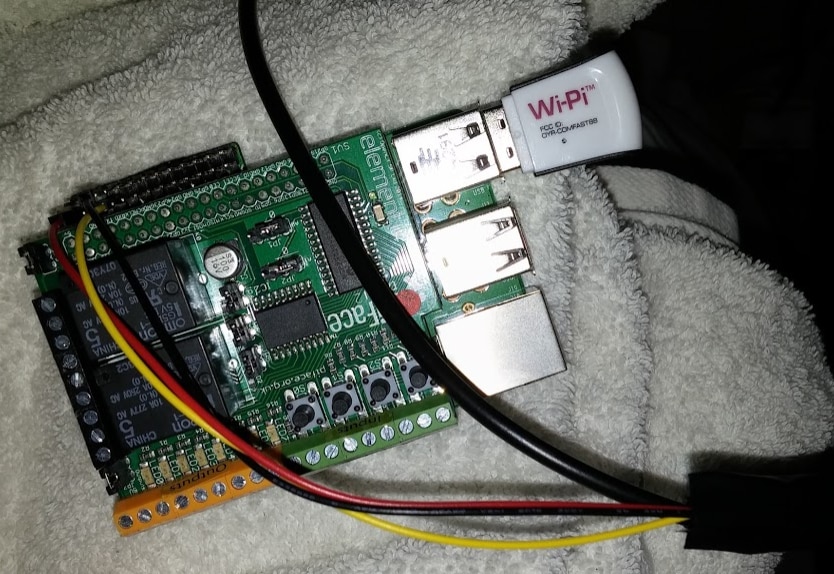
With these basics in place, the rest of the control software can be written to do scheduling, bring in temperature readings, and allow the system to be controlled remotely.


You don't have permission to edit metadata of this video.
Edit media
x
image
Upload Preview
image


Software Architecture


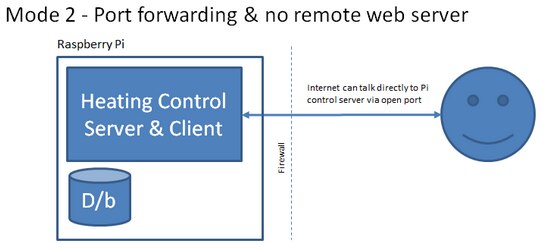
One of the early design decisions for the Raspberry Pi powered heating controller was to have the Pi secured behind a firewall without direct access to it from the Internet. What I decided to do was have a set of simple PHP web pages on a remote web host that you can access from anywhere, and the Pi control server talks to that web host to send/receive data.


What I didn’t want was for the Pi to run a web server that ends up getting compromised & having the run of my home network.


image


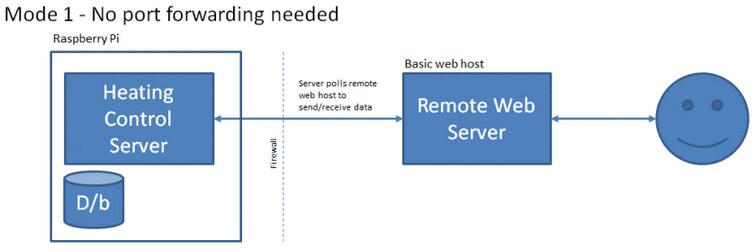
The Pi server and remote webspace need to be paired with an access key. Anyone accessing the remote site needs the correct access key to be able to control the system.. and the level of control is limited by the API we’ll put in place.. i.e. remote clients won’t have direct access to your internal network via an open port on your home router.


Of course, you could actually host the ‘remote’ part of this set up on your Pi and use port forwarding; the architecture allows for both types of access. The access key is still needed to control the system, but you’ll be more vulnerable to attacks on your Apache/PHP installation & need to keep up-to-date with software patches to help ensure your system is secure.


image


I've made a fair amount of progress on a relatively simple set of scripts + PHP that makes this possible.. this video shows how it looks so far. The control part isn't hooked up, but it is able to accept a command from the front-end and pass it to the back end scripts for actioning. The temperature logging is working nicely.


You don't have permission to edit metadata of this video.
Edit media
x
image
Upload Preview
image

  • Sign in to reply

Top Comments

  • gadget.iom
    gadget.iom over 9 years ago +3
    Nice article! Tempted to give this one a go myself. (I have a Towerchron QE1)
  • Matt
    Matt over 9 years ago in reply to Nate1616 +3
    Thanks for the offer of help Nate, much appreciated! What kind of system to you use for cooling? Cooling the house? Well in the UK that's called opening a window
  • mcb1
    mcb1 over 9 years ago +3
    Nice project. There are methods of improving your energy useage and surprisingly one is to reduce the temperature down while you are away ... NOT turn it off. We went down this road with my parents who…
  • mcb1
    mcb1 over 9 years ago

    Nice project.

    There are methods of improving your energy useage and surprisingly one is to reduce the temperature down while you are away ... NOT turn it off.


    We went down this road with my parents who were shutting off their air con (heat source) when they went out, then having to run it for a much longer period at higher temperature when they came back home, and it was still just reaching the optimum when they went to bed.

    I encouraged them to simply reduce it to the lowest setting when they went out and return it when they came home and the result was a huge improvement.


    I solved the GPIO pin issue on the first PiFace by adding  two single row strips.

    Review of PiFace Digital


    image

    but you easily just add the few needed to do the one wire connection.


    It might be interesting to connect some EnOcean remote monitors into the system as we did in the Forget Me Not challenge.

    Forget Me Not Challenge Competitors

    [CaTS] ForgetMeNot - Week 3: Data persistence and charts with OpenHAB


    Mark

    • Cancel
    • Vote Up +3 Vote Down
    • Sign in to reply
    • More
    • Cancel
  • rdibened
    rdibened over 9 years ago

    Liked your project.  Planning to do something similar in the US.  Luckily here the thermostats are pretty standard and easy to control with relays.  I feel I can just close contact via a relay on the wires going directly to my heating and cooling system.  I have a DHT22 Temp/Humidity Sensor that I will use to monitor the environment.  I plan on controlling my heating, humidification (during the winter) and my AC during the summer.  I also plan on leaving my existing thermostat connected as a fail safe and setting it a couple of degrees from the RPi set points.  Doing this I can set a schedule on my RPi that is more granular than that of the thermostat.  I might also incorporate the outdoor temp or the weather forecast to adjust the set points.  I will probably publish what I do as you did.  Good Job and thanks for posting this.

    • Cancel
    • Vote Up +2 Vote Down
    • Sign in to reply
    • More
    • Cancel
  • Nate1616
    Nate1616 over 9 years ago in reply to Matt

    LOL.  Nothing wrong with the window.  At least your getting the required air changes. image


    Nate

    • Cancel
    • Vote Up +2 Vote Down
    • Sign in to reply
    • More
    • Cancel
  • Matt
    Matt over 9 years ago in reply to Nate1616

    Thanks for the offer of help Nate, much appreciated! image


    What kind of system to you use for cooling? 


    Cooling the house? Well in the UK that's called opening a window image

    • Cancel
    • Vote Up +3 Vote Down
    • Sign in to reply
    • More
    • Cancel
  • Nate1616
    Nate1616 over 9 years ago

    Very nice project Matt.  What kind of system to you use for cooling?  Thermostats are very simple devices.  You will have a common, 24VAC, Y(cooling system), W(Heating Sytem), G(fan), Rc, Rh for single stage units.  With a dual stage you will add Y1, W1 and could also get contacts for heat pumps O(Valve), B(Valve), C.  A nice additional would be adding a similar device to the unit itself to track when the filter needs changing, humidity, coil issues (plugged, low coolant, Frozen), Airflow, Air quality just to name a few.  If you ever need any help with anything involving HVAC just let me know as I deal with this stuff on a daily basis with my job.image

    I found this Kickstarter project very interesting but when i sent them some questions they never responded so i didn't back the project.  System Performance Technologies LLC - Home


    Nate

    • Cancel
    • Vote Up +2 Vote Down
    • Sign in to reply
    • More
    • Cancel
>
element14 Community

element14 is the first online community specifically for engineers. Connect with your peers and get expert answers to your questions.

  • Members
  • Learn
  • Technologies
  • Challenges & Projects
  • Products
  • Store
  • About Us
  • Feedback & Support
  • FAQs
  • Terms of Use
  • Privacy Policy
  • Legal and Copyright Notices
  • Sitemap
  • Cookies

An Avnet Company © 2025 Premier Farnell Limited. All Rights Reserved.

Premier Farnell Ltd, registered in England and Wales (no 00876412), registered office: Farnell House, Forge Lane, Leeds LS12 2NE.

ICP 备案号 10220084.

Follow element14

  • X
  • Facebook
  • linkedin
  • YouTube