


Arguably one of the most fun things you can do with a Raspberry Pi Pico is to control a servo motor. If you're planning on taking over the world, I'd suggest this is a good place to start.
In this short tutorial we'll cover the electrical connections, software, and commands that you need to get a hobby servo motor working with MicroPython.
- In this beginner-friendly tutorial, you'll learn how to:
- Connect up a hobby servo motor
- Control the servo using MicroPython
- Lay the foundations for controlling a robot from your Raspberry Pi
What You'll Need
- Raspberry Pi Pico
- USB cable
- PC or Mac
- Hobby Servo Motor
- Connecting Cables
- External Power Supply (optional unless you want to lift things)
On the software side we'll use Thonny, which is one of the easiest ways to program a Raspberry Pi Pico with MicroPython. If you've already used a Pico before, you're probably ready to skip ahead to the code.
Otherwise, install Thonny, connect your Pico, and we'll get everything set up before writing our servo control program.
Once your software is installed we can do the first interesting part. Installing the servo library.
A library is a set of code that does a bunch of stuff behind the scenes for you. In this case it sets up the PWM duty cycle, timers, and converts pulses to angles for you. What does all that mean you ask? Well because it's a library it means you don't need to know for now, we just want to get on with the good stuff. Sure we can look into all of that at a later date.
For now, in Thonny Click on Tools > Manage Packages... and type micropython-servo into the search box. Click enter and select micropython-servo from the list and click install.
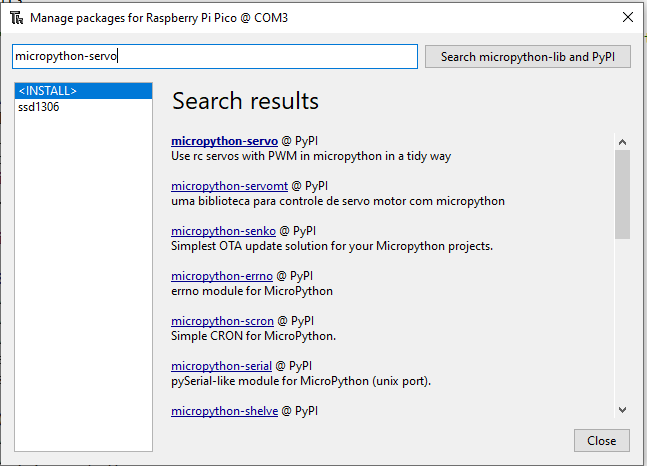
Congratulations, you've installed a library! The details of what this basic library can do, along with a short example is available here.
Now we're going to paste in this code
import time
from servo import Servo
my_servo = Servo(pin_id=15)
my_servo.write(30)
time.sleep(2.0)
my_servo.write(60)
time.sleep(2.0)
my_servo.write(90)
What this code does is
- Sets up the bits of software it will need (time and servo)
- Tells the pico there is a servo on pin 15
- Moves the servo to a 30 degree position
- Waits 2 seconds
- Moves the servo to a 60 degree position
- Waits 2 seconds
- Moves the servo to a 90 degree position
- that's it
Before we run this code however we need to wire our servo up. Fortunately this too is pretty simple.
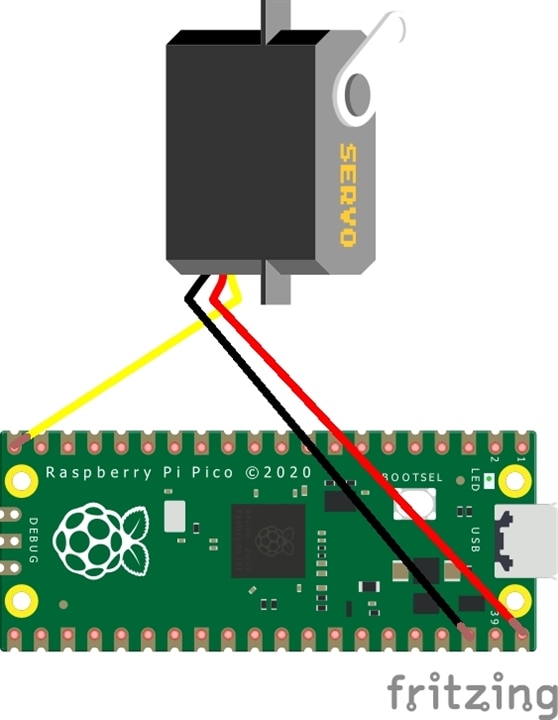
Since we're only watching the servo motor turn and it's not carrying any weight we can wire it to our power from the Raspberry Pi Pico. Here we're connecting the power, which is normally red to the VSYS on the pico, this takes power from the USB supply. The black (or sometimes brown) wire goes to ground, and the yellow or orange wire we call our signal wire and that is going to Pin15.
PLEASE NOTE: USB can't supply lots of power, so if you want to use your servo to lift something you'll need an external power supply, like a 4xAA battery pack. You can connect this up as follows:
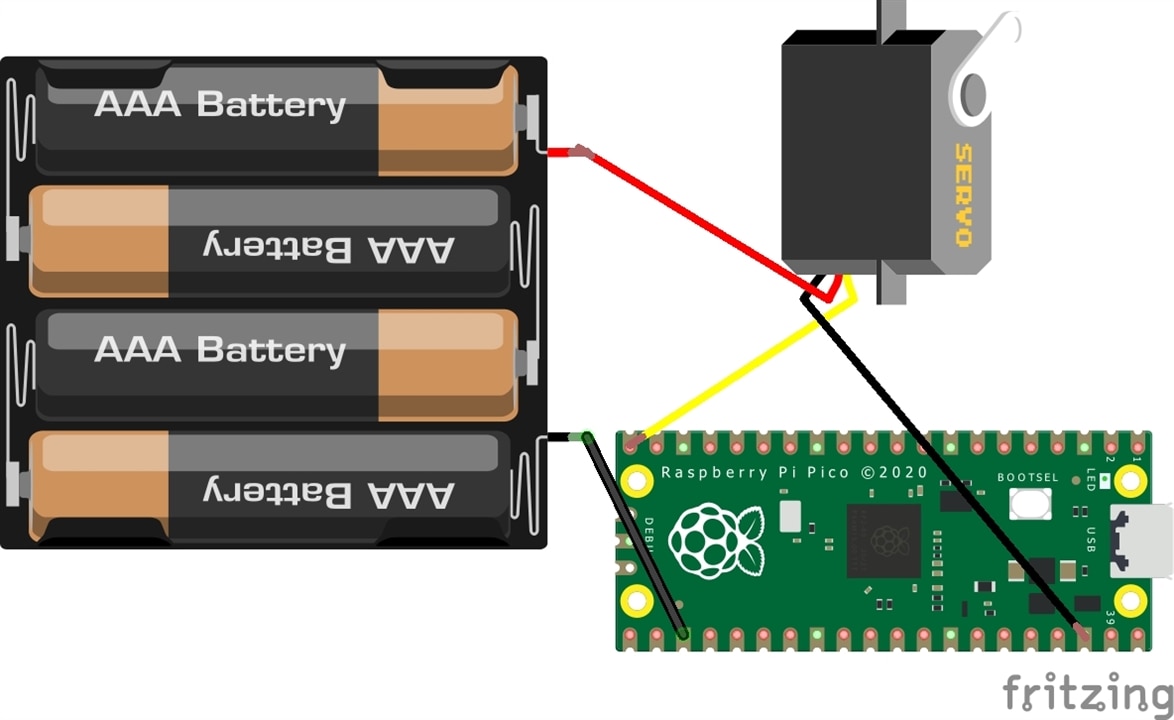
Here the power goes to the battery and the ground is connected to both the battery and the Raspberry Pi Pico. We call this having a "common ground".
Now that we have connected up the Pico and the servo we can upload the code.
Our servo should spring to life and move through the three positions.
Now we've got it moving, but ideally we don't want to have to change the code every time we want to move our servo motor. Wouldn't it be better if we could just send a signal somehow? I have another tutorial that'll get round to publishing on here soon! But for now if we hash two bits of code together we can get a USB Serial controlled servo motor...
import sys, select, time
from machine import Pin
from servo import Servo
#say something
print("PICO READY to move your servo")
print("what angle should I move to?")
#set up our input method
poll = select.poll()
poll.register(sys.stdin, select.POLLIN)
buf = ""
#set up the LED
led = Pin(25, Pin.OUT)
#set up the servo
my_servo = Servo(pin_id=15)
while True:
if poll.poll(0):
ch = sys.stdin.read(1)
if ch:
if ch == "\n":
line = buf.strip()
buf = ""
if not line:
continue
try:
print("You said: ",line," watch me move!")
my_servo.write(int(line))
led.toggle()
except Exception as e:
print("ERROR", e, ". You Wrote: ", line, "which means you didn't give me a whole number")
else:
buf += ch
time.sleep(0.005)
Now we can throw values into the serial monitor and watch the servo motor move to position. I've taken a short video of this.
So what next? Obviously we'll want to control more servo motors, but we could also control them more easily. Perhaps we could make a little graphical user interface (GUI) with a slider that could send the data over serial for us? Watch out for the next in the series.
In this tutorial you've learned how to control a servo motor with MicroPython, you've also learned how to hook up servos, and how to control one over a serial connection. These are hugely useful tools for people planning to take over the world using robots.

